

In Part 1, we integrated OIDC with Microsoft Azure AD — an ideal option if your organization already uses the Microsoft 365 ecosystem. But what if your company does not use Azure, or you want a self-hosted Identity Provider that is fully independent from any cloud vendor and completely free?
In this article, I’ll walk you through how to integrate Authentik with Kubernetes — from creating an OIDC application in Authentik to configuring RBAC on the cluster — so you can manage authentication entirely on your own infrastructure.
Authentik is an open-source Identity Provider that you can deploy on your own infrastructure. It supports OIDC, SAML, LDAP, and many other protocols. The admin interface is intuitive, easy to work with, and most importantly — it’s free :D.
This article does not cover how to install Authentik.
I. Prerequisites
- A Kubernetes cluster where you can modify the kube-apiserver configuration (this guide uses RKE2 to initialize Kubernetes).
- An Authentik server that has already been deployed and will be used as the Identity Provider.
- A client machine for testing that can connect to the kube-apiserver and already has kubectl installed.
II. Configure Authentik
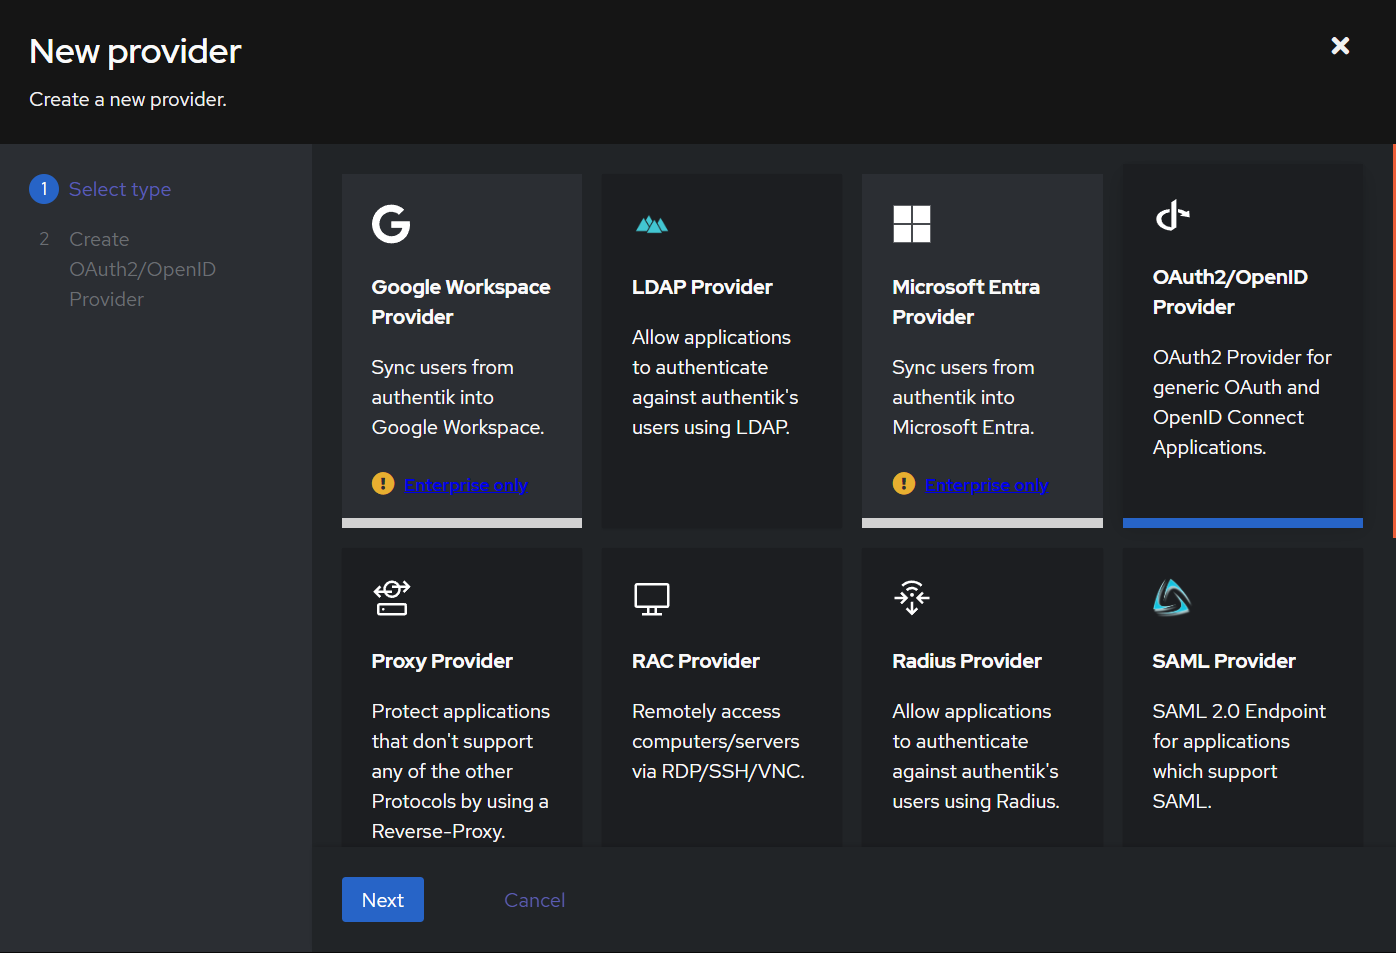
To create a provider, go to the Authentik Admin interface and navigate to Application -> Provider -> New Provider -> OAuth2/OpenID Provider -> Next.
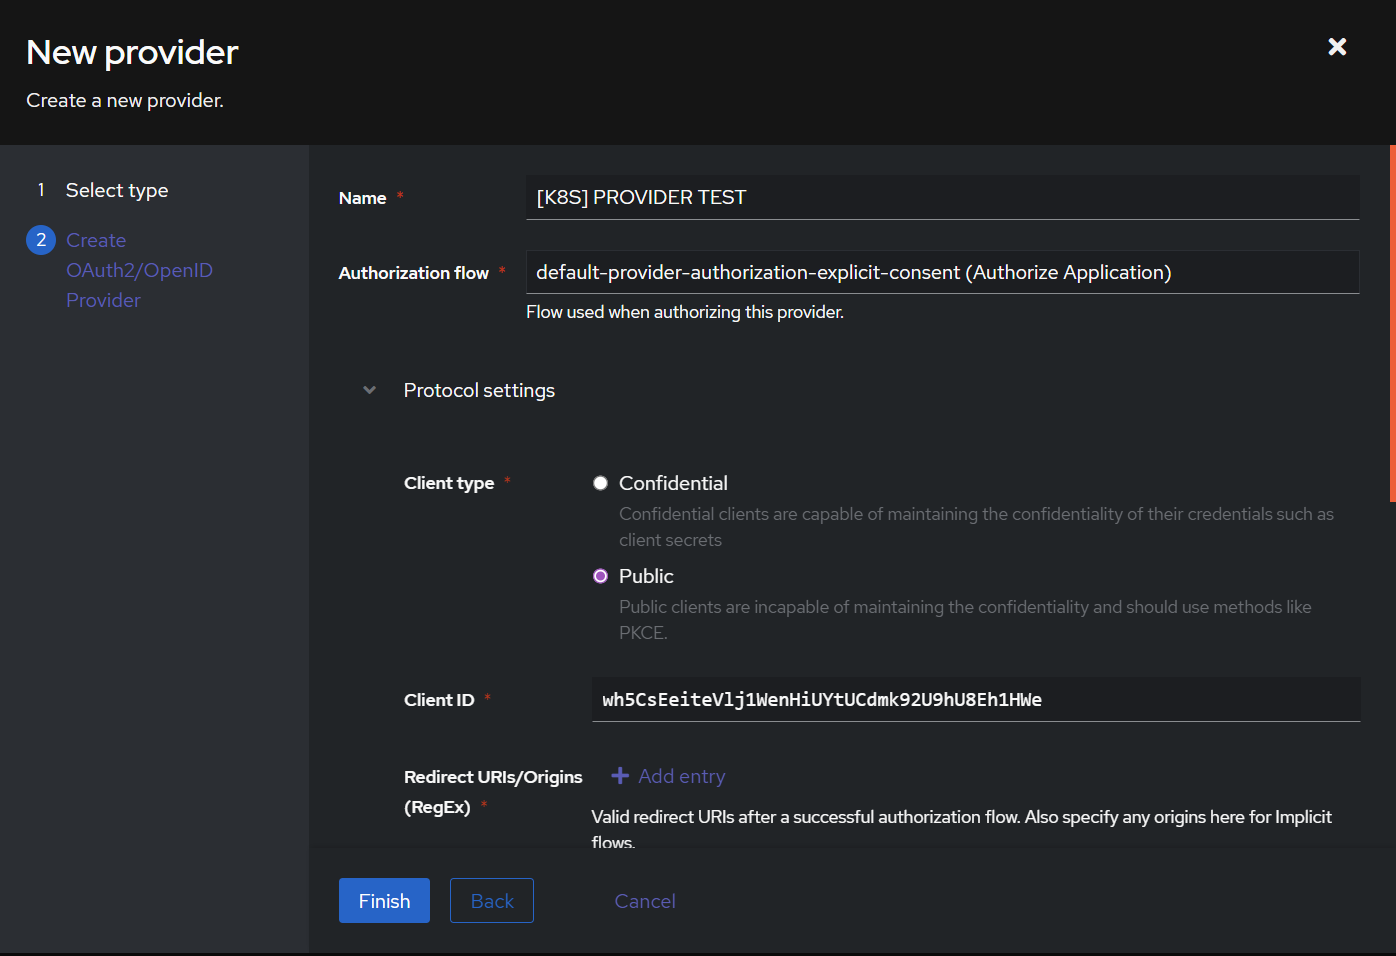
Fill in the provider details and click Finish.
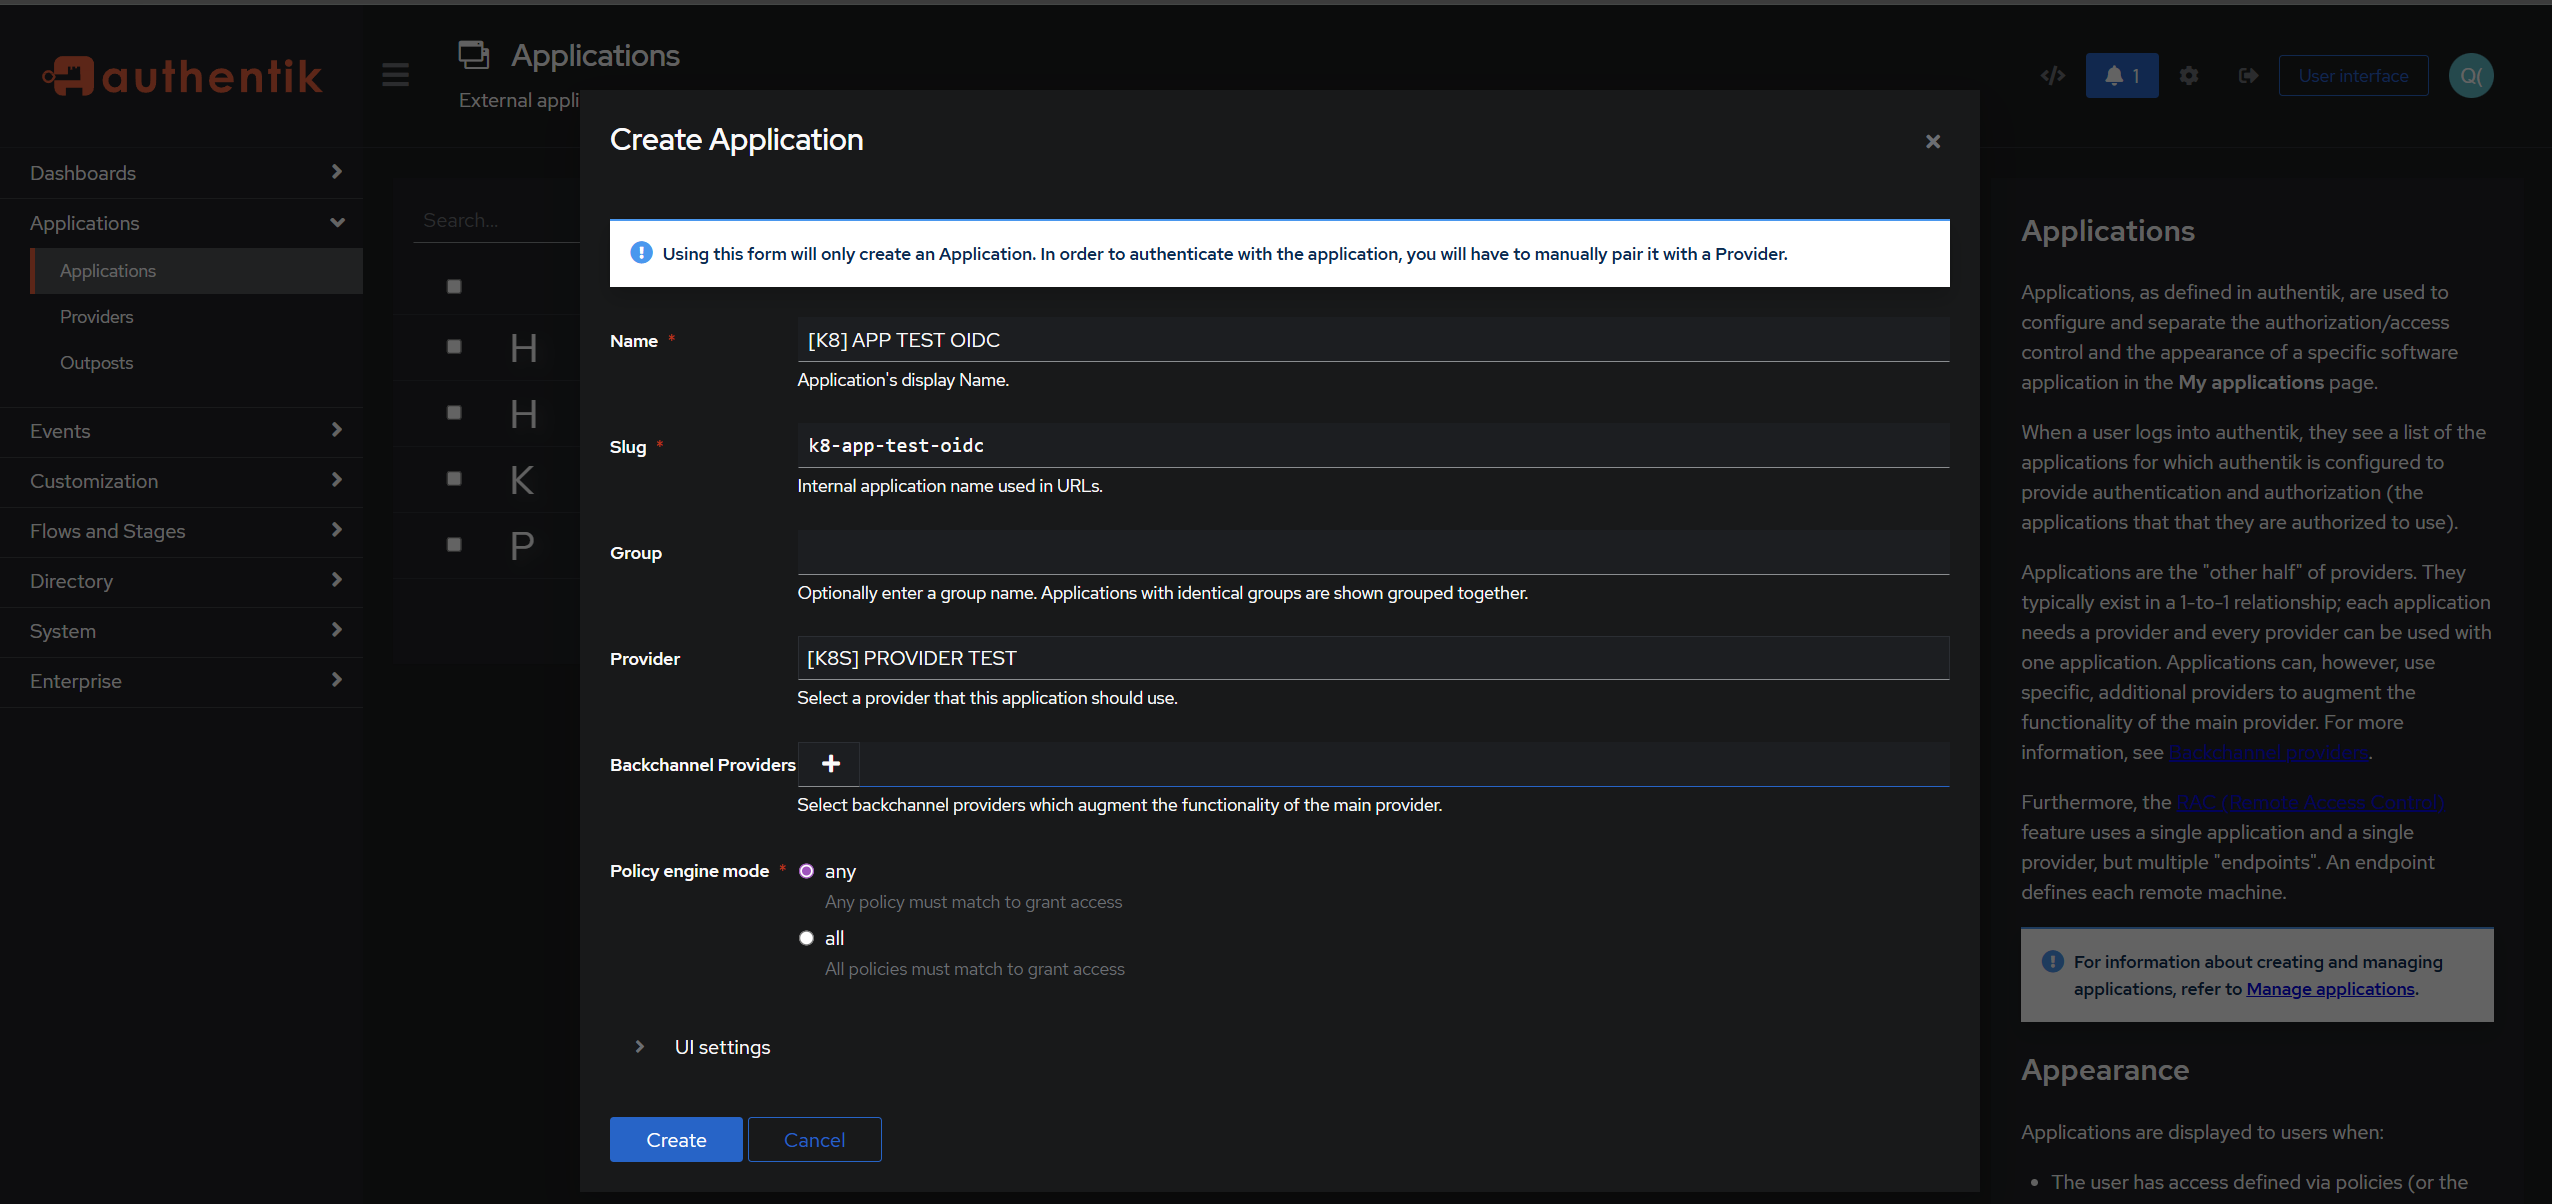
Next, go to Applications -> Create and enter the application details. Make sure you select the provider you created in the previous step.
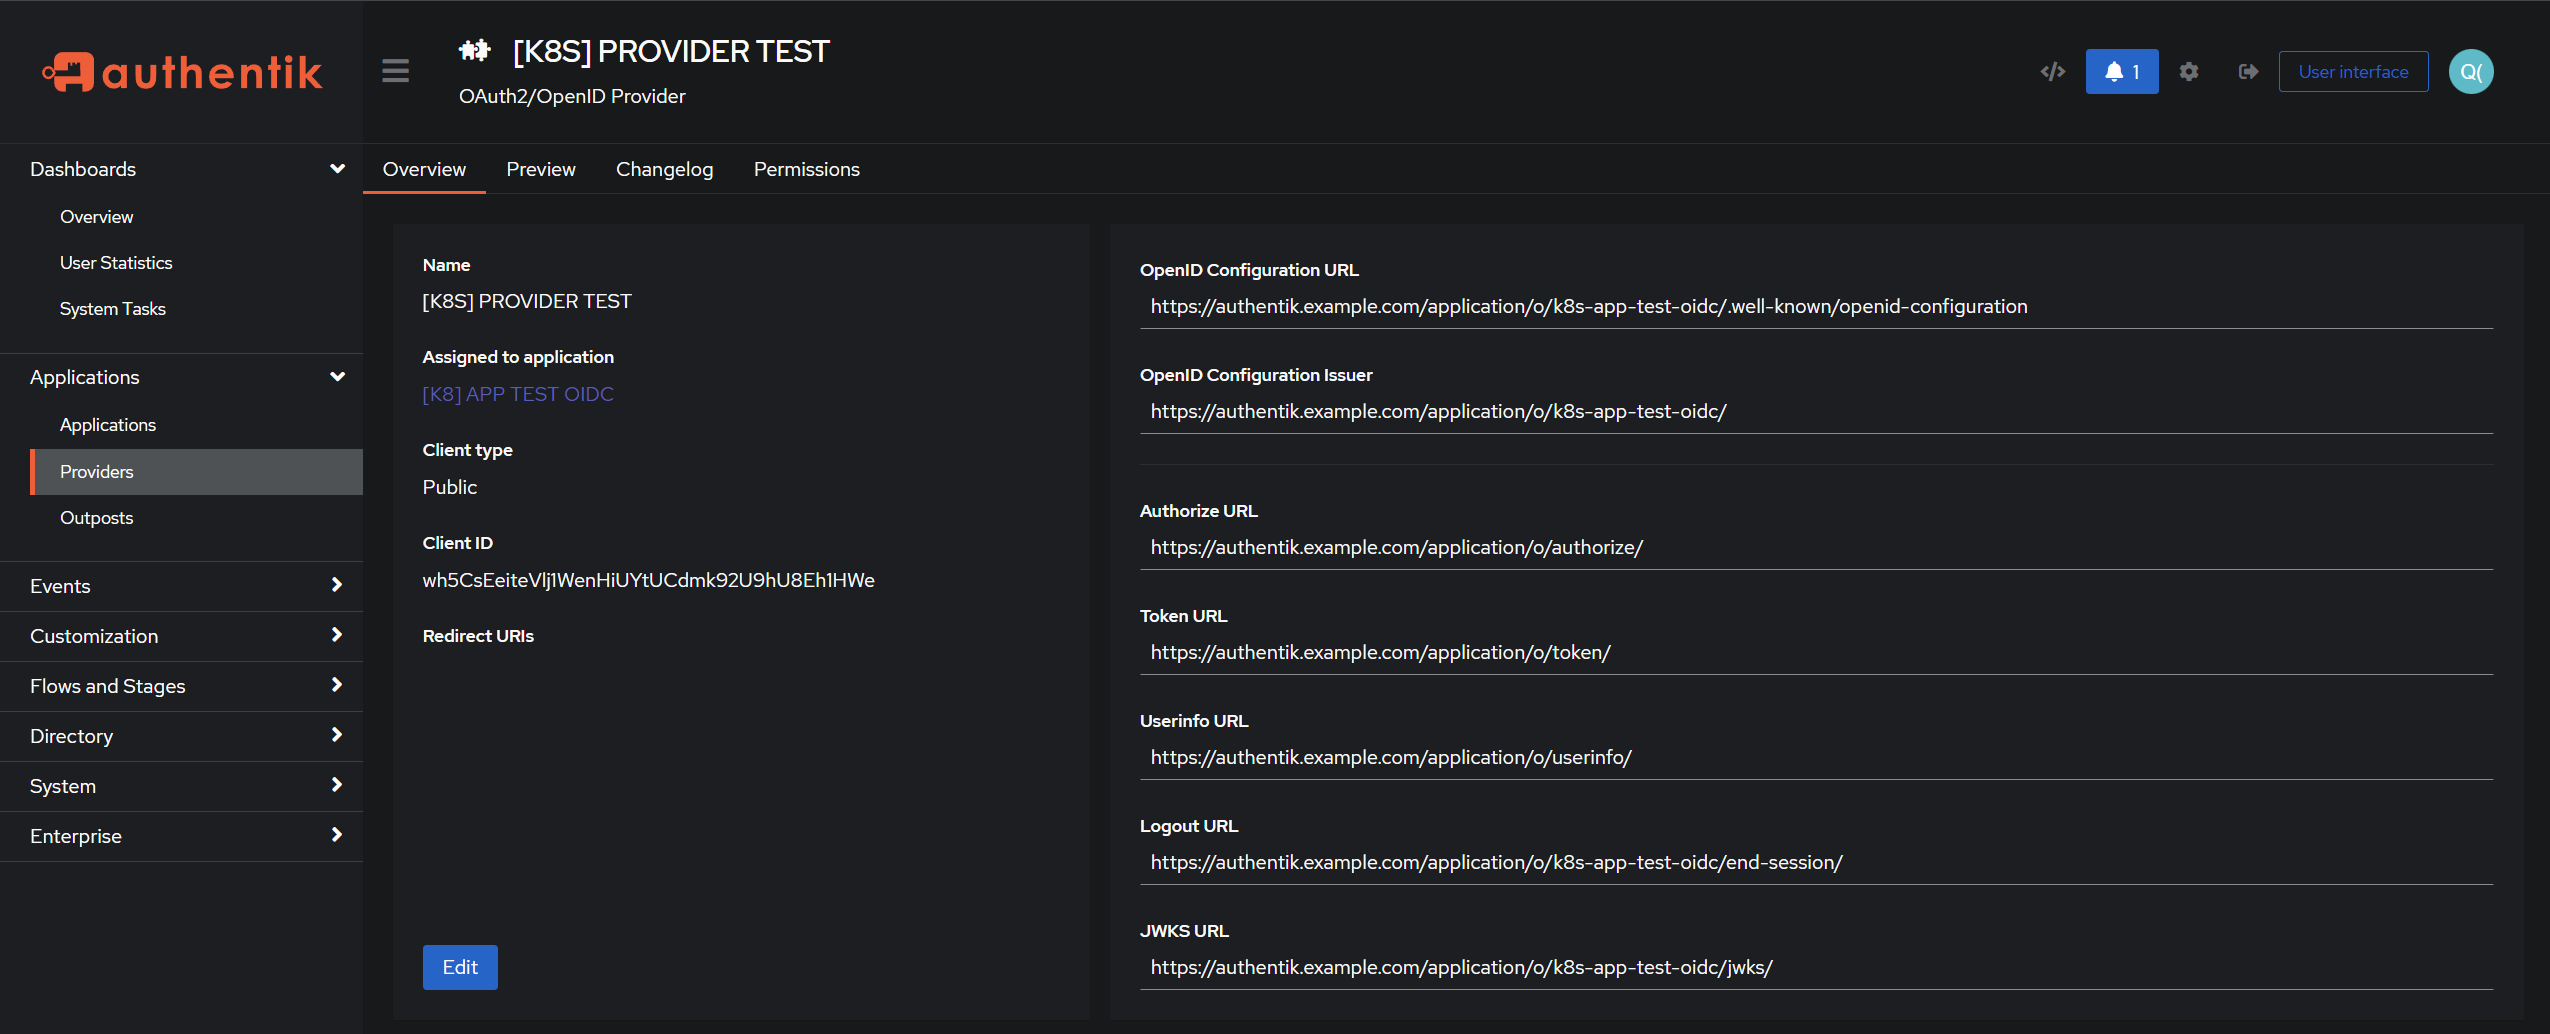
The key values you will need are:
OpenID Configuration Issuer: https://authentik.example.com/application/o/k8s-app-test-oidc/
Client ID: wh5CsEeiteVlj1WenHiUYtUCdmk92U9hU8Eh1HWe
At this point, the Application configuration in Authentik is complete.
III. Configure kube-apiserver on Kubernetes
In this example, I initialized the Kubernetes cluster using RKE2, so I’ll update the configuration at /etc/rancher/rke2/config.yaml. If your cluster was created using a different method, the configuration file may be located elsewhere, so check the documentation for your setup.
Add the following configuration to config.yaml:
kube-apiserver-arg:
- "oidc-issuer-url=https://authentik.example.com/application/o/k8s-app-test-oidc/"
- "oidc-client-id=wh5CsEeiteVlj1WenHiUYtUCdmk92U9hU8Eh1HWe"
- "oidc-username-claim=email"
- "oidc-groups-claim=groups"
Here is an example of the config.yaml file:
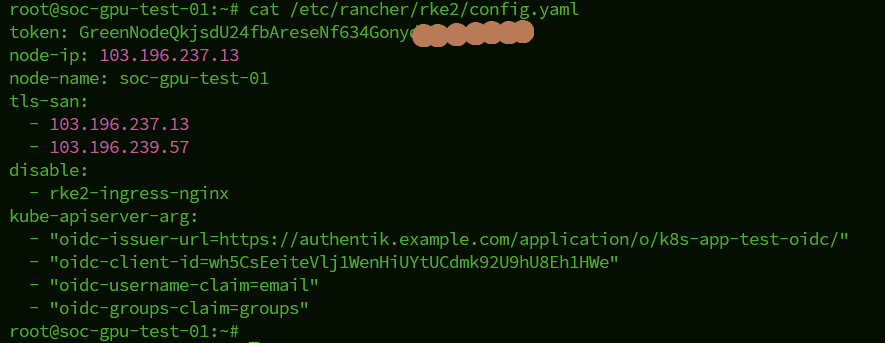
Restart the RKE2 server with the following command: systemctl restart rke2-server.service
Next, we’ll configure the client machine that will use kubectl to manage the Kubernetes cluster.
IV. Configure the client machine
First, install kubelogin by following the instructions at https://github.com/int128/kubelogin.
Then create a kubeconfig file using the following template:
apiVersion: v1
clusters:
- cluster:
    certificate-authority-data: <cluster CA certificate>
    server: https://IP:6443
  name: default
contexts:
- context:
    cluster: default
    user: oidc-user
  name: oidc-context
current-context: oidc-context
kind: Config
preferences: {}
users:
- name: oidc-user
  user:
    exec:
        apiVersion: client.authentication.k8s.io/v1
        command: kubectl
        interactiveMode: IfAvailable
        args:
          - oidc-login
          - get-token
          - --oidc-issuer-url=https://authentik.example.com/application/o/k8s-app-test-oidc/
          - --oidc-client-id=wh5CsEeiteVlj1WenHiUYtUCdmk92U9hU8Eh1HWe
          - --oidc-extra-scope=profile,email,groups
Try running a kubectl command to test the setup.
When you do, your browser will open a popup page at http://localhost:8000 so you can sign in with your Authentik account.

After logging in, kubectl will be able to retrieve the username and groups. However, since no permissions have been granted to that user or group yet, you will get a Forbidden error.
This is actually a good sign! A Forbidden error means OIDC authentication is working correctly — Kubernetes has successfully read the username and groups from the Authentik token. All that’s left is to create a ClusterRoleBinding in the next step.
Now let’s use Kubernetes RBAC to define what actions those users or groups are allowed to perform on the cluster.
V. Authorize access with Kubernetes RBAC
Instead of assigning permissions to individual users, the best practice is to grant permissions to groups. When a new employee joins, you only need to add them to the right group in Authentik and they immediately get the correct Kubernetes access. Likewise, when someone leaves the company, disabling or deleting their Authentik account removes their access completely.
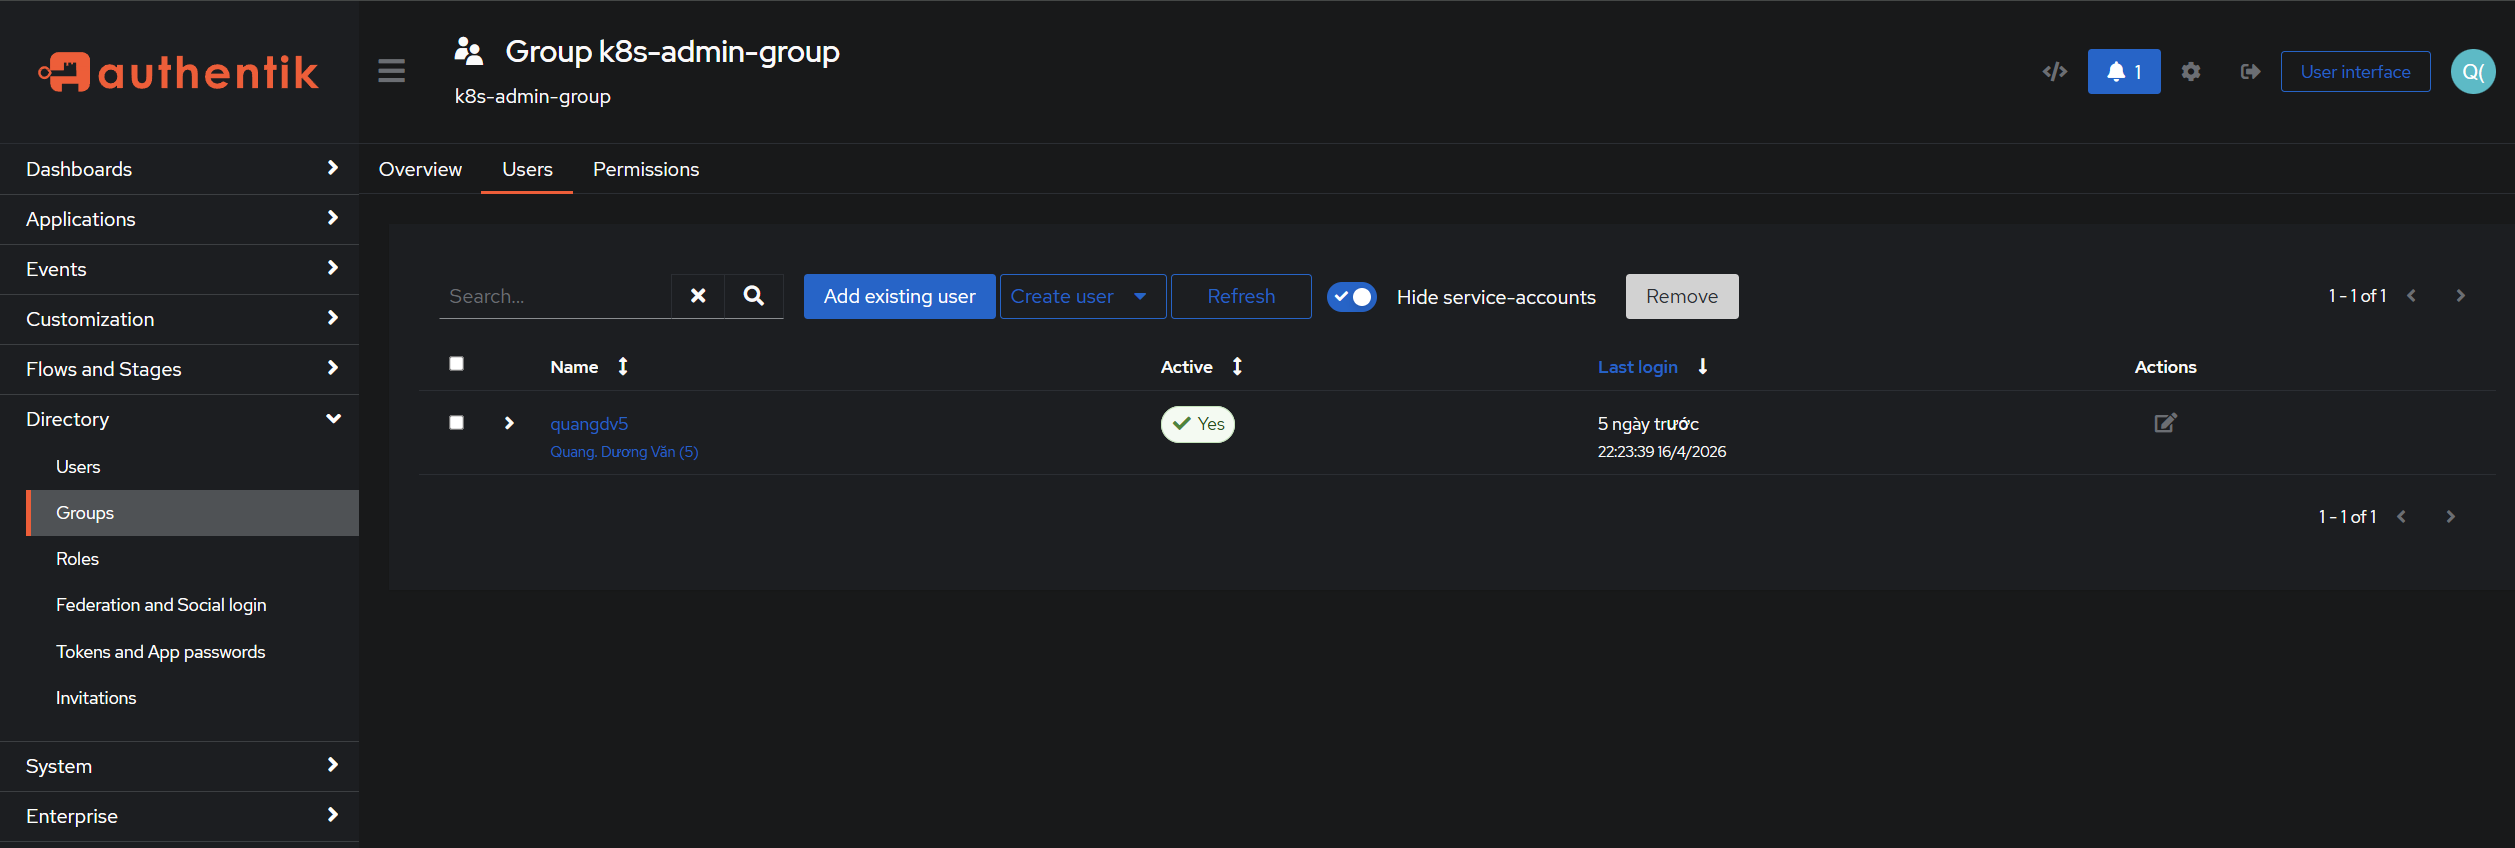
Create a group named k8s-admin-group in Authentik and add the user to that group.
Create a ClusterRoleBinding for that group to grant view-only access first.
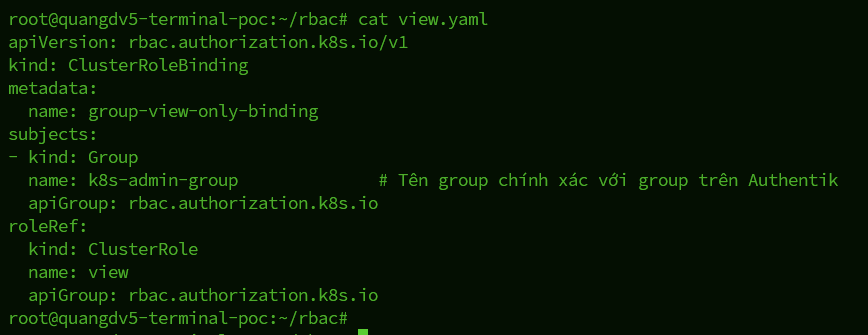
At this stage, the user has view access, but still cannot modify or delete resources.

Update the ClusterRoleBinding to grant cluster-admin permissions instead.
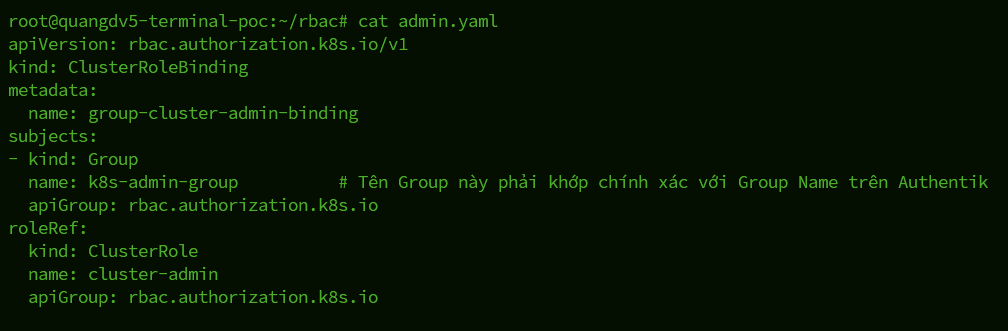
The user can now edit the Kubernetes cluster.

From this point on, whenever there are staffing changes, you only need to manage group membership in Authentik instead of creating users and assigning permissions directly inside the Kubernetes cluster.
Tip: To force a fresh login or generate a new token, delete the cache directory under $HOME/.kube/cache.
VI. Conclusion
After completing these steps, you will have a Kubernetes access management setup fully integrated with Authentik. From here, the workflow becomes very simple:
- New employee: Add them to an Authentik group → they immediately get the correct Kubernetes access.
- Employee leaving: Disable or delete the Authentik account → all Kubernetes access is removed with no extra steps required.
- Permission changes: Move the user between Authentik groups → Kubernetes permissions update accordingly.
Across both parts of this series, the core idea stays the same whether you use Azure AD or Authentik: Kubernetes does not need to manage identity itself. It only needs to trust an external system that has already authenticated the user. That is the essence of separation of concerns.
For developers and SREs who work with multiple clusters every day, the experience is also much better: sign in once, use multiple clusters, avoid managing a pile of kubeconfig files, and reduce the risk of credential leaks. At this point, integrating an IdP should no longer be seen as optional — for any serious organization, it should be considered a baseline requirement rather than a nice-to-have.
Read more: Build an SRE Agent to automate Kubernetes operations with GPT-4o
Thanks for following along with the series. Happy clustering!
