As AI projects continuously expand in complexity and scale, the demand for robust high-performance computing (HPC) environments skyrockets. This growth necessitates efficient resource management – a challenge that SLURM (Simple Linux Utility for Resource Management) tackles head-on.
Then what is SLURM for AI and how this high-scalable workload manager works on Linux clusters? In this blog, we’ll guide you through SLURM concept and how to set up a SLURM cluster tailored for AI projects. This setup will help you efficiently allocate resources, schedule jobs, and maximize the use of your computing infrastructure for AI training and inference.
Let’s dive in!
Introduction to SLURM
SLURM (Simple Linux Utility for Resource Management) is an open-source workload manager designed to be the conductor of your high-performance computing (HPC) symphony. Imagine having an orchestra of powerful machines, each with its own processing prowess. During the performance, SLURM acts as the maestro. More than just a workload manager, SLURM ensures:
- Tasks are accurately distributed across your compute cluster
- Resources like CPU cores, memory, and even specialized hardware like GPUs are appropriately allocated
- Adequate resource redistribution to ensure the operation's scalability.
In short, SLURM is the central nervous system of your HPC environment, enabling AI engineers to efficiently harness the power of their compute clusters for tackling the most demanding AI challenges.
SLURM Setup Prerequisites
Before setting up a SLURM cluster, you’ll need the following:
- A cluster of machines running a Linux distribution (e.g., Ubuntu, CentOS) with network connectivity between them.
- Root access to the machines in the cluster.
Lab environment:
- Head node (controller node) running Ubuntu 22.04
- hostname: cls-wrk105, IP: 10.237.96.105
- Compute nodes running Ubuntu 22.04
- hostname: - cls-wrk105, IP: 10.237.96.105
- hostname: - cls-wrk106, IP: 10.237.96.106
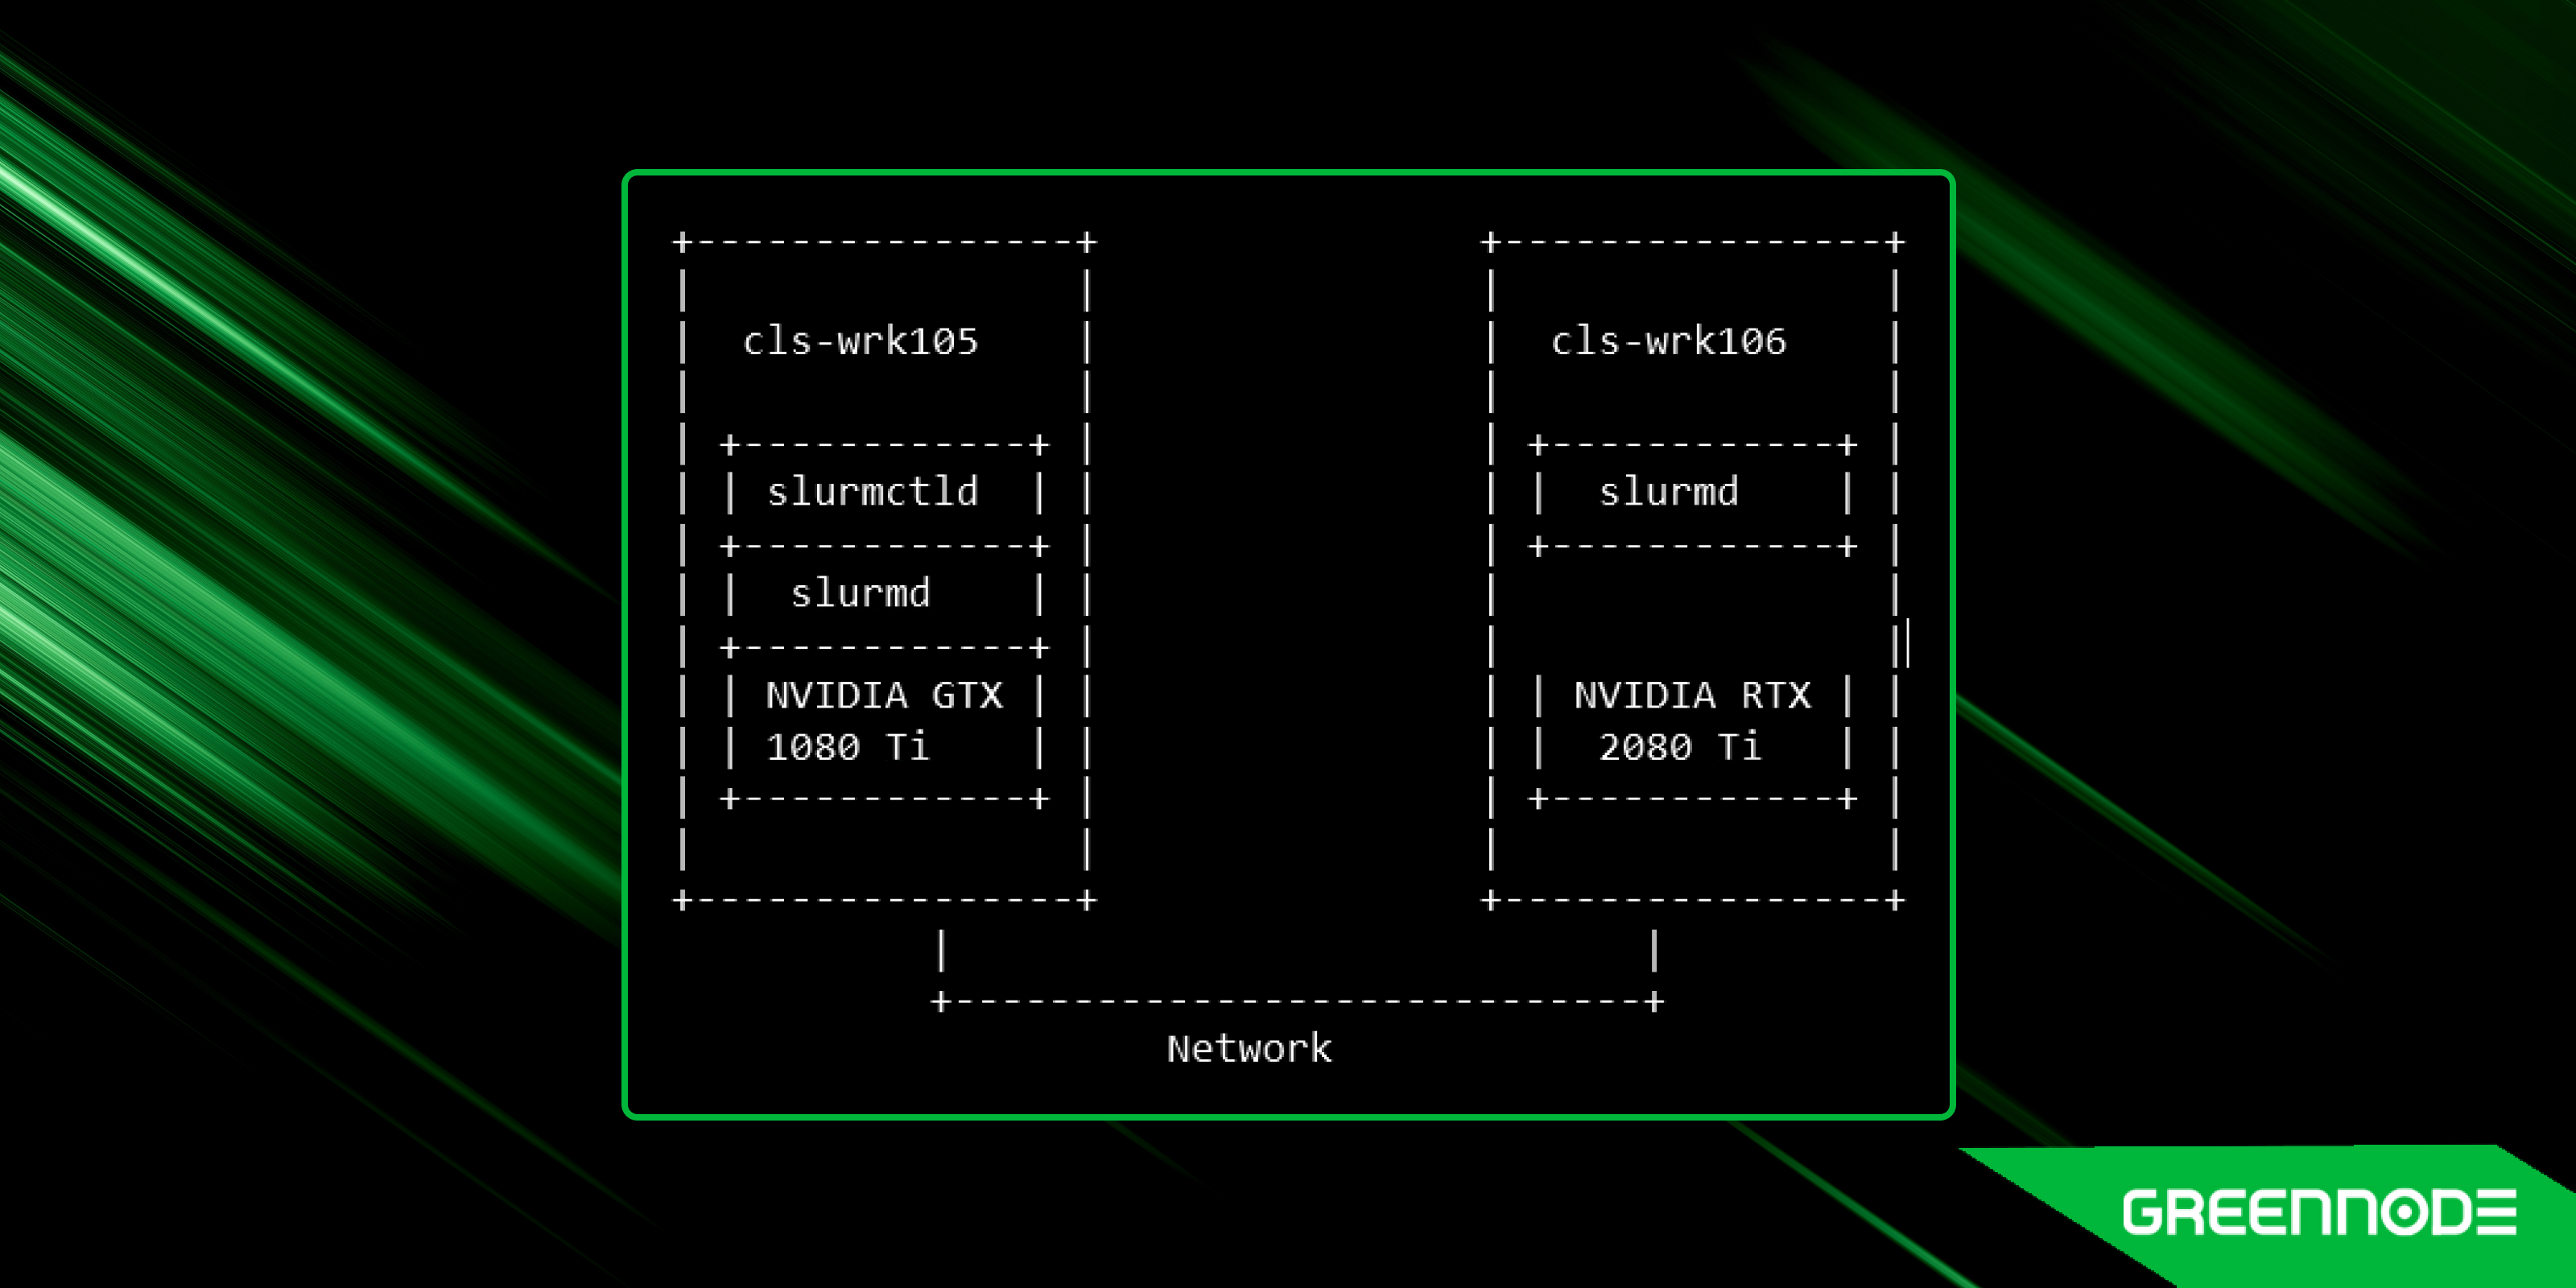
You can see node information as follows:
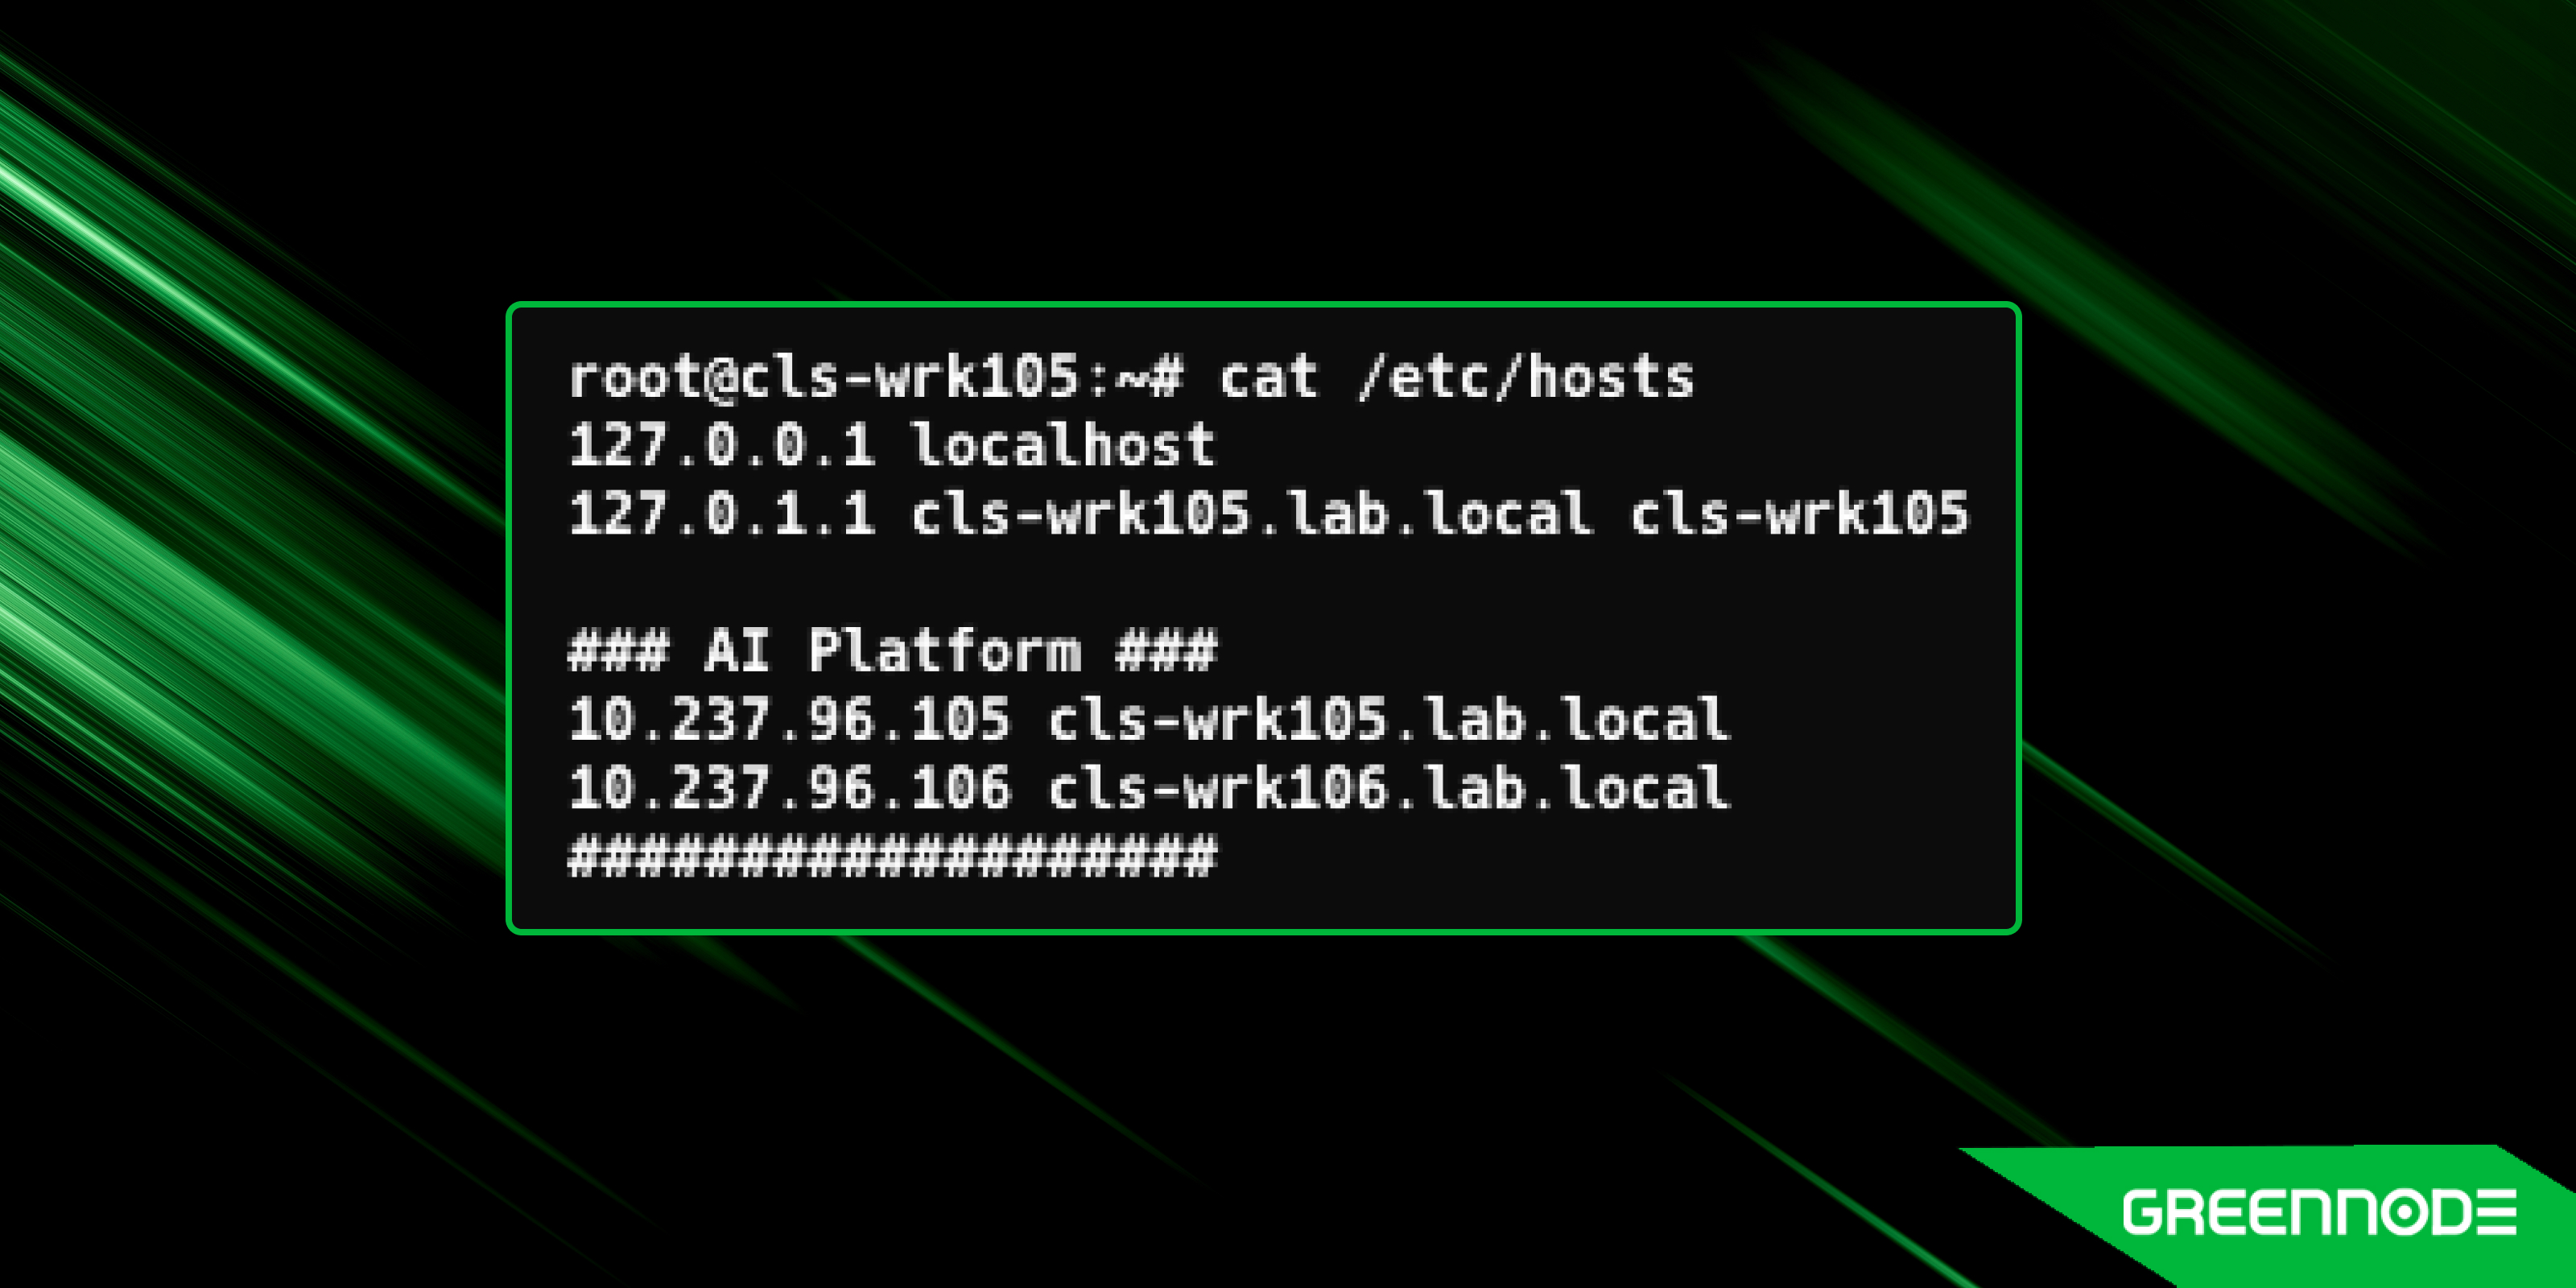
Install and configure Slurm on head node
To create a SLURM cluster, you have to install and configure Slurm on a head node.
Install SLURM
First, update your package manager and install slurmctld on head nodes:
root@cls-wrk105:~# sudo apt update
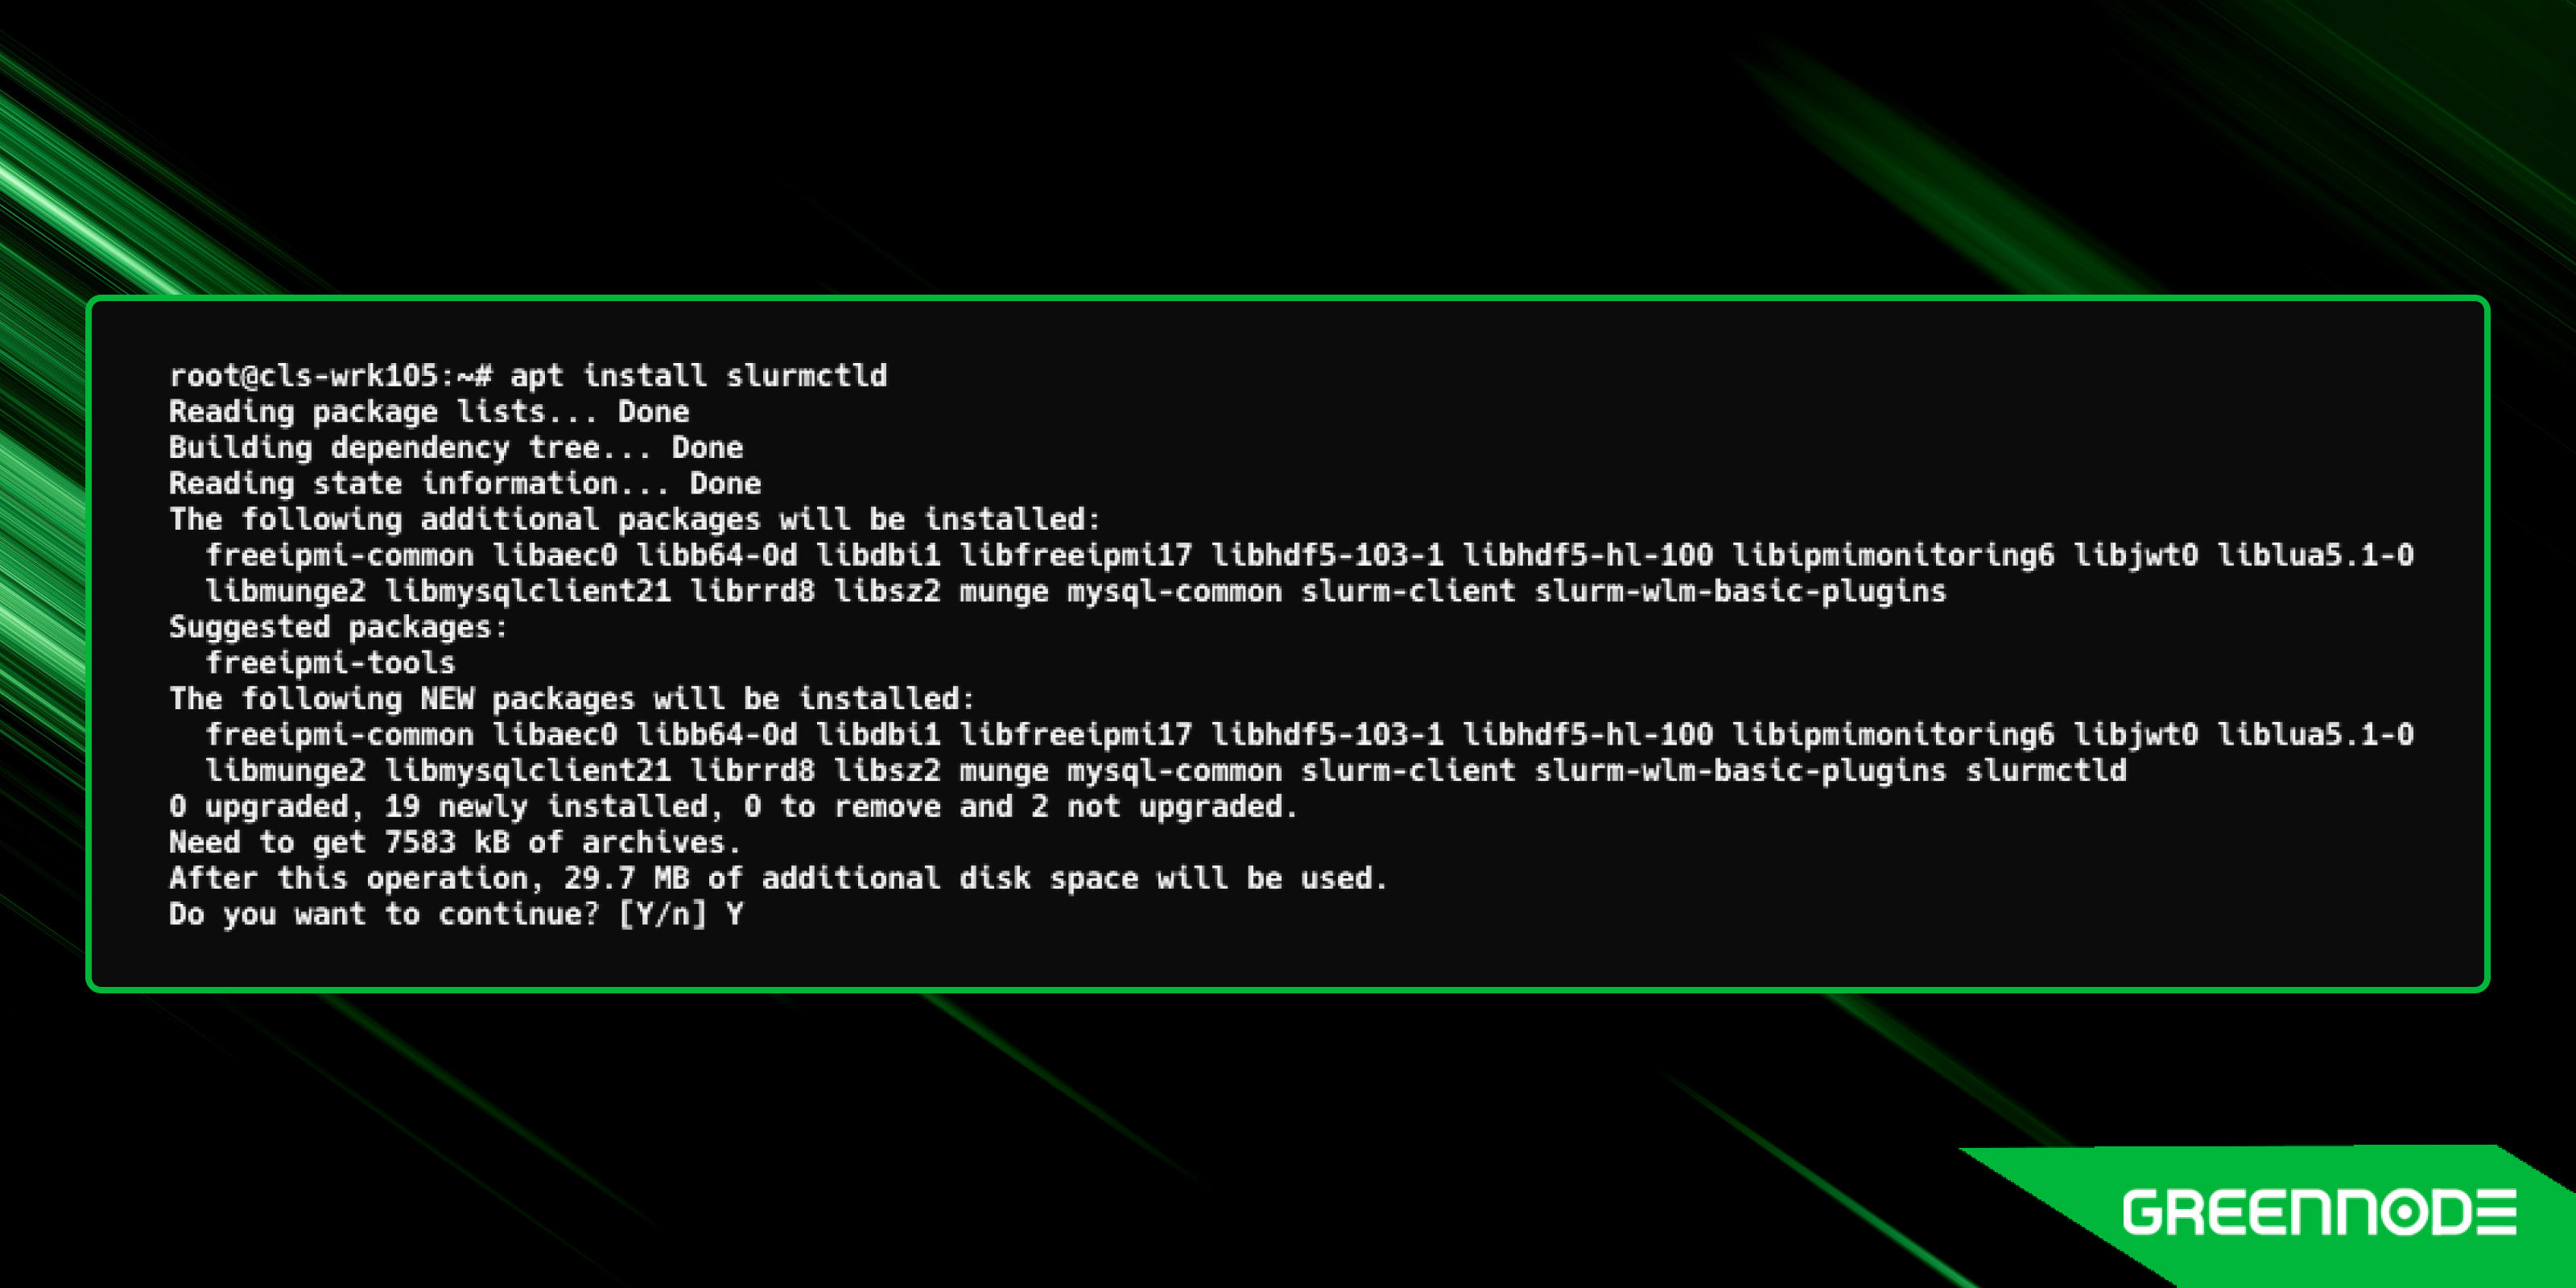
root@cls-wrk105:~# sudo apt install slurmctld
You should see the following result:
Munge Authentication
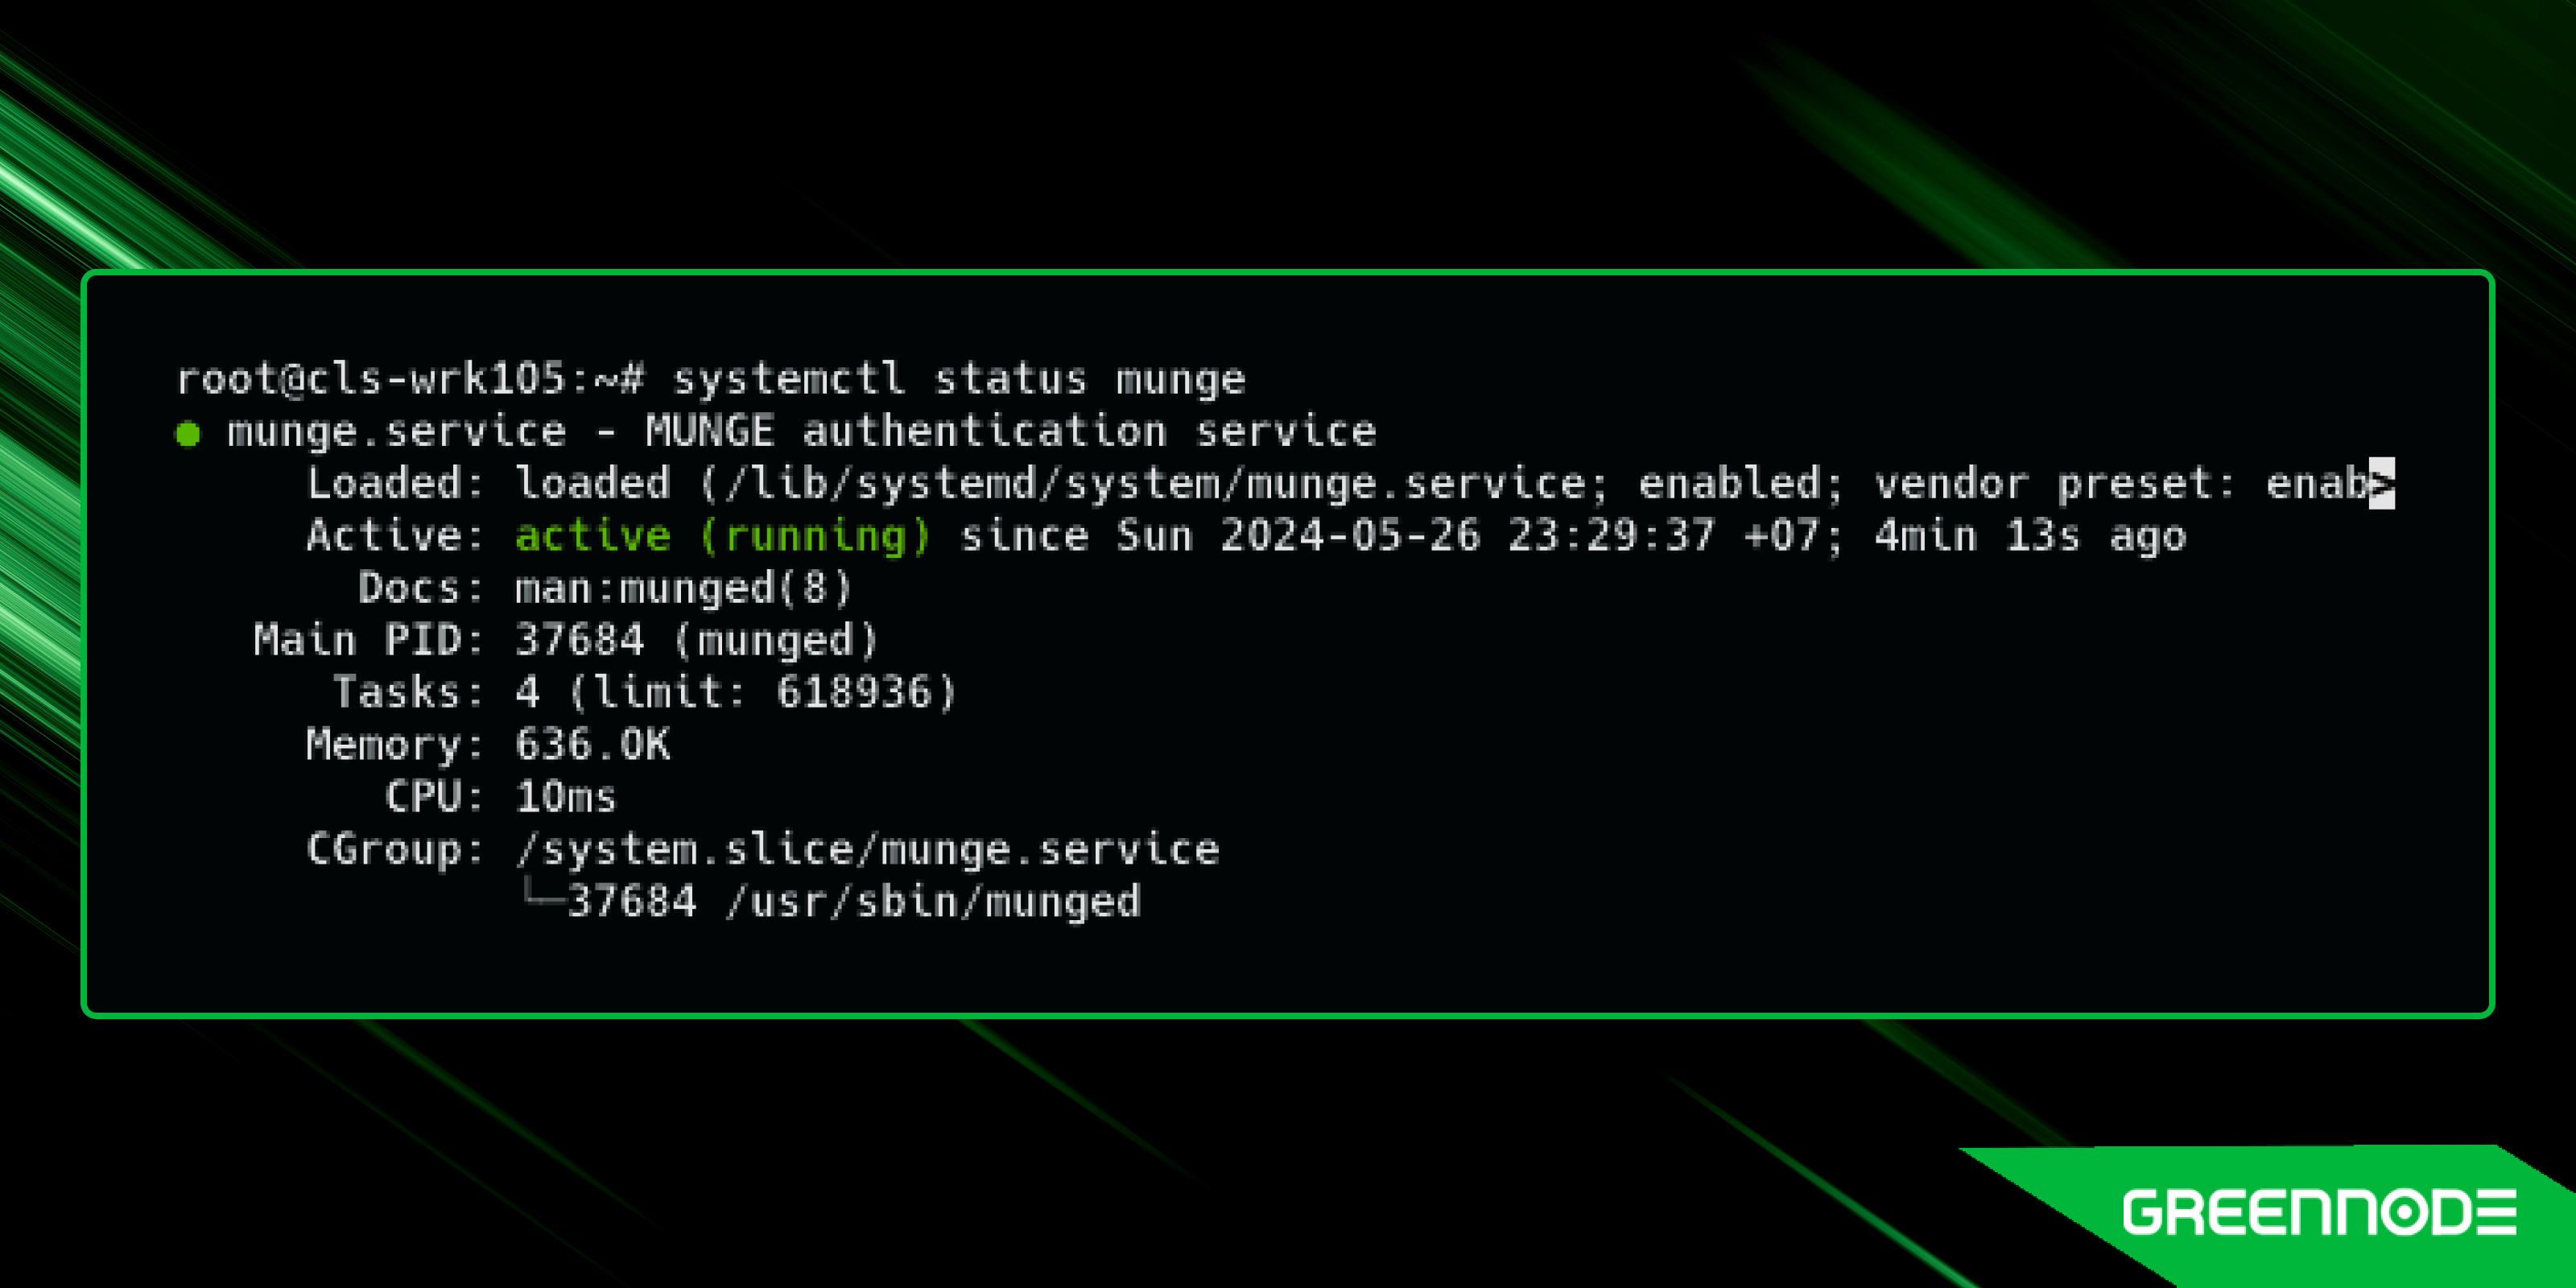
Next, you need to ensure munge is running. To check this, do as follows:
root@cls-wrk105:~# systemctl status munge You should see the following result:
Configure
Configure SLURM by editing the main configuration file, usually located at /etc/slurm/slurm.conf.
Below is a basic configuration example:
root@cls-wrk105:~# sudo cat << EOF > /etc/slurm/slurm.conf
ClusterName=lab-cluster
SlurmctldHost=cls-wrk105.lab.local
ProctrackType=proctrack/linuxproc
SlurmctldPidFile=/var/run/slurmctld.pid
SlurmctldPort=6817
SlurmdPidFile=/var/run/slurmd.pid
SlurmdPort=6818
SlurmdSpoolDir=/var/lib/slurm/slurmd
SlurmUser=slurm
StateSaveLocation=/var/lib/slurm/slurmctld
SwitchType=switch/none
TaskPlugin=task/none
#
# TIMERS
InactiveLimit=0
KillWait=30
MinJobAge=300
SlurmctldTimeout=120
SlurmdTimeout=300
Waittime=0
# SCHEDULING
SchedulerType=sched/backfill
SelectType=select/cons_tres
SelectTypeParameters=CR_Core
#
#AccountingStoragePort=
AccountingStorageType=accounting_storage/none
JobCompType=jobcomp/none
JobAcctGatherFrequency=30
JobAcctGatherType=jobacct_gather/none
SlurmctldDebug=info
SlurmctldLogFile=/var/log/slurm/slurmctld.log
SlurmdDebug=info
SlurmdLogFile=/var/log/slurm/slurmd.log
#
# COMPUTE NODES
DefMemPerNode=32000
GresTypes=gpu
NodeName=cls-wrk105.lab.local Gres=gpu:8 CPUs=64 RealMemory=504000
State=UNKNOWN
NodeName=cls-wrk106.lab.local Gres=gpu:7 CPUs=40 RealMemory=252000
State=UNKNOWN
PartitionName=gpu Nodes=ALL Default=YES MaxTime=INFINITE State=UP
EOF
If you have GPU resources, you can configure the gres field in the slurm.conf file to specify the number of GPUs available on each node. For example, if you have two nodes with different GPU configurations, you can set up the gres field as follows in the slurm.conf file:
GresTypes=gpu
NodeName=cls-wrk105.lab.local gres=gpu:8 CPUs=64 RealMemory=504000
State=UNKNOWN
NodeName=cls-wrk106.lab.local gres=gpu:7 CPUs=40 RealMemory=252000
State=UNKNOWN
In this example, cls-wrk105.lab.local has 8 GPUs, 64 CPUs, and 504GB of memory, while cls-wrk106.lab.local has 7 GPUs, 40 CPUs, and 252GB of memory. You can adjust these values based on your hardware configuration. See more: https://slurm.schedmd.com/slurm.conf.html
Configure gres for GPU
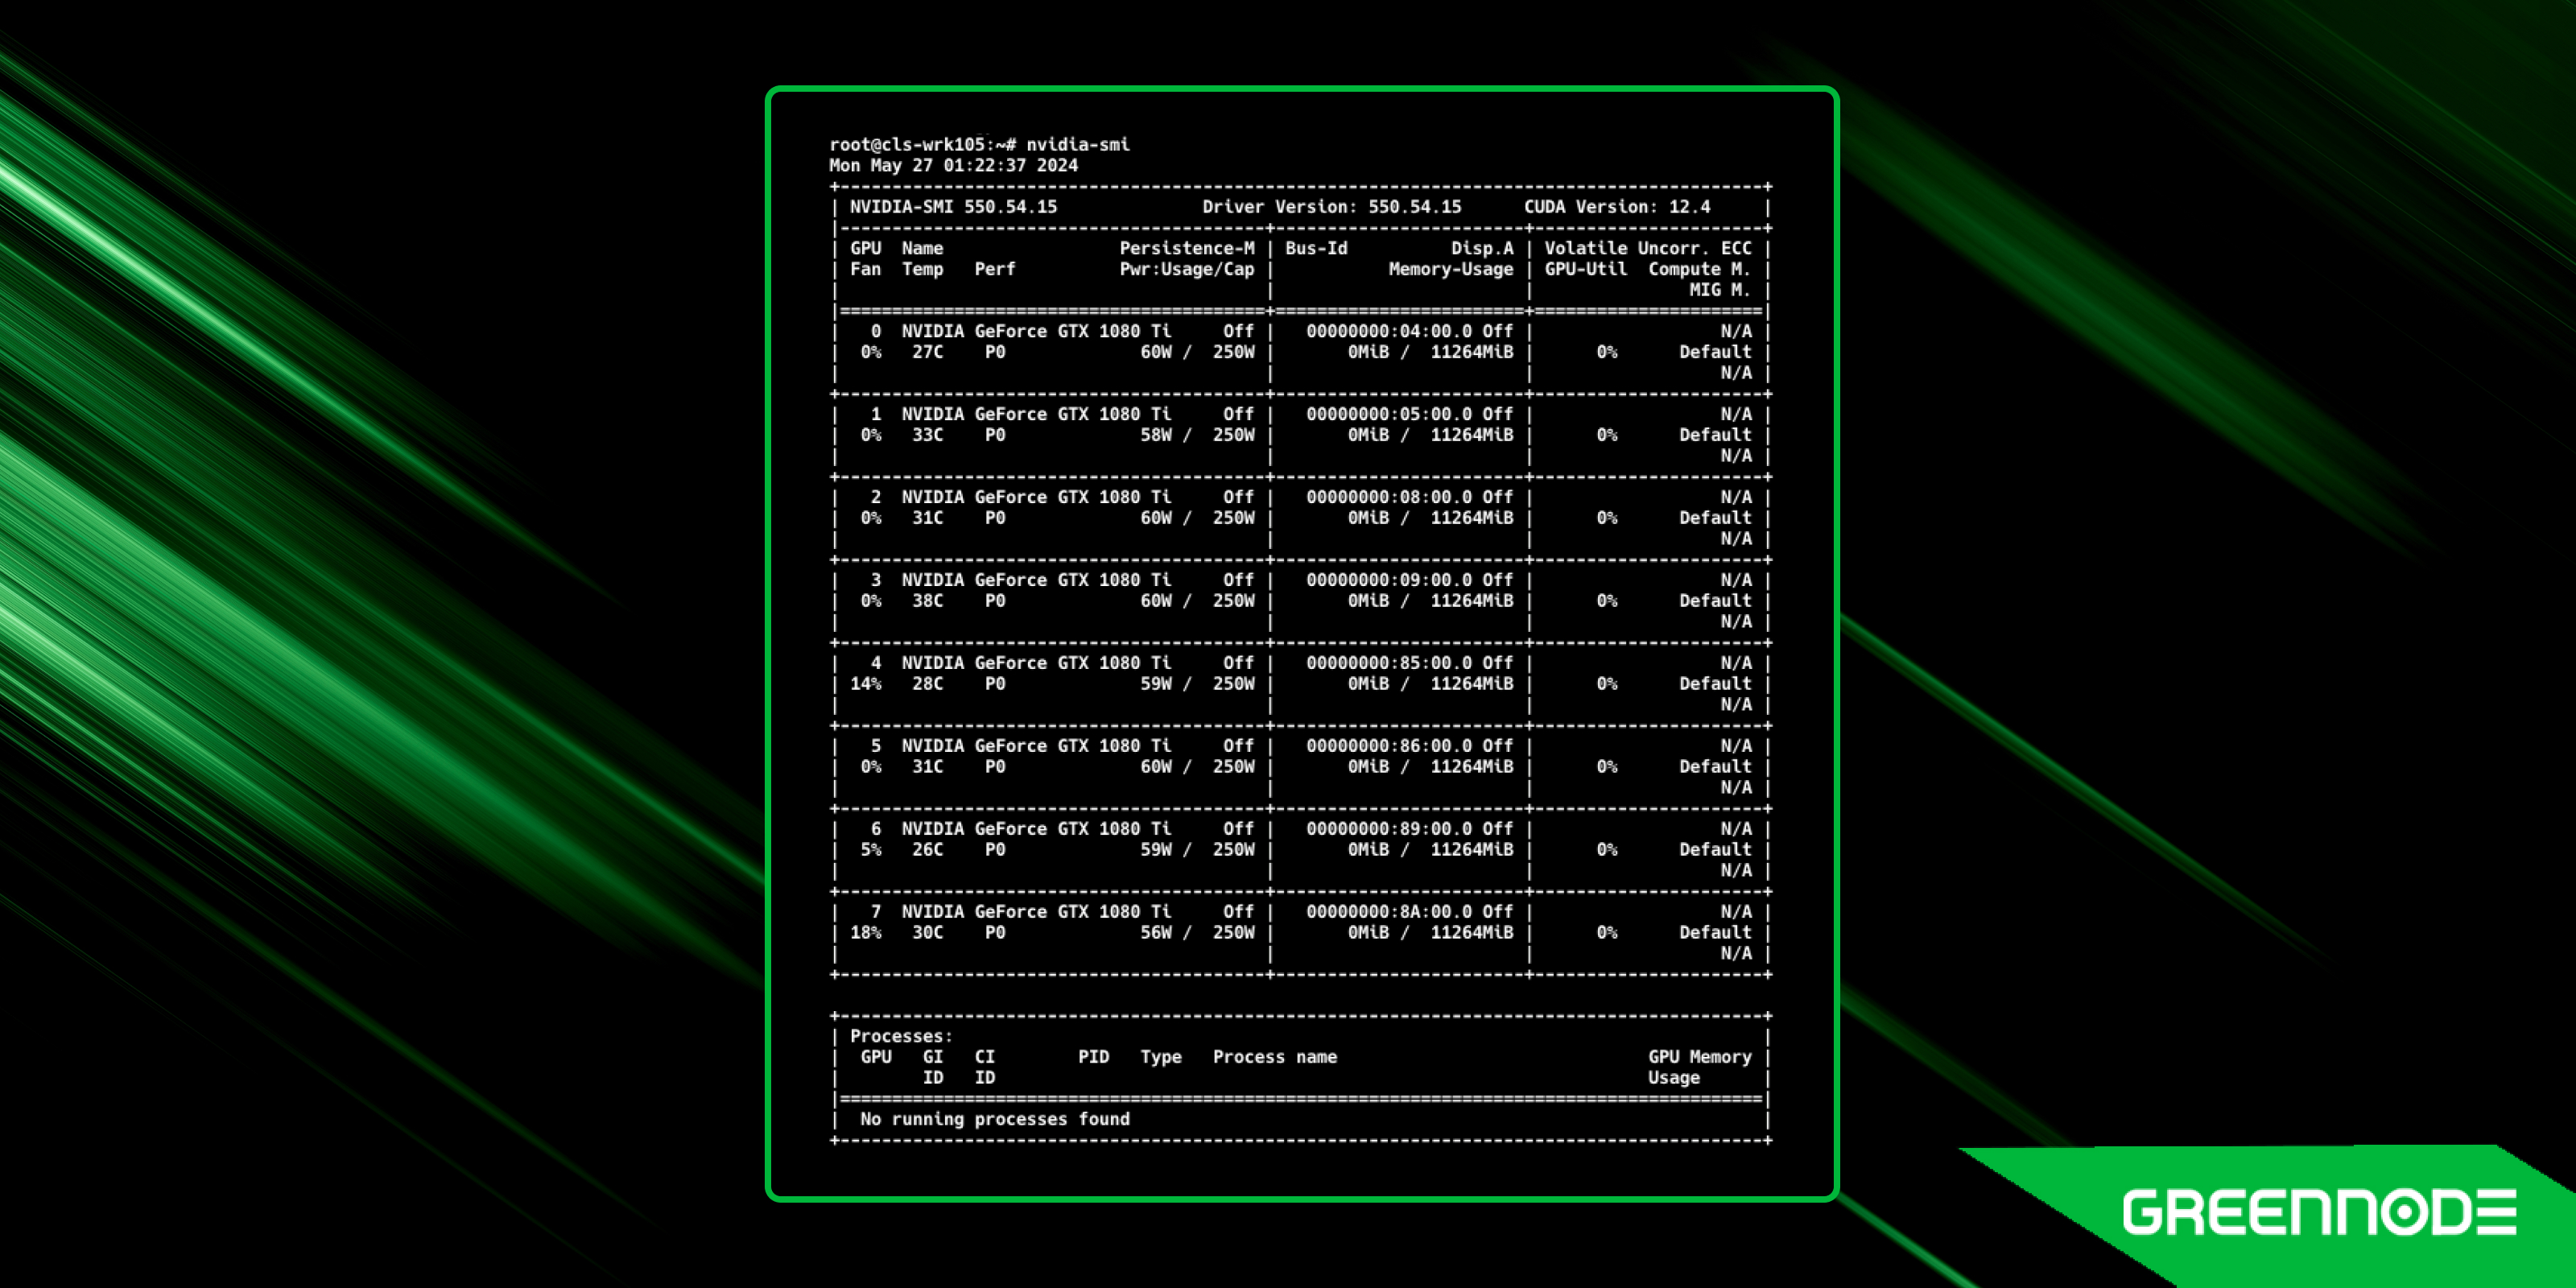
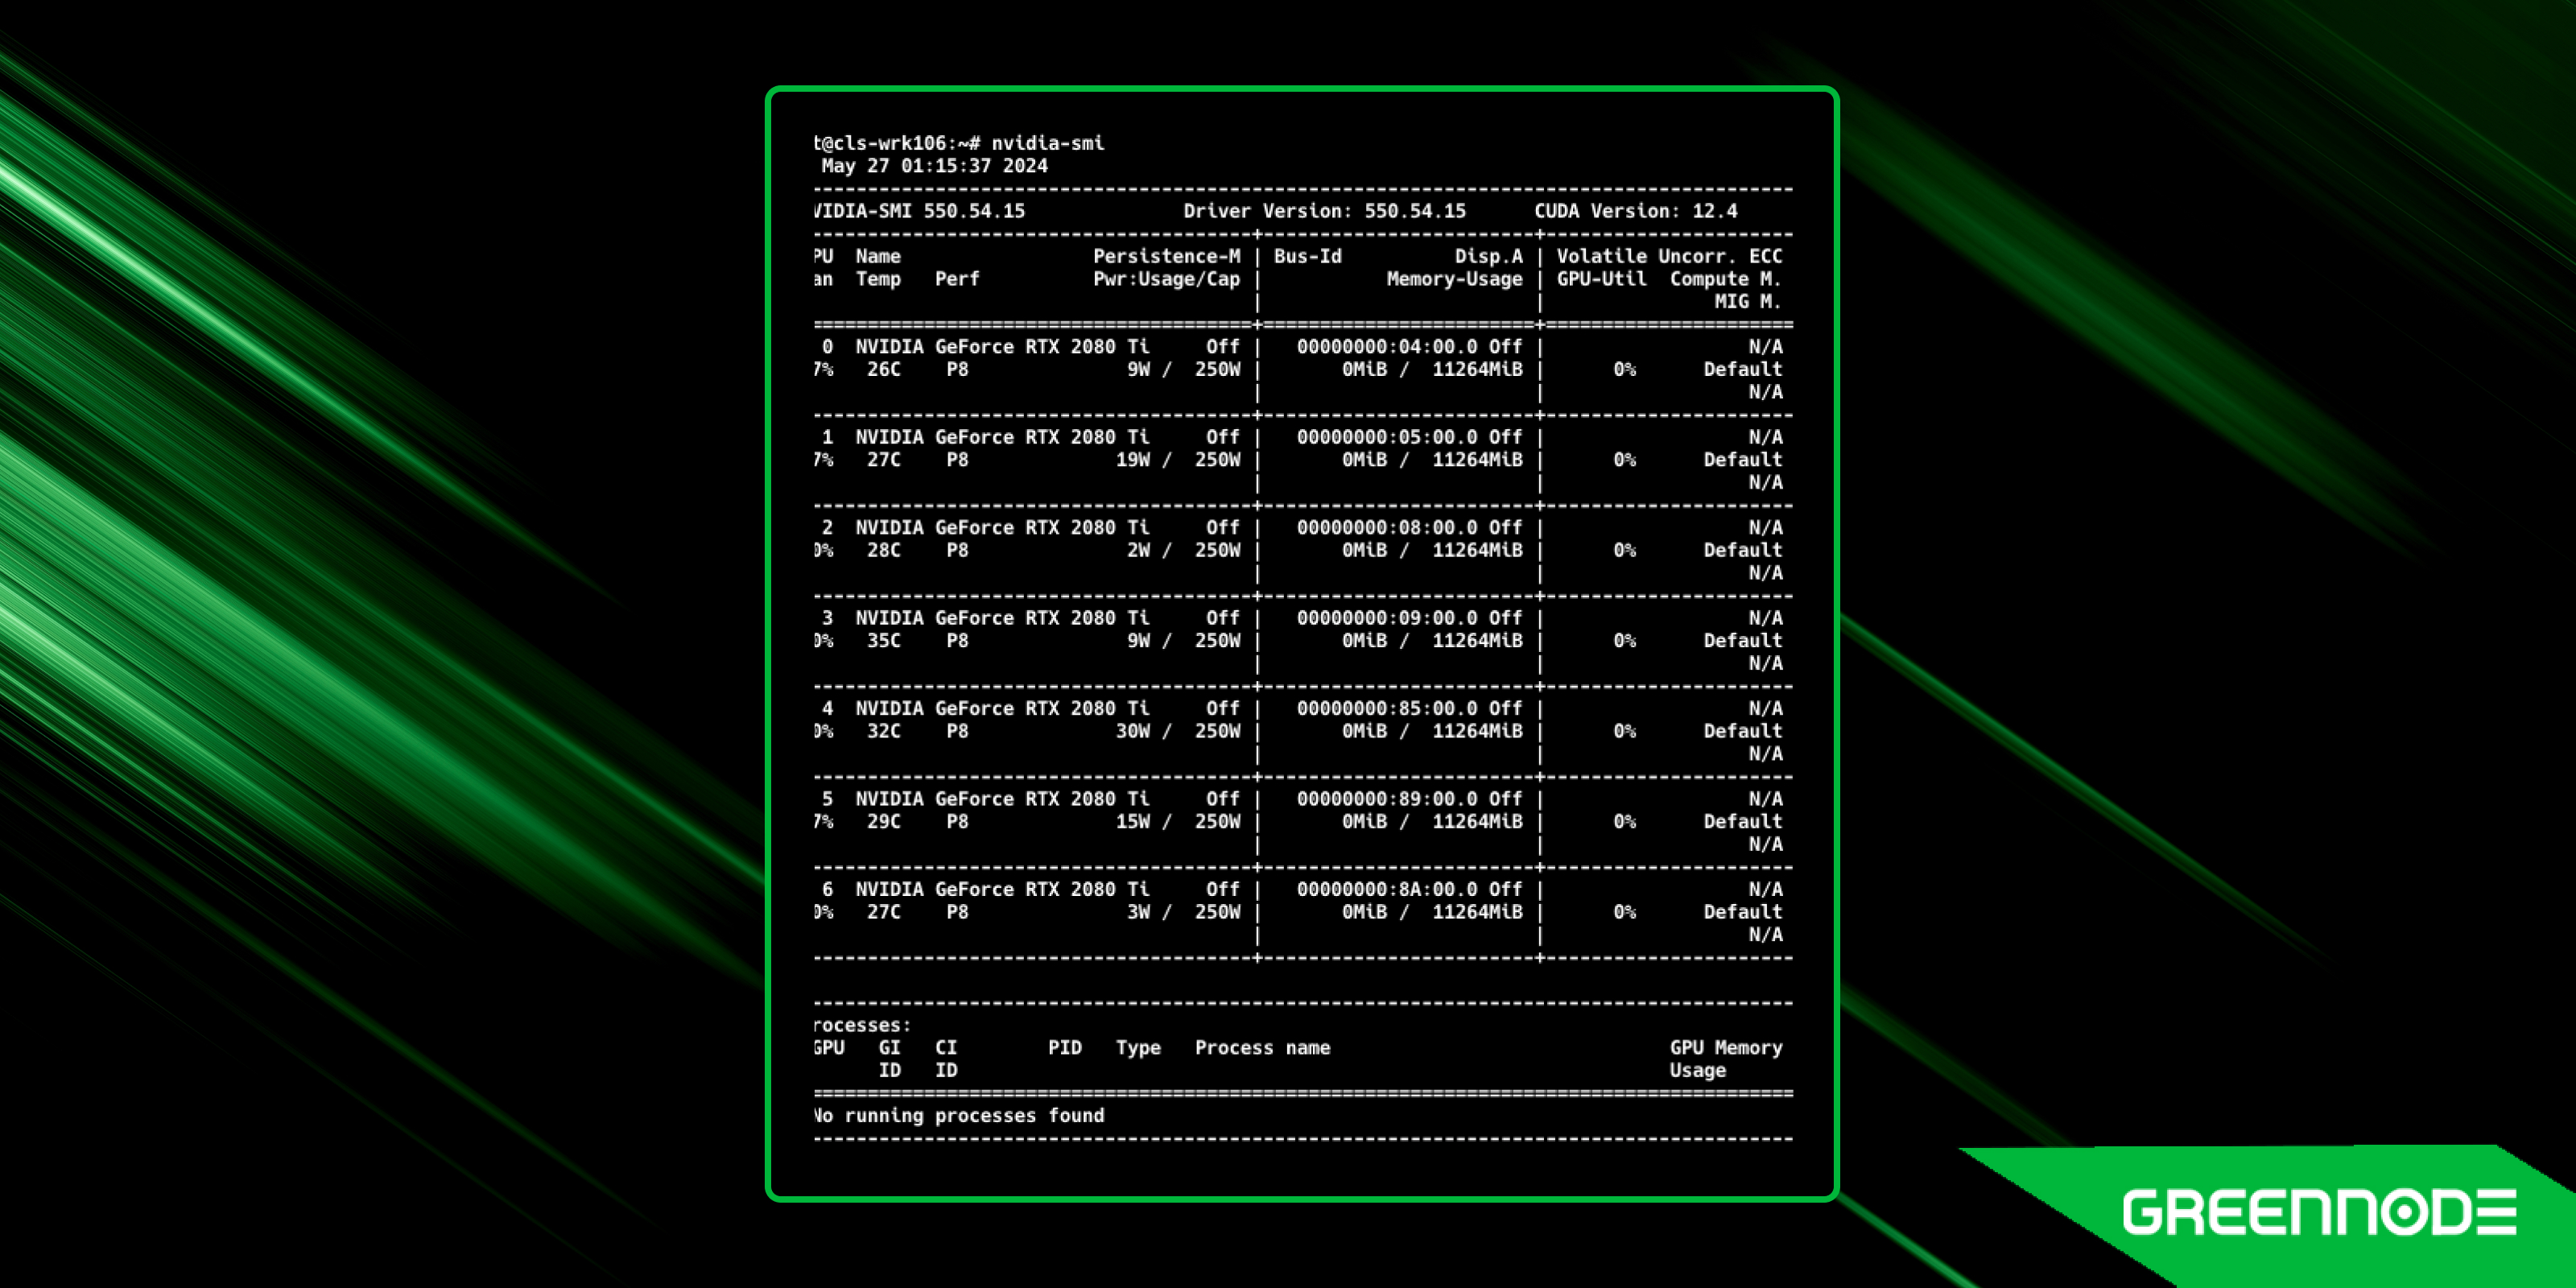
Ensure you install the NVIDIA driver and CUDA toolkit on each node to access the GPU resources.
cls-wrk105: 8 GPUs
You can see the list of GPUs to be shown as follows:
cls-wrk106: 7 GPUs
Setup the /etc/slurm/gres.conf file to specify the GPU type and number of GPUs available on each node:
root@cls-wrk105:~# sudo cat << EOF > /etc/slurm/gres.conf
NodeName=cls-wrk105.lab.local Name=gpu File=/dev/nvidia0
NodeName=cls-wrk105.lab.local Name=gpu File=/dev/nvidia1
NodeName=cls-wrk105.lab.local Name=gpu File=/dev/nvidia2
NodeName=cls-wrk105.lab.local Name=gpu File=/dev/nvidia3
NodeName=cls-wrk105.lab.local Name=gpu File=/dev/nvidia4
NodeName=cls-wrk105.lab.local Name=gpu File=/dev/nvidia5
NodeName=cls-wrk105.lab.local Name=gpu File=/dev/nvidia6
NodeName=cls-wrk105.lab.local Name=gpu File=/dev/nvidia7
NodeName=cls-wrk106.lab.local Name=gpu File=/dev/nvidia0
NodeName=cls-wrk106.lab.local Name=gpu File=/dev/nvidia1
NodeName=cls-wrk106.lab.local Name=gpu File=/dev/nvidia2
NodeName=cls-wrk106.lab.local Name=gpu File=/dev/nvidia3
NodeName=cls-wrk106.lab.local Name=gpu File=/dev/nvidia4
NodeName=cls-wrk106.lab.local Name=gpu File=/dev/nvidia5
NodeName=cls-wrk106.lab.local Name=gpu File=/dev/nvidia6
EOF Note: Make sure you install the NVIDIA driver and CUDA toolkit on each node to access the GPU resources.
If you build SLURM from source, you can enable NVML support by adding the –with-nvml flag to the configure command. This will allow SLURM to monitor GPU usage and temperature and enforce resource limits based on GPU utilization.
Hence, you don’t need to specify the GPU type and number of GPUs available on each node in the gres.conf file, just add the following line to the gres.conf file:
Autodetect=NVML See more:
- https://slurm.schedmd.com/gres.conf.html
- https://slurm.schedmd.com/gres.html
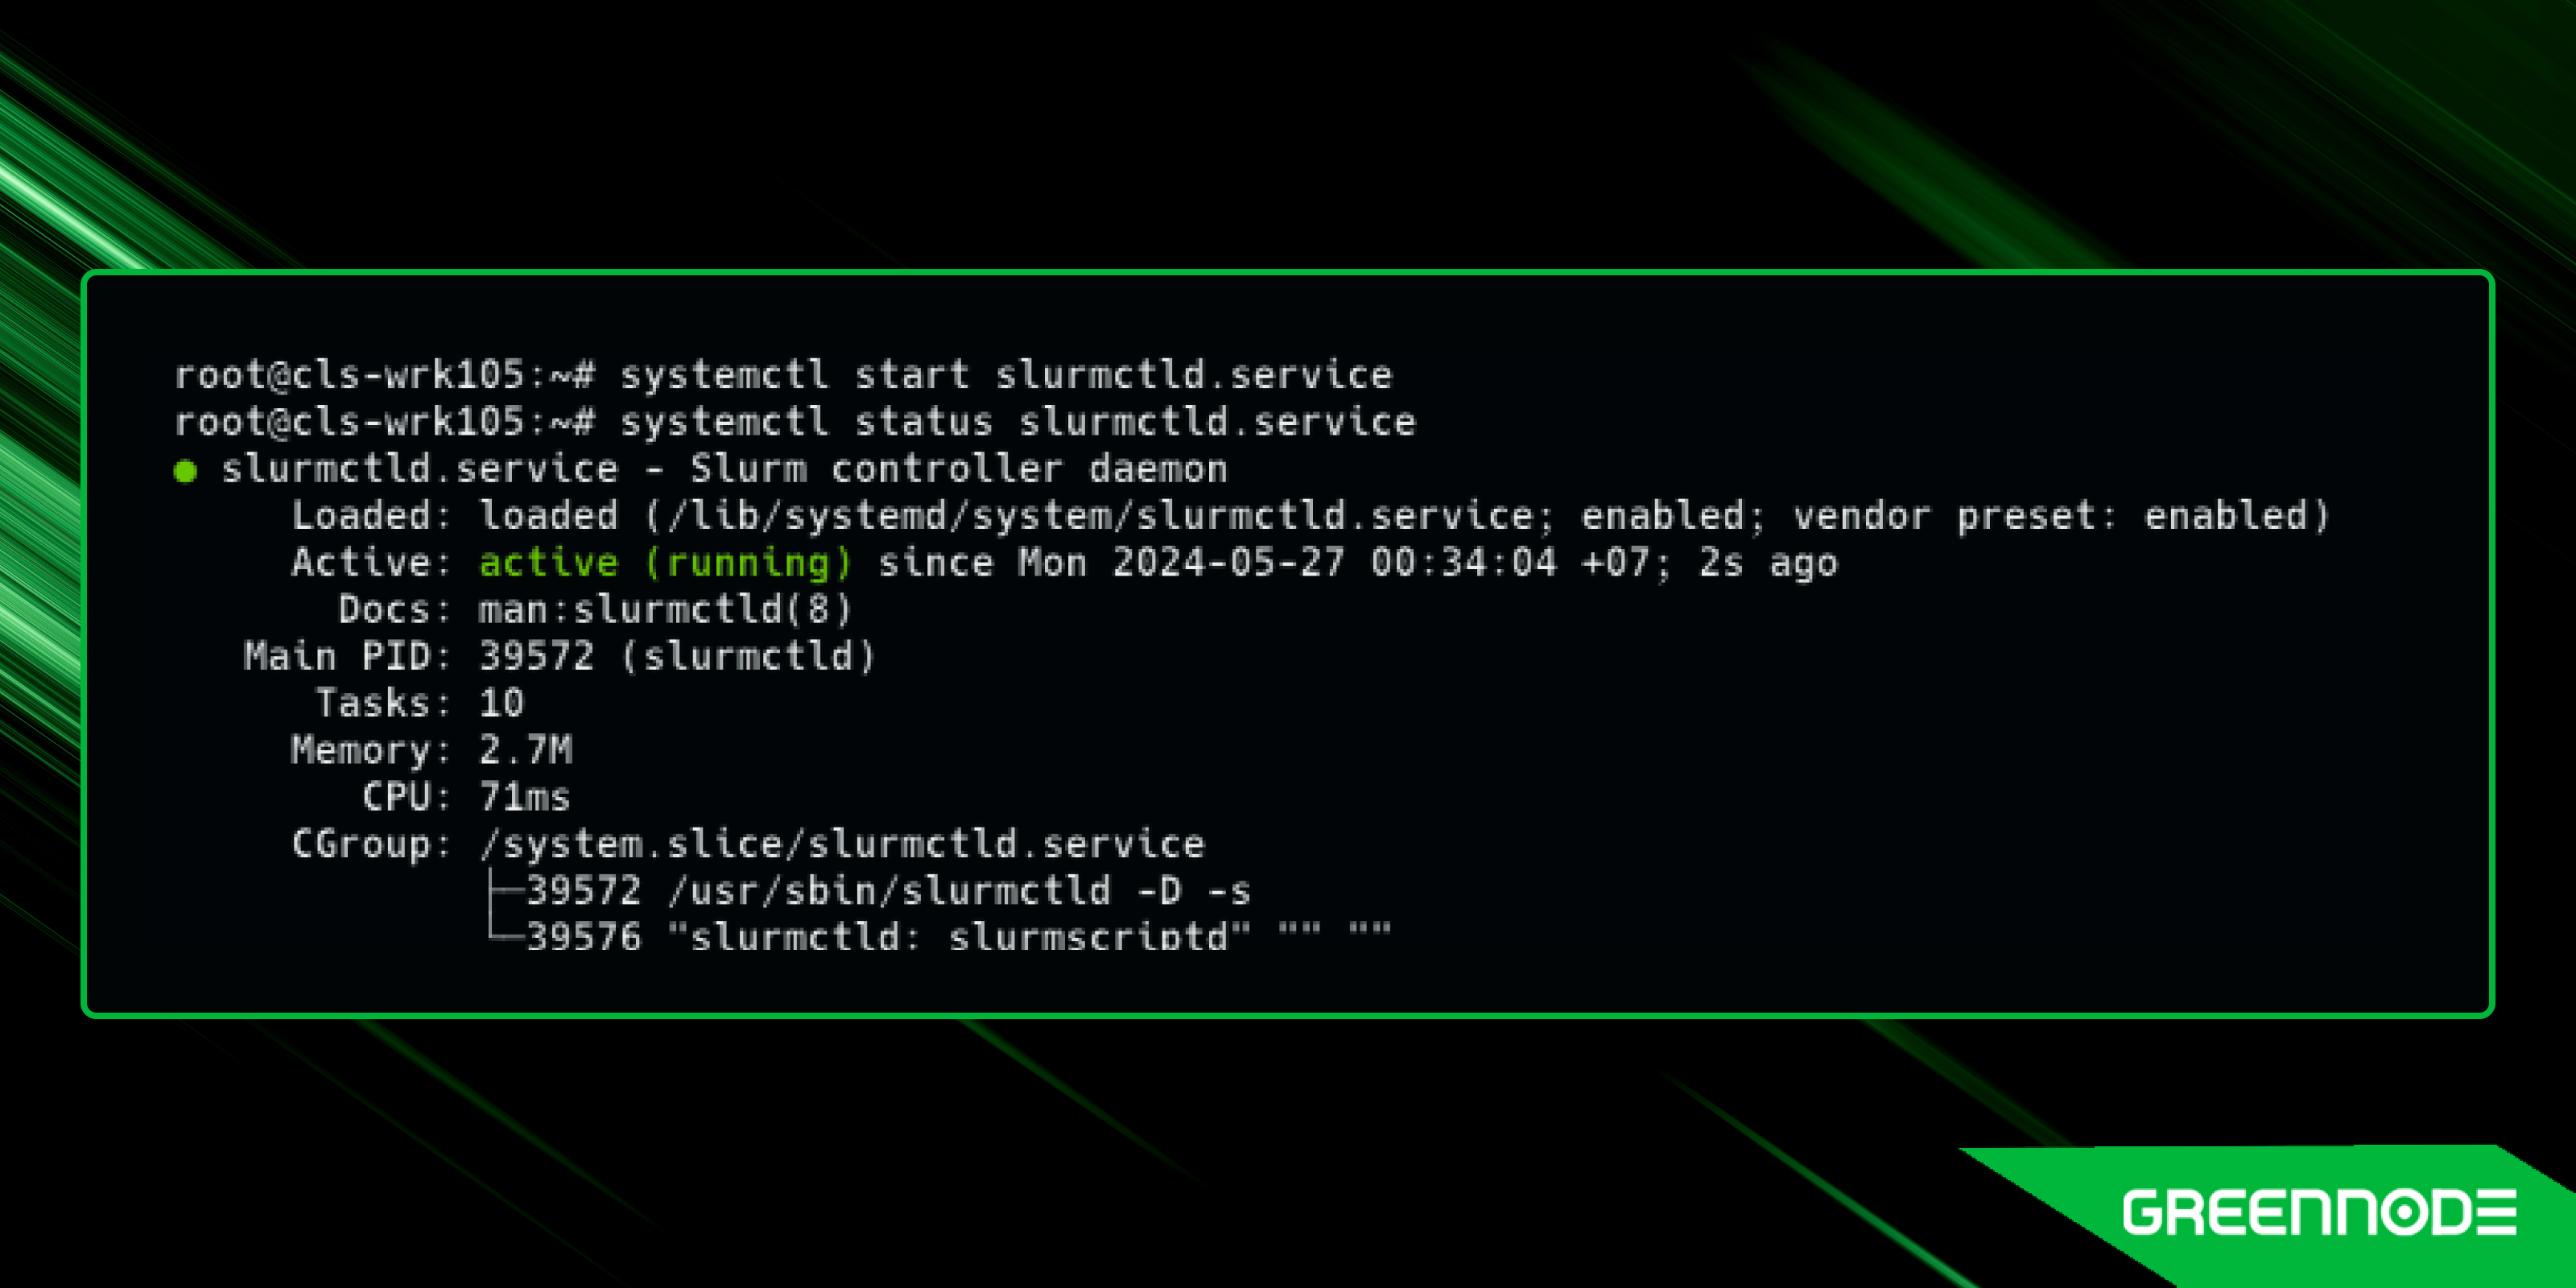
Start the SLURM service on the head node:
root@cls-wrk105:~# sudo systemctl start slurmctld You should see the following result:
Install slurm on compute nodes
To install slurm on the compute nodes, do as follows:
1. Install SLURM on the compute nodes:
root@cls-wrk105:~# sudo apt update
root@cls-wrk105:~# sudo apt install slurmd

root@cls-wrk106:~# sudo apt install slurmd
root@cls-wrk106:~# sudo systemctl start slurmd
2. Copy the SLURM configuration, munge key file from the head node to each compute node:
root@cls-wrk105:~# scp /etc/slurm/*.conf root@cls-wrk106.lab.local:/etc/slurm/
root@cls-wrk105:~# scp /etc/munge/munge.key root@cls-wrk106.lab.local:/etc/munge/munge.key
3. Restart the munge service on each compute node:
root@cls-wrk106:~# sudo systemctl restart munge 4. Start the SLURM service on each compute node:
root@cls-wrk106:~# sudo systemctl start slurmd 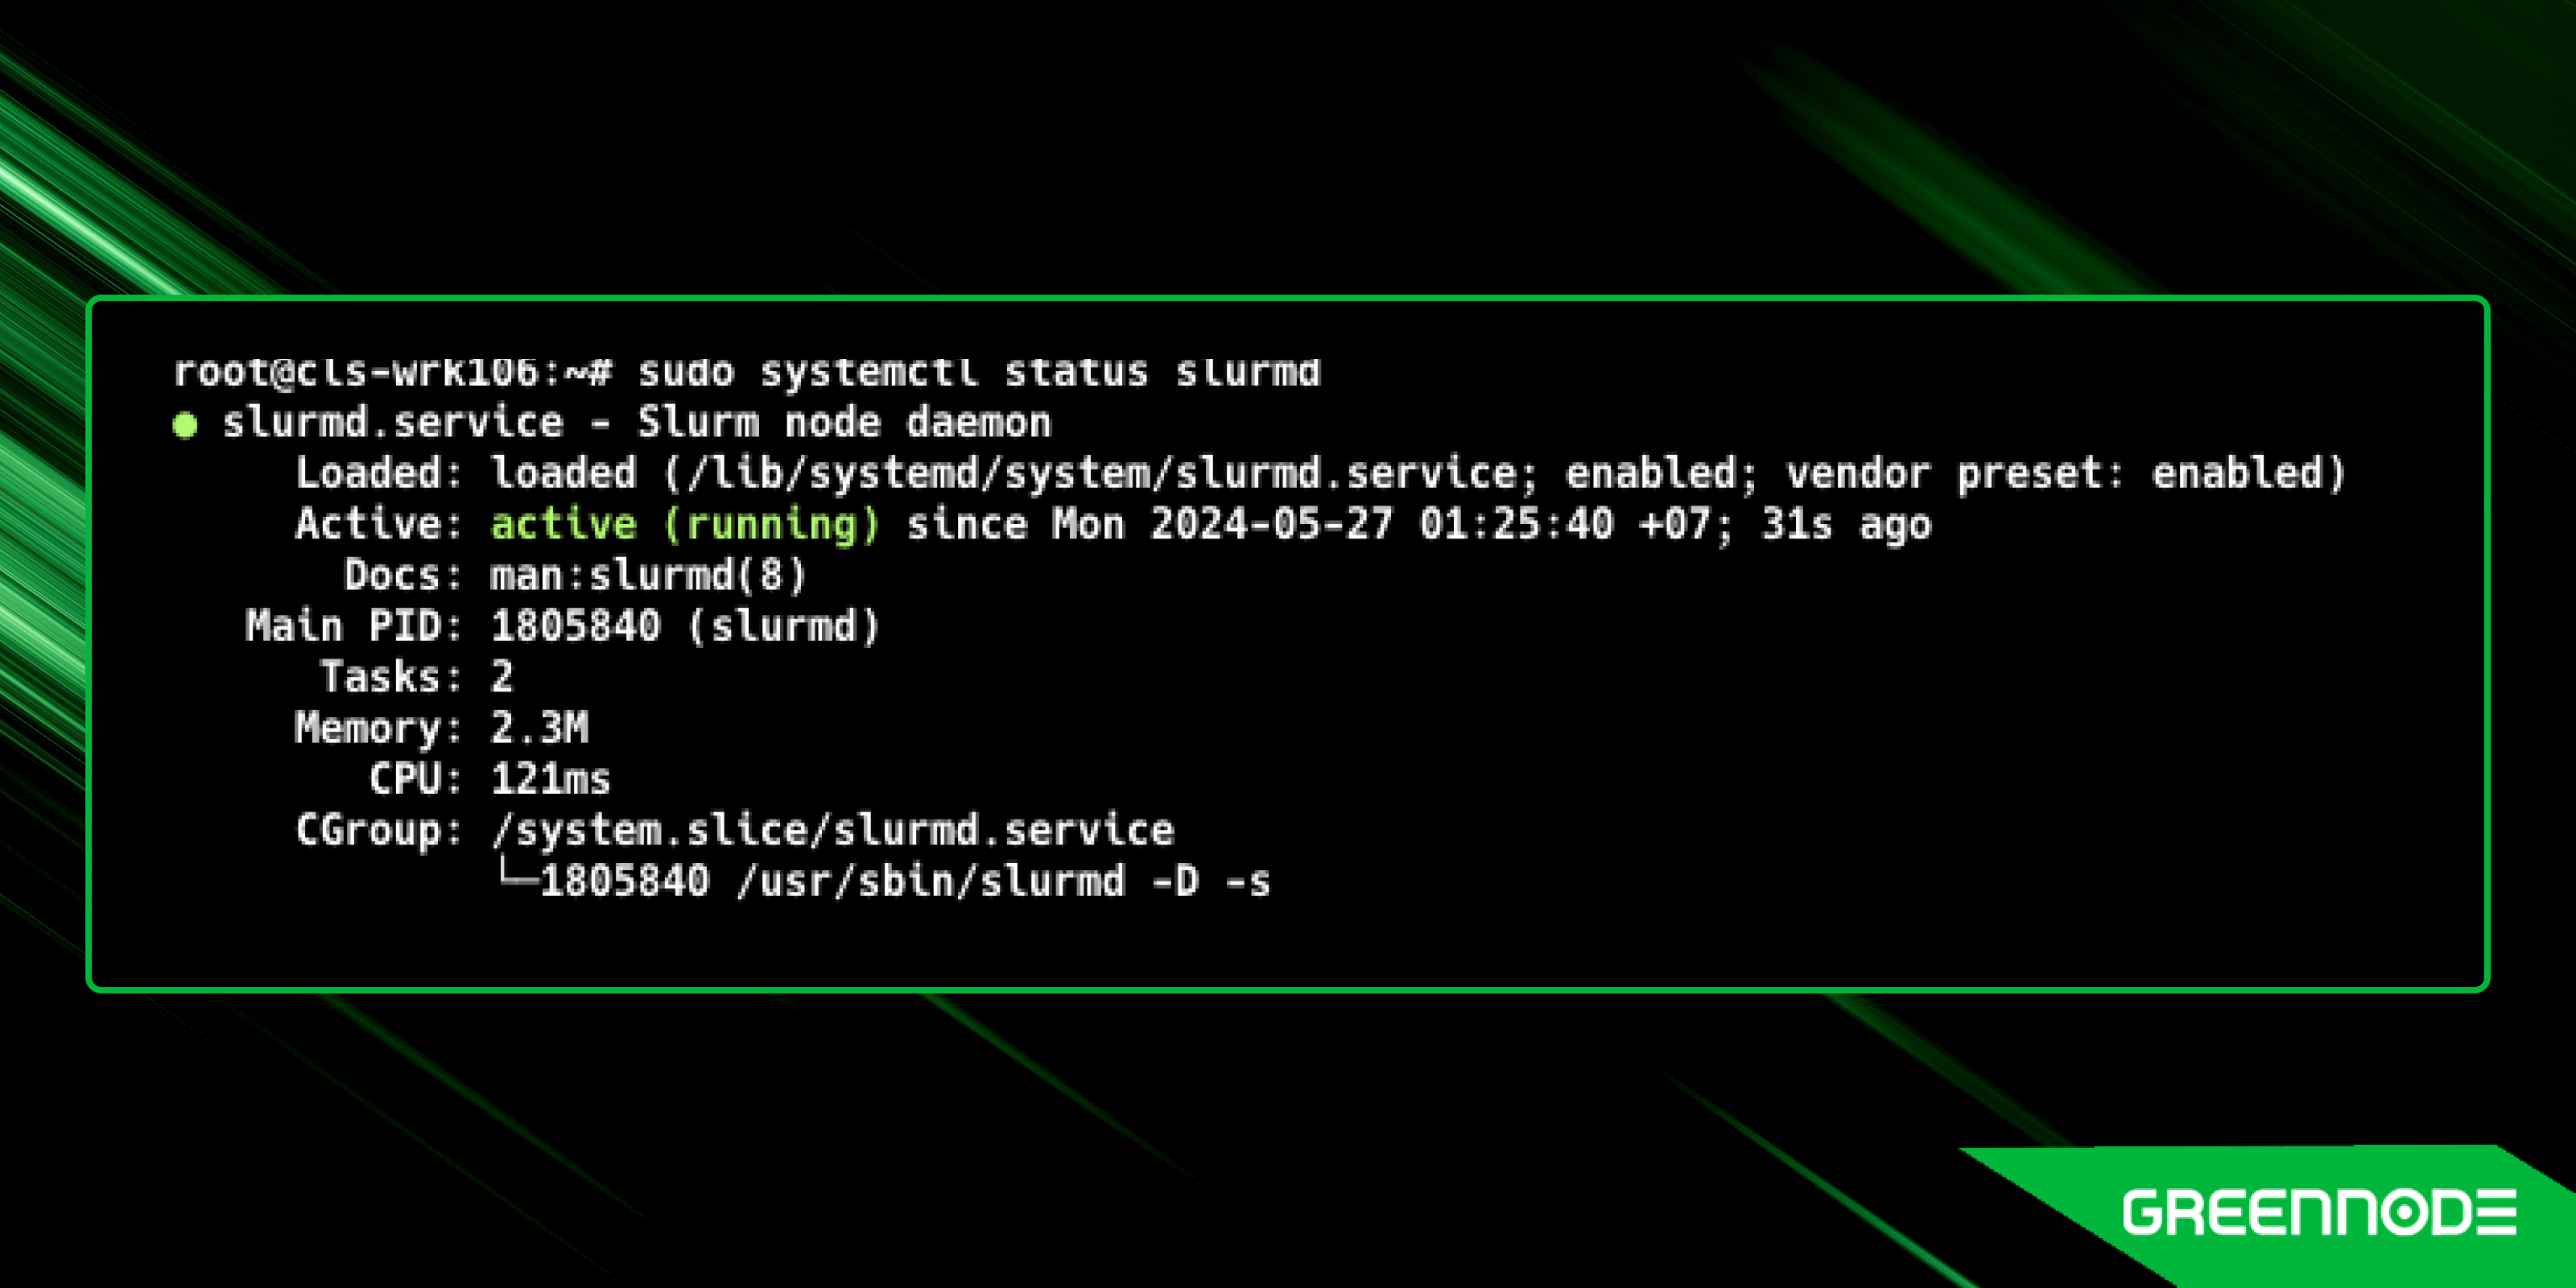
Testing the SLURM Cluster
1. Set the nodes to the idle state to allow jobs to be scheduled on them. You can do this using the scontrol command
root@cls-wrk105:~# scontrol update nodename=cls-wrk105.lab.local,cls-wrk106.lab.local state=idle 2. Check the status of your nodes:
root@cls-wrk105:~# sinfo 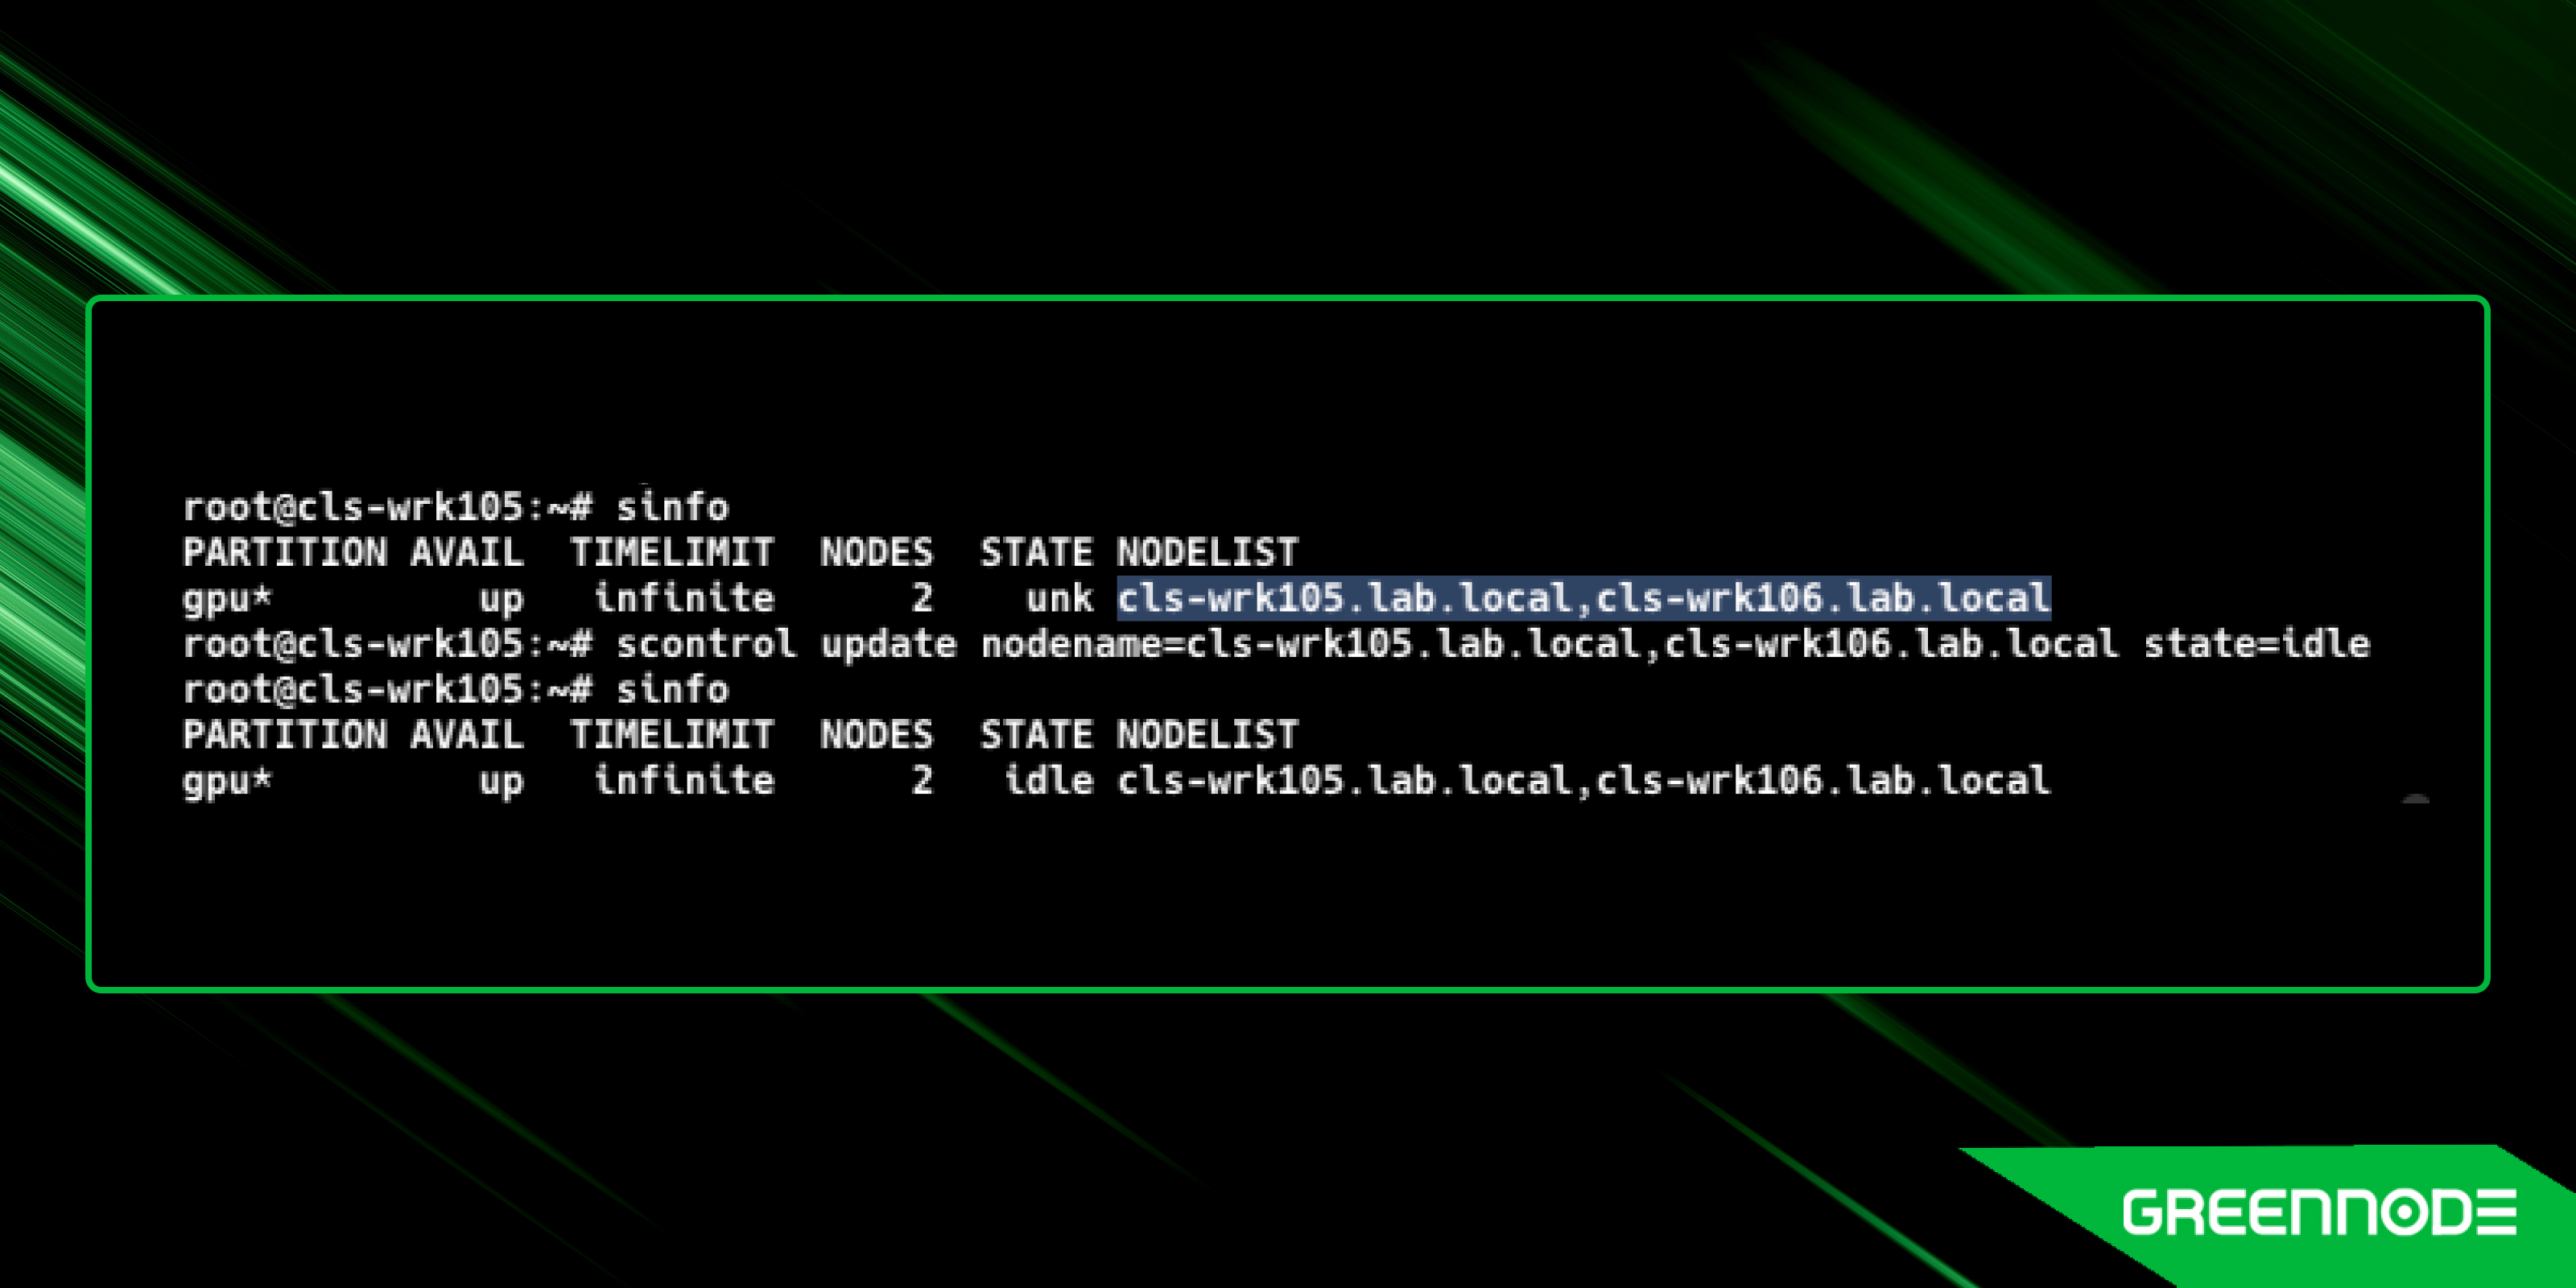
3. Run a test job to verify that the SLURM cluster is working correctly:
root@cls-wrk105:~# srun -N2 hostname 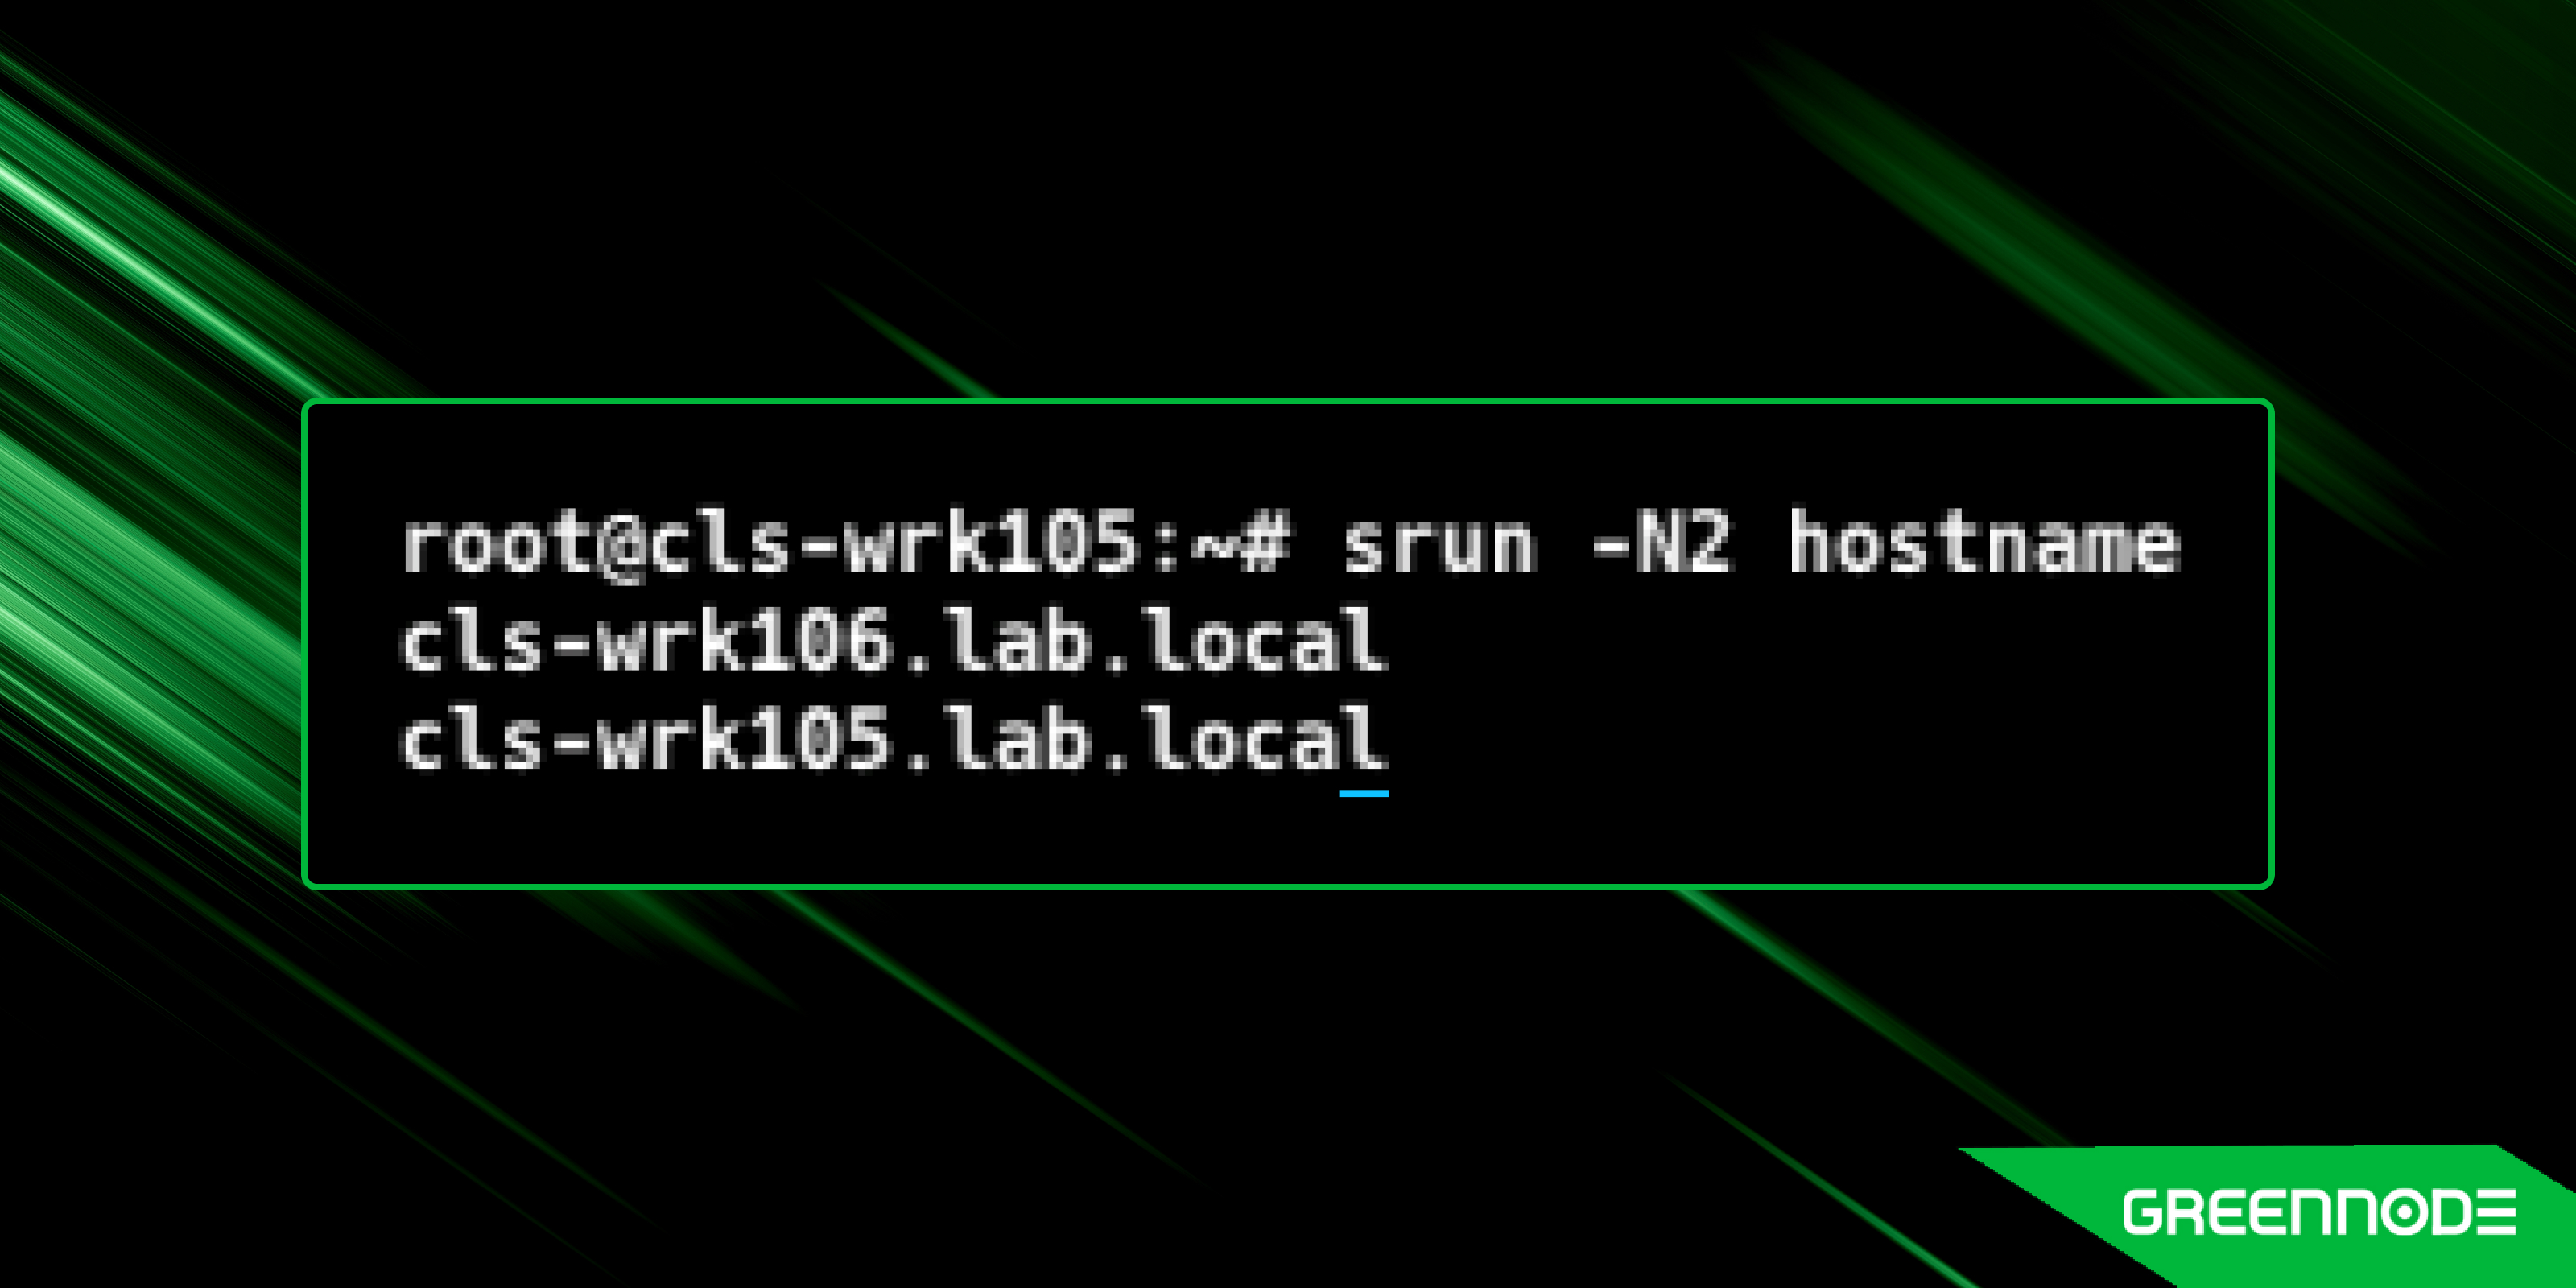
You can check some basic SLURM commands here: https://slurm.schedmd.com/quickstart.html#commands
Run GPU job
1. Install apptainer
Install appcontainer to run the sample job on compute nodes. Appcontainer is a container runtime that allows you to run containerized applications on HPC clusters. You can install appcontainer from the PPA repository as follows:
root@cls-wrk105:~# sudo add-apt-repository -y ppa:apptainer/ppa
root@cls-wrk105:~# sudo apt update
root@cls-wrk105:~# sudo apt install -y apptainer
root@cls-wrk106:~# sudo add-apt-repository -y ppa:apptainer/ppa
root@cls-wrk106:~# sudo apt update
root@cls-wrk106:~# sudo apt install -y apptainer
2. Run sample job
Here is an example of batch script to run a PyTorch distributed data parallel (DDP) job on the SLURM cluster :
root@cls-wrk105:~# cat << EOF > ./sbatch_torchrun_ddp.job
#!/bin/bash
#SBATCH --job-name=multinode-random
#SBATCH --nodes=2
#SBATCH --time=2:00:00
#SBATCH --gres=gpu:2
#SBATCH -o /tmp/multinode-random.%N.%J.%u.out # STDOUT
#SBATCH -e /tmp/multinode-random.%N.%J.%u.err # STDERR
#SBATCH --ntasks=2

nodes=($(scontrol show hostnames $SLURM_JOB_NODELIST ) )
nodes_array=($nodes)
echo $nodes_array
head_node=${nodes_array[0]}
echo $head_node
head_node_ip=$(srun --nodes=1 --ntasks=1 -w "$head_node" hostname --ip-address | cut -d" " -f2)
echo Master Node IP: $head_node_ip
export LOGLEVEL=INFO

srun rm -rf /tmp/slurm-exec-instruction
srun git clone https://github.com/QuangNamVu/slurm-exec-instruction /tmp/slurm-exec-instruction

srun apptainer run \
   --nv --bind /tmp/slurm-exec-instruction/torch_dist_train/src/:/mnt \
   docker://pytorch/pytorch:2.0.0-cuda11.7-cudnn8-devel \
   torchrun --nnodes=2 \
   --nproc_per_node=1 \
   --rdzv_id=100 \
   --rdzv_backend=c10d \
   --rdzv_endpoint=$head_node_ip:29400 \
   /mnt/rand_ddp.py --batch_size 128 --total_epochs 10000 --save_every 50
EOF
3. Run the job using the sbatch command:
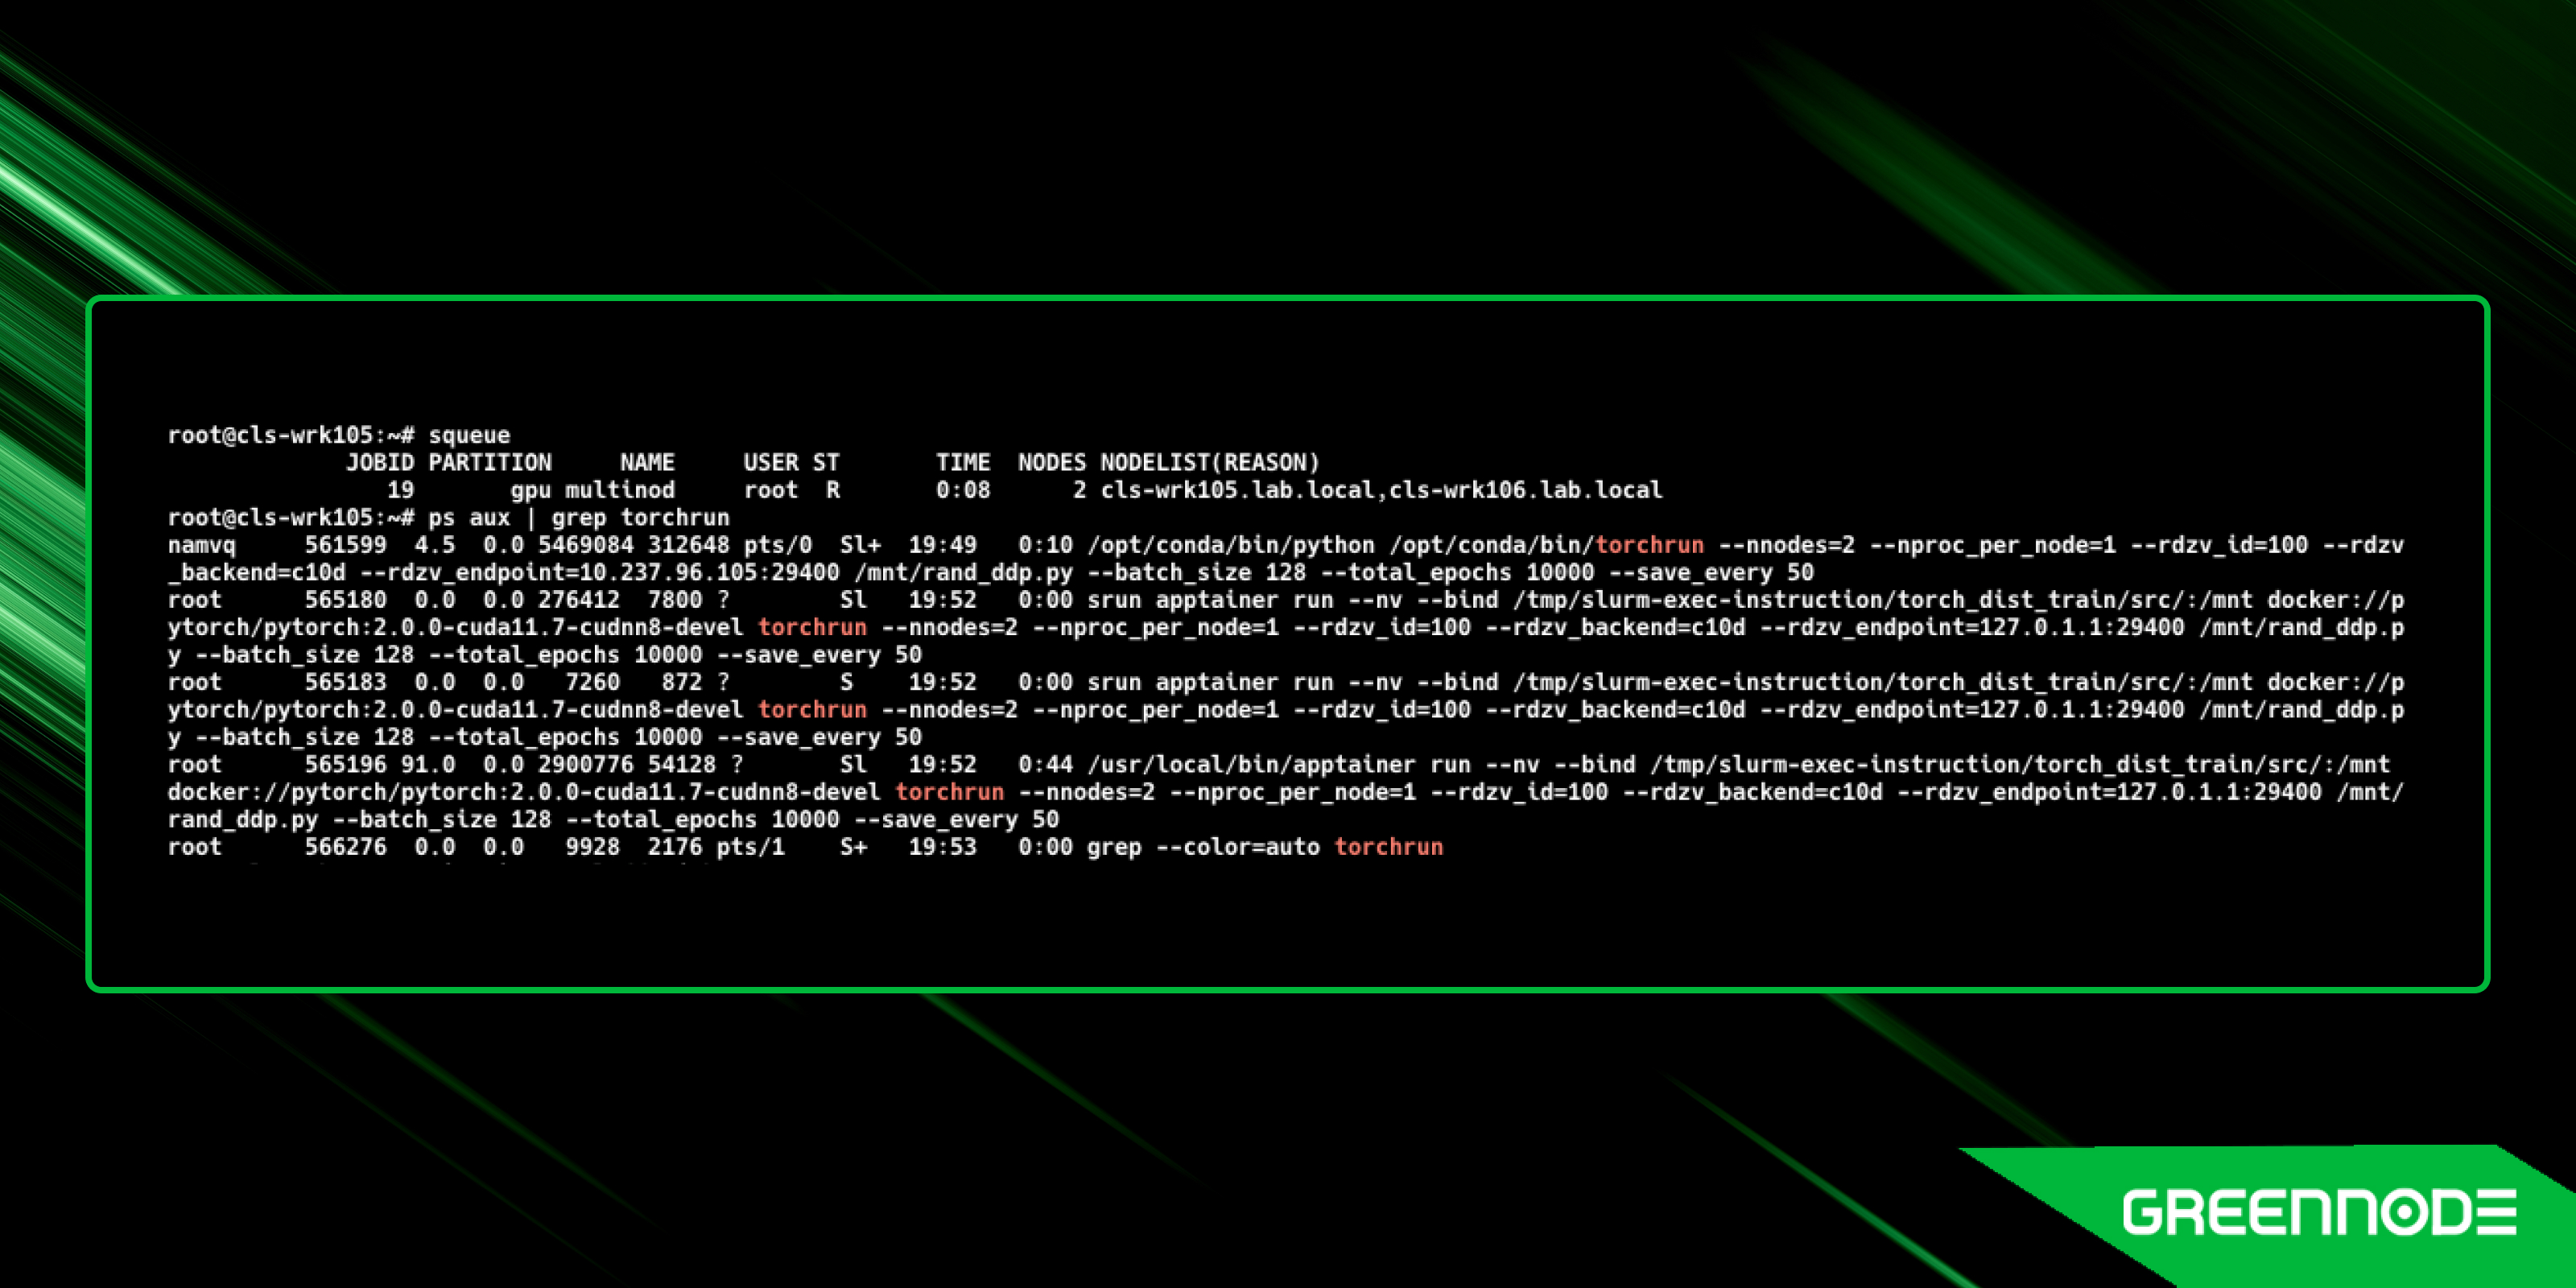
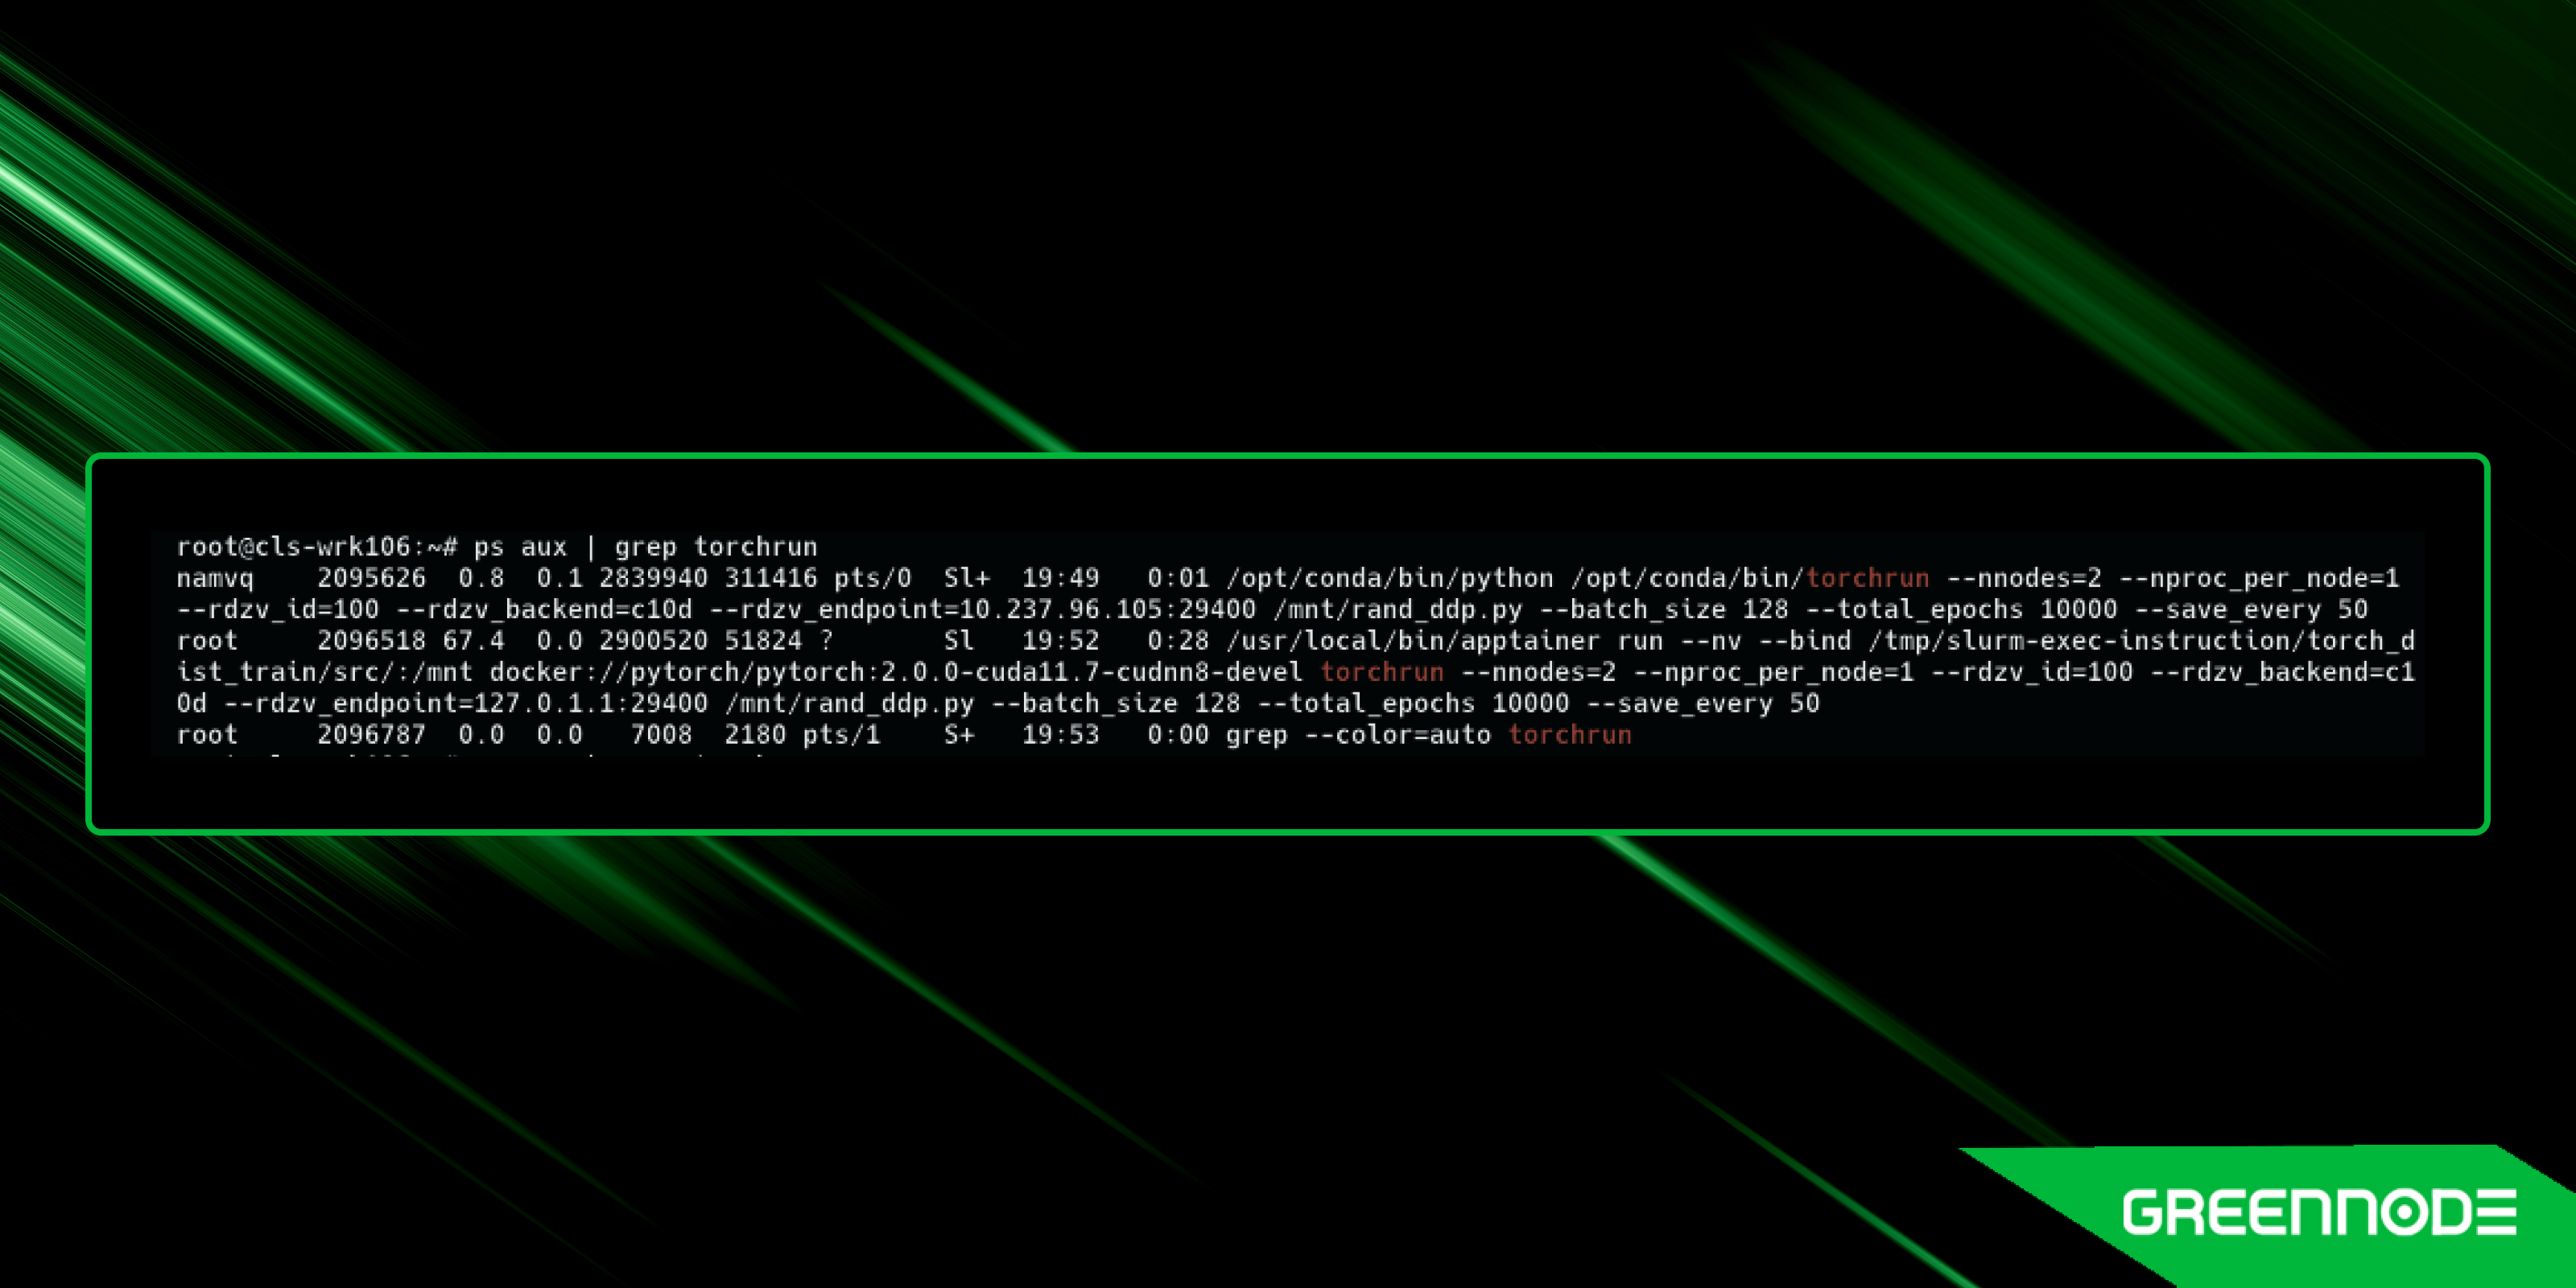
root@cls-wrk105:~# sbatch ./sbatch_torchrun_ddp.job Slurm will schedule the job on the compute nodes and run the PyTorch DDP job using the specified resources. You can monitor the job using the squeue command and check the output files for the job.
Process running on cls-wrk105:
Process running on cls-wrk106:
Output file template was defined in sbatch_torchrun_ddp.job:
#SBATCH -o /tmp/multinode-random.%N.%J.%u.out # STDOUT Here is sample output of job ID 19 run on cls-wrk105 by user root
root@cls-wrk105:~# cat /tmp/multinode-random.cls-wrk105.19.root.out You can see the sample output as follows:
.....
starting main
delete snapshot file
starting main
delete snapshot file
using backend NCCL
====================
0
====================
using backend NCCL
====================
0
====================
____________________
cuda:0
____________________
____________________
cuda:0
____________________
[GPU0] Epoch 0 | Batchsize: 64 | Steps: 1
[GPU1] Epoch 0 | Batchsize: 64 | Steps: 1
.....
Conclusion
Setting up a SLURM cluster for AI engineers can greatly improve the efficiency and scalability of your compute resources. This guide has equipped you with the knowledge to set up and optimize your SLURM cluster for maximum AI productivity.
By following the steps outlined in this guide, you've unlocked the immense potential of a SLURM cluster specifically tailored for AI projects. SLURM’s powerful job scheduling and resource management capabilities make it an essential tool for managing complex AI projects. We hope this guide has been helpful in setting up your SLURM cluster and optimizing your AI workflows. Follow GreenNode’s newsletter on LinkedIn for more valuable insights and in-depth knowledge of the fast-paced AI industry.
