

Why Even Bother With Bot Tokens?
You have already deployed OpenClaw on AgentBase—nice work. Your agent is up and running, but there is still one friction point: every time you want to use it, you have to open the OpenClaw Gateway in a browser.
That becomes inconvenient fast when you are away from your desk and only have your phone. Maybe you want the agent to summarize a document, check something quickly, or remind you about a deadline—but you do not have a clean entry point.
Now imagine your agent is reachable directly through Telegram.
- You are in a meeting and need the agent to look something up immediately → send a Telegram message and get the result in seconds.
- You want the agent to push an automated report every morning at 8:00 → configure it once and let the workflow run.
- Your team shares a single agent → everyone can interact with it without sharing Gateway access.
That sounds useful, but this is also the point where many users get stuck because terms like bot token, pairing mode, and allow list feel more complex than they should.
No worries—this guide breaks the entire setup down into practical steps you can complete in about 10 to 15 minutes.
Article Roadmap
- Understand the connection model and why a bot token is required.
- Step 1 — Create a Telegram bot and retrieve a token from
@BotFather. - Step 2 — Configure Telegram in AgentBase during deployment.
- Step 3 — Pair your Telegram account with the bot.
- Step 4 — Use an allow list to grant team access.
- Step 5 — Manage multiple user sessions.
- Review real-world usage scenarios.
- Use the final checklist for repeatable setup.
Section 1: How the Integration Works
What Are OpenClaw, AgentBase, and Telegram in This Stack?
OpenClaw is your AI agent. It can browse the web, run commands, read files, generate code, and execute task flows, but it needs an LLM as its reasoning layer.
AgentBase is the infrastructure layer that lets you run OpenClaw with a one-click deployment model, without having to manage runtime, credentials, monitoring, or operational plumbing manually.
Telegram Bot acts as the messaging interface between you and OpenClaw. Instead of going through the browser-based Gateway each time, you can interact with the agent directly from Telegram.
Connection Flow
You → Telegram → AgentBase Gateway → OpenClaw Agent → LLM → Telegram response
Two Connection Modes
| Mode | Description | Best For |
|---|---|---|
| Pairing Mode | A user must request access and be explicitly approved before messaging the agent. | Personal use or private agents. |
| Allow List Mode | The admin whitelists specific Telegram user IDs, and those users can message the bot immediately. | Small teams sharing the same agent. |
Telegram supports both models, and you can combine them depending on how tightly you want to control access.
Step 1: Create a Telegram Bot and Get the Token From @BotFather
Why This Step Matters
Telegram requires every bot to be registered through @BotFather, the platform’s official bot management account. Once the bot is created, BotFather issues a Bot Token, which works like an API credential that allows OpenClaw to control that bot.
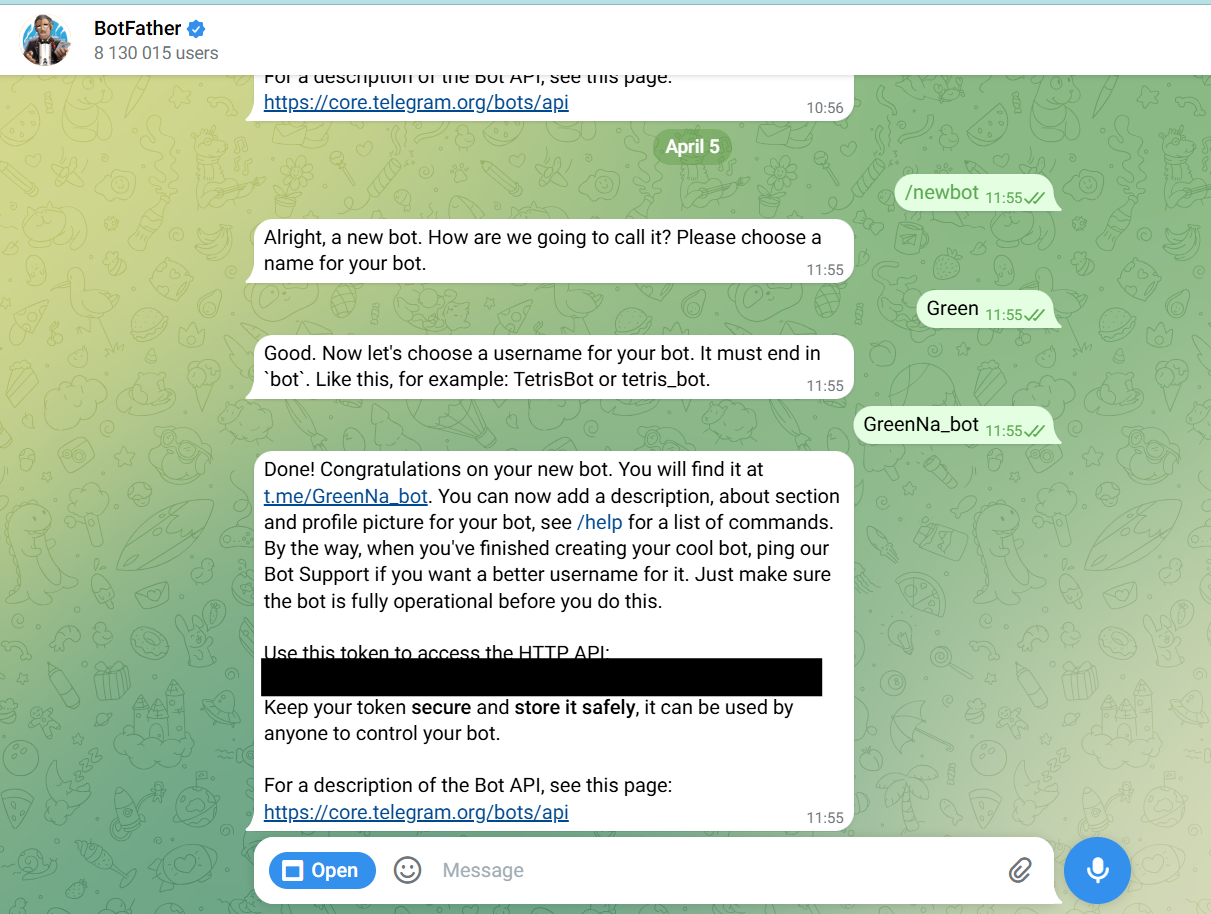
Procedure
- Open Telegram and search for
@BotFather. - Click Start or send
/start. - Send
/newbotto create a new bot. - Provide the requested values:
- Bot name — for example:
Hana OpenClaw Assistant - Bot username — for example:
hana_openclaw_bot(must end withbot)
- Bot name — for example:
- Copy the generated Bot Token and store it securely.
Expected Result
- Success: you have a Telegram bot such as
@hana_openclaw_bot. - Success: the Bot Token has been copied and stored safely.
- Error: the username is already taken → choose another one.
- Error: BotFather does not respond → verify your connection and retry later.
Step 2: Configure Telegram in AgentBase During Deployment
Why This Step Matters
AgentBase needs the Bot Token so it can bind your Telegram bot to the deployed OpenClaw instance and configure the message delivery path correctly.
Procedure
- Open the Agent Marketplace in AgentBase.
- Click Deploy OpenClaw With 1 Click!
- In the optional channel configuration section:
- Select Telegram
- Paste your Bot Token
- Click Deploy.
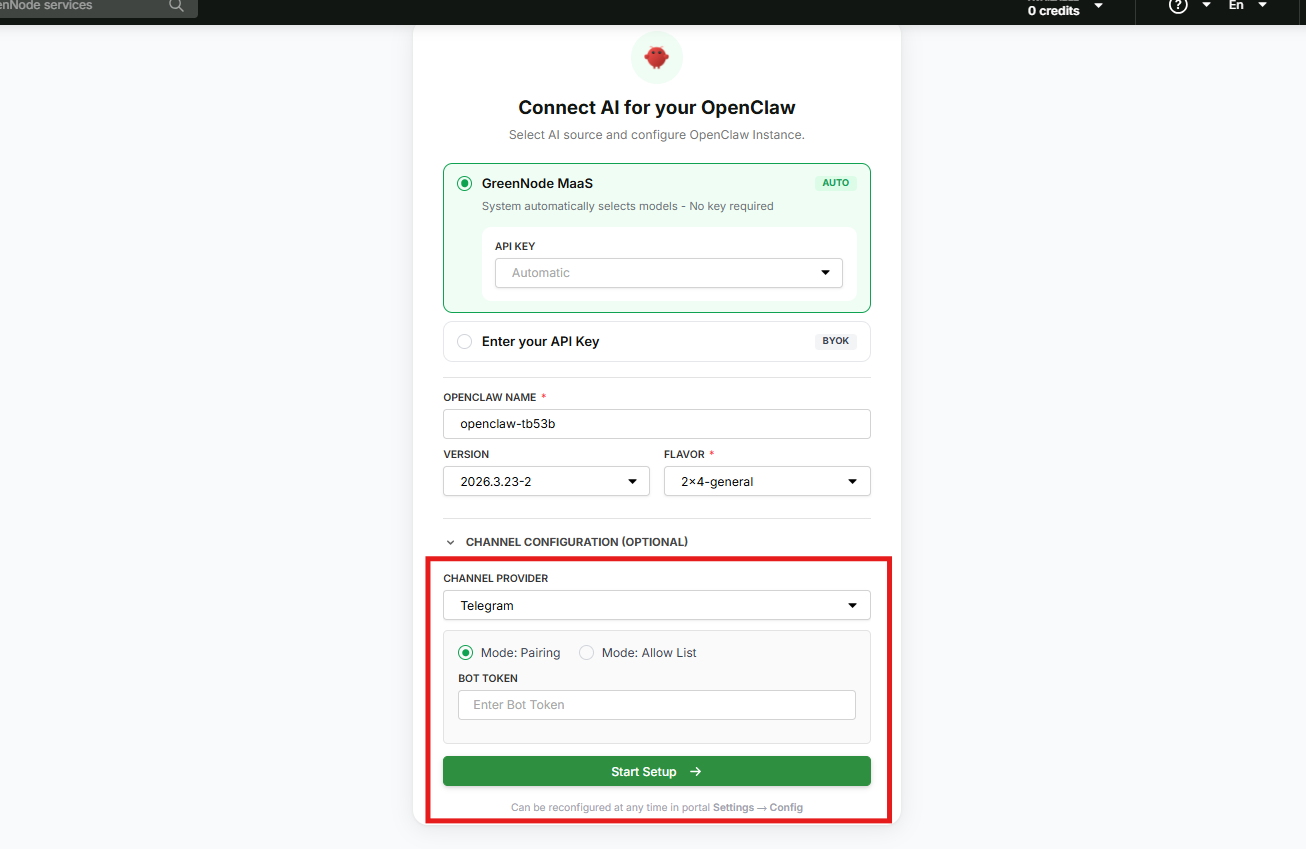
AgentBase will automatically:
- create the OpenClaw instance,
- bind the Telegram bot to that instance,
- and configure the webhook so incoming Telegram messages are routed correctly.
Expected Result
- Success: deployment finishes and the instance status becomes
Online. - Success: you receive the OpenClaw Gateway URL.
- Success: the Telegram bot is active and ready for testing.
- Error:
Invalid bot token→ verify the token string and remove extra spaces. - Error: deployment fails → review logs in the AgentBase Dashboard.
Step 3: Pair Your Telegram Account With the Bot
Why Pairing Is Required
After deployment, the bot is technically online, but it is not yet associated with any Telegram user account. Pairing establishes that trust link between your Telegram identity and the OpenClaw instance.
Pairing Workflow
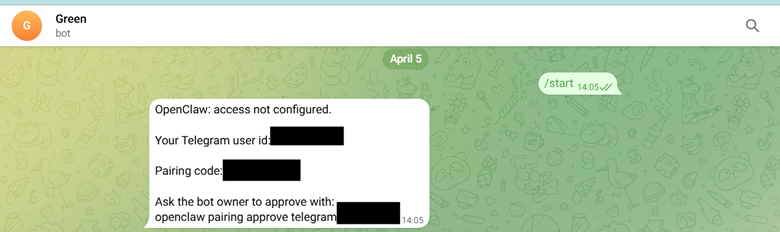
- Open Telegram and find your bot.
- Click Start or send
/start. - The bot returns a pairing code, for example:
Your pairing code is: ABC123DEF456
Please run this command in OpenClaw:
openclaw pairing approve telegram ABC123DEF456- Open the OpenClaw Gateway Dashboard from AgentBase.
- Approve the pairing code using one of these methods:
Option 1: Approve Pairing in the Dashboard Chat
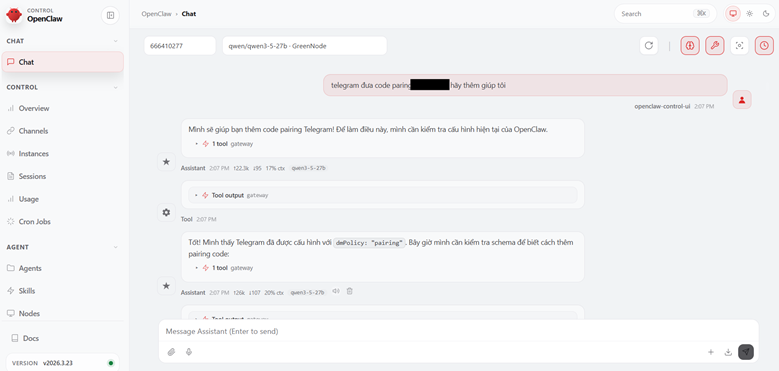
- Locate the chat input inside the Dashboard UI.
Run:
openclaw pairing approve telegram ABC123DEF456- Wait for confirmation.
Option 2: Approve Pairing in Console or Terminal
- Open the Console or Terminal section.
Run:
openclaw pairing approve telegram ABC123DEF456
Validation
- Confirm that pairing succeeded in the Dashboard.
- Send a test message in Telegram such as:
Hello, who are you? - The bot should reply immediately.
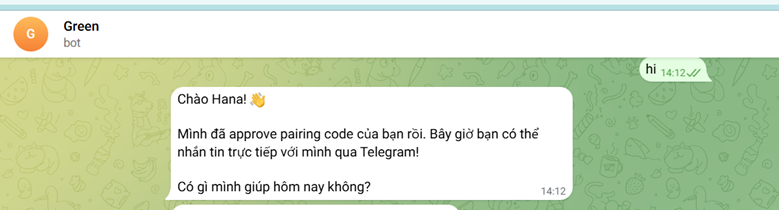
Expected Result
- Success: the bot responds to your Telegram messages.
- Success: your user appears in the
Connected Userslist. - Success: bidirectional chat is working.
- Error:
Pairing code expired→ restart the bot chat with/startto get a new code. - Error:
Invalid pairing code→ verify the pasted code. - Error: no response from the bot → confirm the instance is still online.
Step 4: Use Allow List Mode for Team Access
Why an Allow List Is Useful
Once your own Telegram account is connected, the next logical step is team access. If you want multiple teammates to share the same OpenClaw agent without performing manual pairing one by one, an allow list is the simplest access-control model.
How Pairing Mode and allowFrom Work Together
Users already in allowFrom:
- can chat immediately,
- do not need a pairing code,
- and are effectively pre-approved.
Users not in allowFrom:
- must complete pairing the first time,
- are added automatically after approval,
- and can message normally afterward.
Option 1: Ask OpenClaw to Update the Allow List
- Open the OpenClaw Gateway Dashboard or message the bot directly.
- Send a natural-language instruction such as
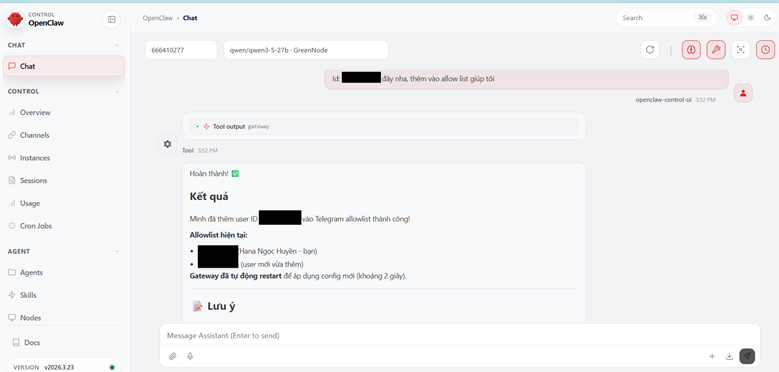
OpenClaw will then:
- check whether the user IDs are valid,
- update the allow list configuration,
- save changes and restart the gateway,
- and report the result back to you.
Option 2: Edit the Configuration Manually
- Retrieve the Telegram user ID from incoming messages in Gateway.
- Open Settings → Config in OpenClaw Gateway.
- Find
telegram → allowFromand append the relevant user IDs.
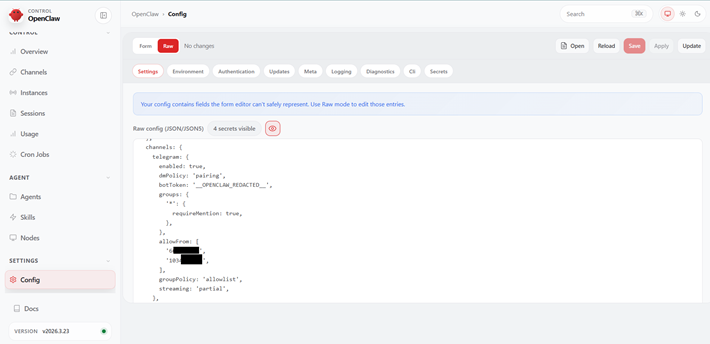
4. Click Save & Restart Gateway.
Expected Result
- Success: users in the allow list can message the bot immediately.
- Success: unauthorized users cannot use the bot unless paired and approved.
- Success: the gateway reloads the updated configuration correctly.
- Error: a listed user still cannot chat → verify the Telegram user ID.
- Error: user lookup fails → validate that the ID is correct.
- Error: gateway restart fails → inspect logs in the Dashboard.
Step 5: Manage Sessions for Multiple Users
Why Session Isolation Matters
When multiple people access the same Telegram-connected agent, each user gets an isolated session. That means chat history is segmented per user, admins retain visibility across sessions, and users do not see one another’s conversations.
How Sessions Behave
User A might have session telegram:66... with a history focused on weather lookups, while User B might have session telegram:103... focused on summarization or document interpretation.
From the admin side, the Dashboard exposes these as distinct session entries with metadata such as last message and current status.
Option 1: Review Sessions in the Dashboard
- Open the OpenClaw Gateway Dashboard.
- Go to the Sessions tab.
- Inspect the list of active user sessions.
- Click a session to view its chat history.
Option 2: Use the CLI
# List all sessions
openclaw sessions list
# Inspect a specific session
openclaw sessions get telegram:1034442564
Permissions Model
| Role | Visibility |
|---|---|
| Admin | Can inspect all sessions and all histories. |
| Standard user | Can only see their own conversation context. |
Expected Result
- Success: each user has a separate session context.
- Success: the admin can monitor all active sessions.
- Success: sessions can be filtered by user or activity timestamp.
- Error: a new user session is missing → that user has not sent any messages yet.
- Error: a session is inactive → check allow-list membership and connectivity.
Real-World Practice
Case 1: Business Analyst Uses Telegram for Daily Email Summaries
Use case: every morning, the BA spends roughly 30 minutes reading email threads and extracting action items for the team.
- Connect OpenClaw to Telegram.
- Create an OpenClaw skill such as
Email Morning Summary. - Set the trigger to 8:00 a.m. daily.
- Configure the action flow: read new mail → summarize → push the digest into Telegram.
- Add the team to the allow list.
Operational outcome: the team receives a concise summary every morning, action items are surfaced clearly, and the BA no longer has to do the triage manually.
Case 2: Dev Team Uses Telegram for Production Monitoring
Use case: the engineering team spends too much time checking logs manually.
- Connect OpenClaw to Telegram.
- Create a monitoring workflow that reads production logs, detects warnings or failures, and pushes alerts to Telegram.
- Add the dev team to the allow list.
Operational outcome: the team receives real-time alerts, avoids constant manual log inspection, and reduces response time significantly.
Additional Resources
Tips and Best Practices
Store the Bot Token Securely
Never keep the token in a public repository or open document. Use a password manager, an encrypted local file, or environment variables in development workflows.
Test Pairing Before Rolling Out the Allow List
Validate the integration with your own Telegram account first, then test with one or two teammates before enabling team-wide access.
Use Sessions for Monitoring and Support
The Sessions view is useful for tracing user activity, understanding what people are asking, and debugging runtime or prompt-flow issues in production.
Let OpenClaw Manage the Allow List for You
In most cases, asking OpenClaw to update the allow list is safer and faster than editing raw configuration manually.
Back Up Your Channel Configuration
If the token is lost or exposed, use /token in @BotFather to rotate it and update the AgentBase configuration immediately.
Master Setup Checklist
Telegram Setup
- Create a bot with
@BotFather. - Copy and securely store the Bot Token.
- Deploy OpenClaw on AgentBase with Telegram enabled.
- Start the bot in Telegram using
/start. - Receive the pairing code.
- Open the OpenClaw Gateway Dashboard.
- Approve the pairing command.
- Test messaging the bot from Telegram.
- Optionally add your team to the allow list.
- Verify active sessions in the Sessions tab.
Best Practices
- Store tokens in a password manager.
- Validate pairing before enabling team-wide allow-list access.
- Monitor sessions in AgentBase regularly.
- Review chat history when troubleshooting user issues.
- Use natural-language commands with OpenClaw to manage allow-list membership.
- Keep a backup plan for token rotation and channel reconfiguration.
