

Your team already uses Zalo every day, which makes it the most practical channel for accessing OpenClaw in a real working environment. If you have already deployed OpenClaw on AgentBase but still need users to open the Gateway in a browser every time, integrating Zalo can make access much more convenient.
This becomes especially useful when someone is away from their desk and only has a phone, but still needs the agent to summarize a document, answer a question, or retrieve information quickly.
The solution is to connect OpenClaw to Zalo.
- You can message the agent through Zalo and get quick answers during meetings or while on the go.
- Your team does not need to install or learn another app.
- The agent becomes available inside an existing communication workflow your team already uses.
In this guide, we will walk through the full setup process step by step.
Article roadmap
- How the integration works and how Zalo bots differ from Telegram bots.
- Step 1 - Create a Zalo bot and get the token.
- Step 2 - Configure Zalo during OpenClaw deployment on AgentBase.
- Step 3 - Pair your Zalo account with the bot.
- Step 4 - Use an allow list to control team access.
- Step 5 - Manage sessions for multiple users.
- Real-world practice and example use cases.
- A master checklist you can reuse later.
How the Integration Works
How is a Zalo bot different from a Telegram bot?
At a high level, the setup model is similar: both platforms use a bot token, support pairing, allow access control, and create separate sessions for each user. However, the provisioning flow and channel limitations are different on Zalo.
Key differences
- Bot creation platform: Telegram bots are typically created through BotFather, while Zalo bots are created through
bot.zaloplatforms.com. - Token format: Telegram tokens usually follow a
number:letterspattern, while Zalo tokens use thenumeric_id:secretformat. - Setup time: The source article estimates around 5 minutes for Telegram and 5 to 10 minutes for Zalo.
- Channel maturity: The article describes the Zalo channel as experimental.
- User ID format: Telegram commonly uses numeric IDs, while Zalo user IDs are described as strings.
Connection flow
User → Zalo → AgentBase Gateway → OpenClaw Agent → LLM → Response back through Zalo.
Two access modes
- Pairing Mode: A user sends an initial message, receives a pairing code, and must be approved before they can start chatting. This works best for personal use or private agent access.
- Allow List Mode: An admin adds user IDs to an approved list, and anyone on that list can start messaging the bot immediately. This is a better fit for team usage.
Step 1 - Create a Zalo Bot and Get the Token
Why this step matters
Zalo requires you to register a bot before you can obtain the bot token needed to connect the channel to OpenClaw. Without that token, AgentBase cannot control the bot or route messages through it.
Zalo bot experimental status
The source blog states that the Zalo channel is currently in an experimental state, which affects feature coverage and reliability.
- Direct Messages (DM): Fully supported.
- Media: Limited support, with possible instability for images or files.
- Groups: Not available for Marketplace bots.
- Streaming: Blocked because of the 2000-character limit.
How to create the bot
Create the bot on Zalo Platform
- Go to https://bot.zaloplatforms.com.
- Sign in with your Zalo account.
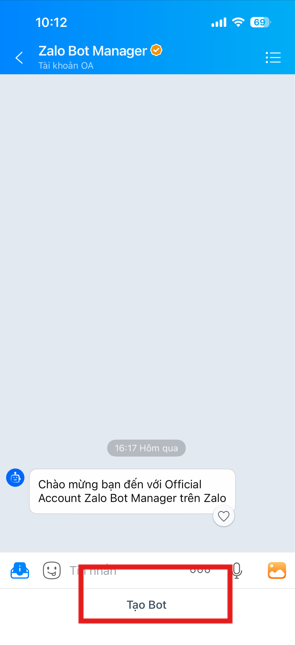
3. Create a new bot and configure the basic settings:
- Set a bot name.
- Upload an avatar if needed.
- Fill in the bot profile details.
4. Copy the bot token in the format numeric_id:secret.
Example token format: 1234567890123456789:abcXYZexampleTokenSecretKey123
Store the token securely and make sure you copy the full value, including both the numeric ID and the secret portion.
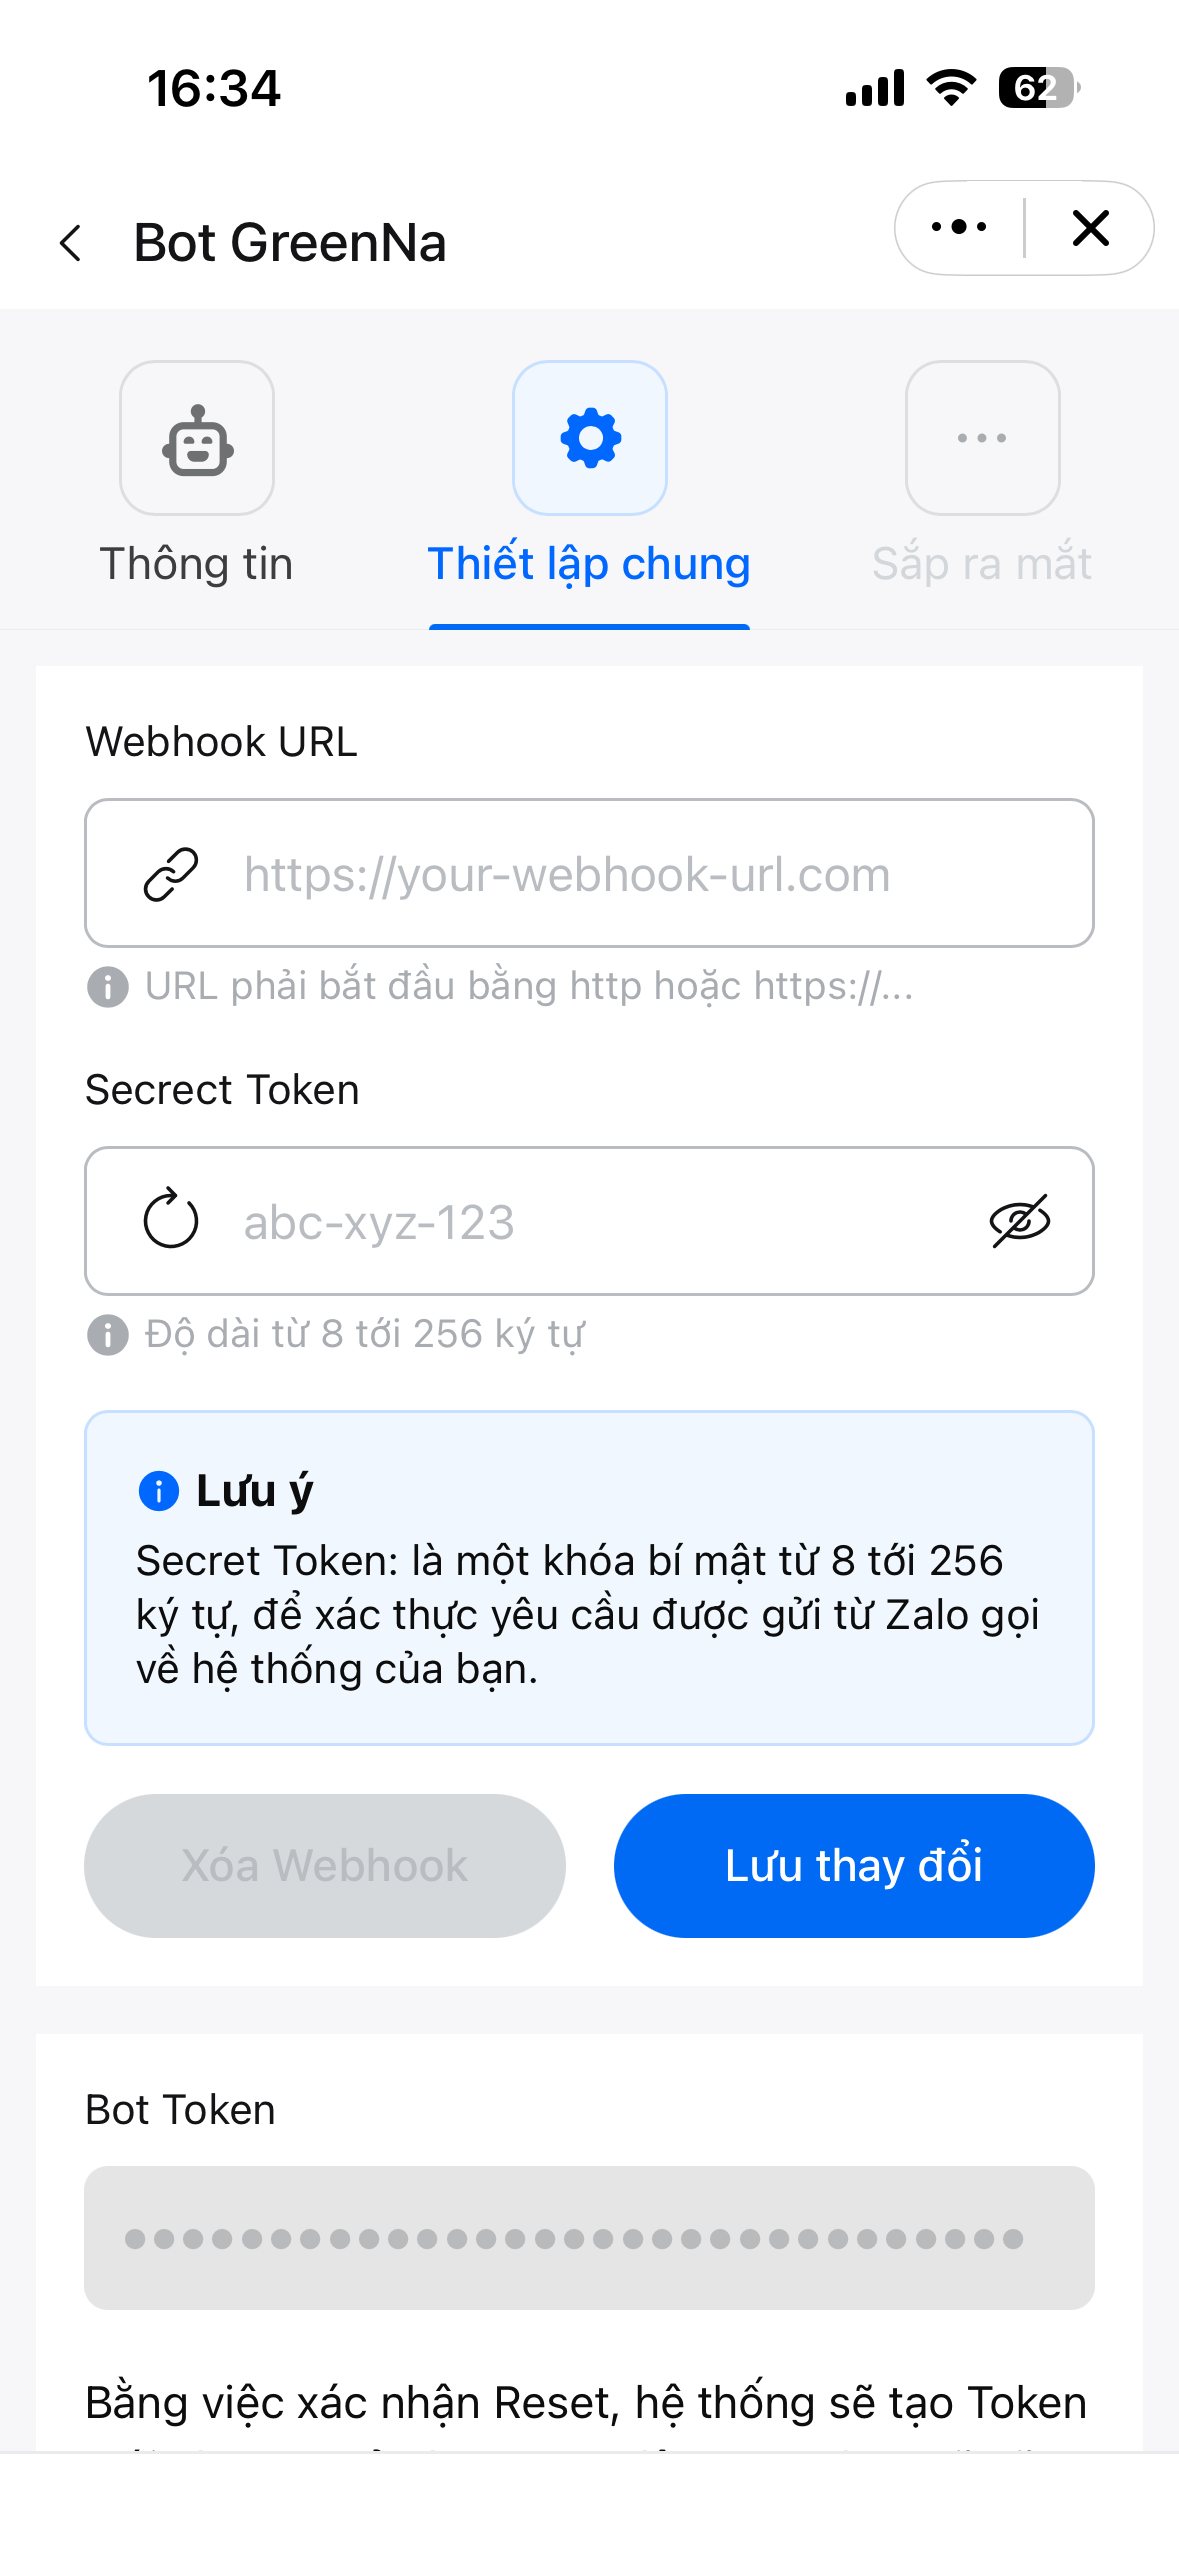
Expected result
- Success: You have a Zalo bot token in the
numeric_id:secretformat. - Success: The bot has been created successfully on Zalo Platform.
- Error: If you cannot find the token, review the bot settings page.
- Error: If the format looks wrong, make sure the
:secretsegment was not omitted.
Tip
Zalo bot tokens are different from Telegram tokens and may be longer, so it is important to copy the entire string carefully.
Step 2 - Configure Zalo During Deployment on AgentBase
Why this step matters
AgentBase needs your bot token so it can attach the Zalo bot to your OpenClaw instance and configure message delivery correctly.
How to configure it
Set up Zalo during the one-click deployment flow
- Open the Agent Marketplace in AgentBase.
- Click Deploy OpenClaw With 1 Click!
- In the Channel Configuration (Optional) section:
- Select Zalo.
- Paste the bot token from Step 1.
- Confirm that the token follows the
numeric_id:secretformat.
- Click Deploy.
According to the article, AgentBase will then automatically create the OpenClaw instance, connect the Zalo bot, and configure the webhook required for incoming messages.
Expected result
- Success: Deployment completes and the instance status becomes Online.
- Success: You receive the OpenClaw Gateway URL.
- Success: The Zalo bot is ready to receive messages.
- Error: If you see
Invalid bot token, check the token format again. - Error: If deployment fails, inspect the logs in the AgentBase Dashboard and retry.
Tip
Once deployment is complete, you can immediately message the Zalo bot to trigger the pairing flow.
Step 3 - Pair Your Zalo Account with the Bot
Why pairing is required
After deployment, the Zalo bot is online but not yet linked to any user account. Pairing is the mechanism that associates your Zalo account with the OpenClaw instance.
Pairing workflow
- Open Zalo and find your bot.
- Send a message such as
/startor a simple greeting. - The bot will return an 8-character pairing code.
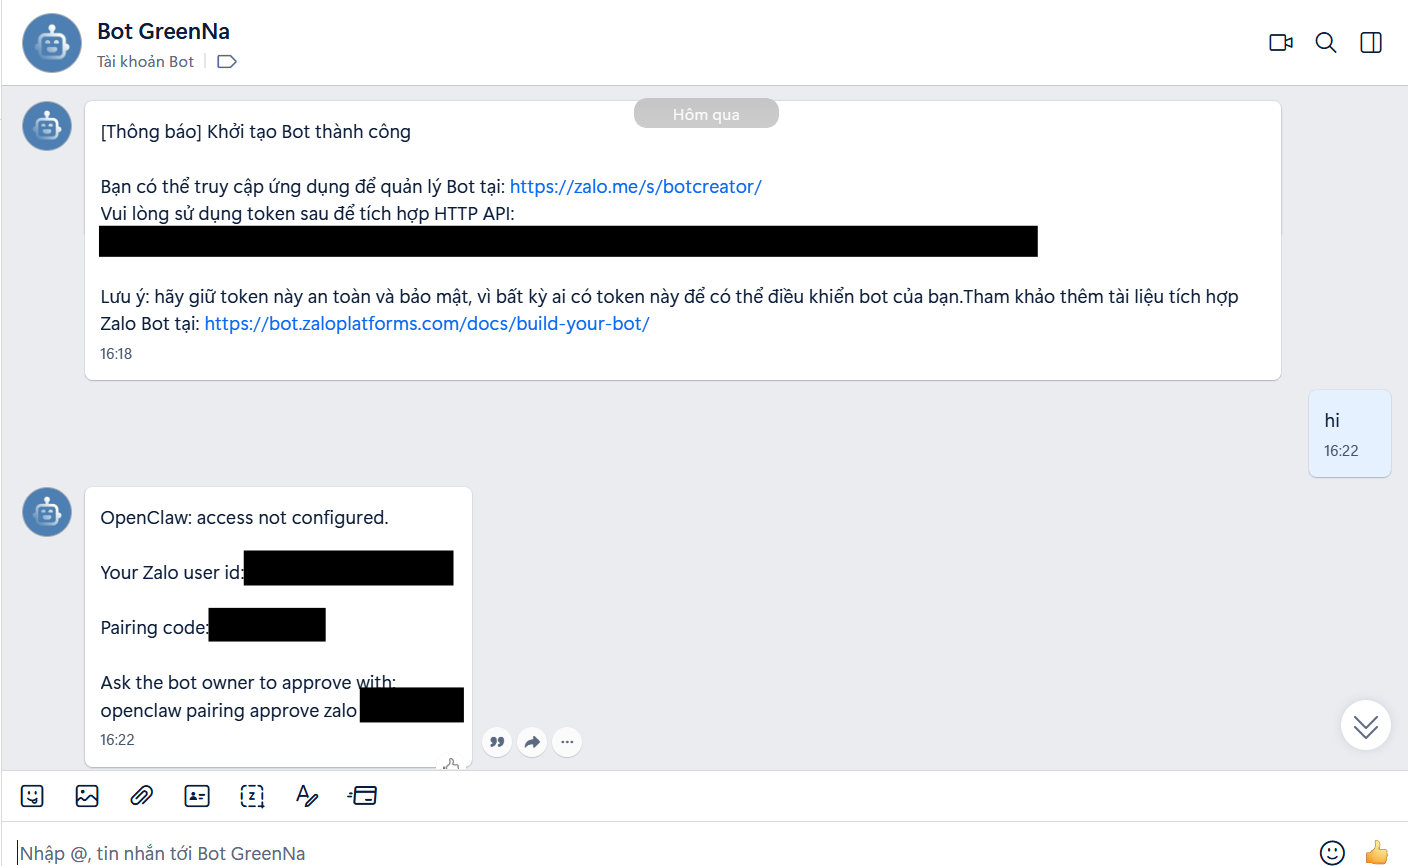 4. Open the OpenClaw Gateway Dashboard:
- From your My Agents Dashboard on AgentBase.
- Click "Open" to enter Gateway
5. Approve the pairing code using one of the methods below.
Mehtod 1: Locate the chat input in the Dashboard interface.
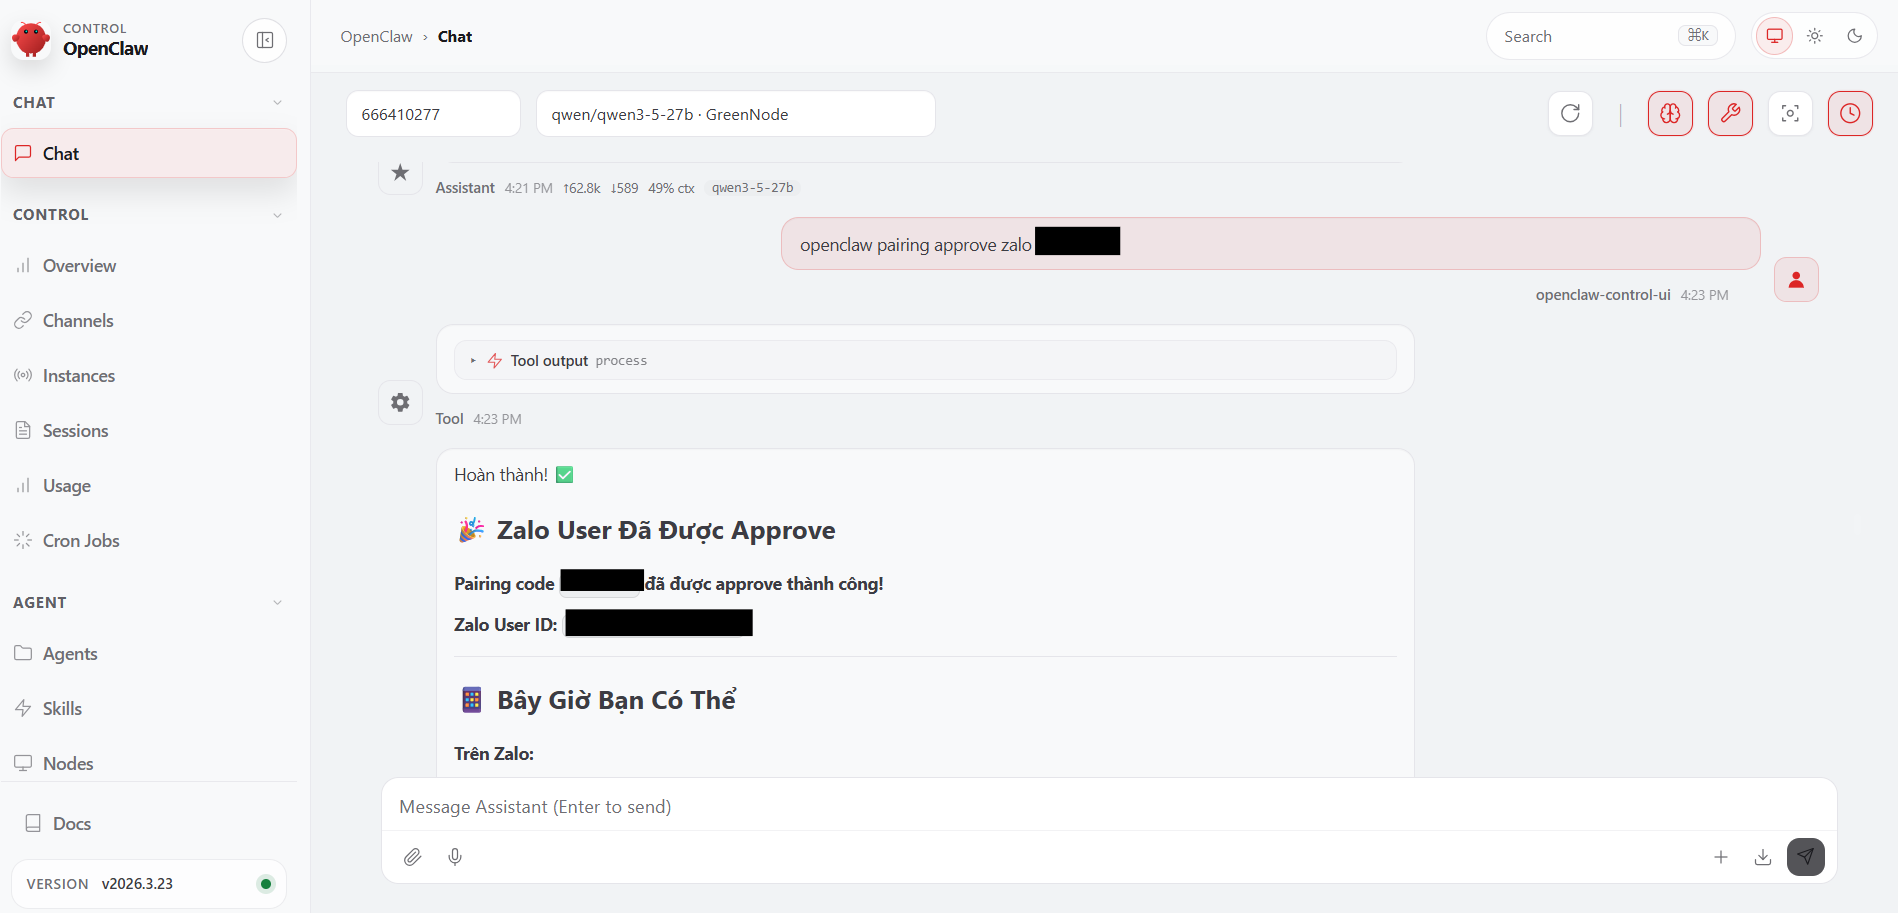
- Run the command:
openclaw pairing approve zalo EXMP1234 - Press Enter and wait for confirmation.
Method 2 - Approve from Console or Terminal
- Open the Console or Terminal section.
- Run the command:
openclaw pairing approve zalo EXMP1234.
Important notes
- The pairing code expires after 1 hour.
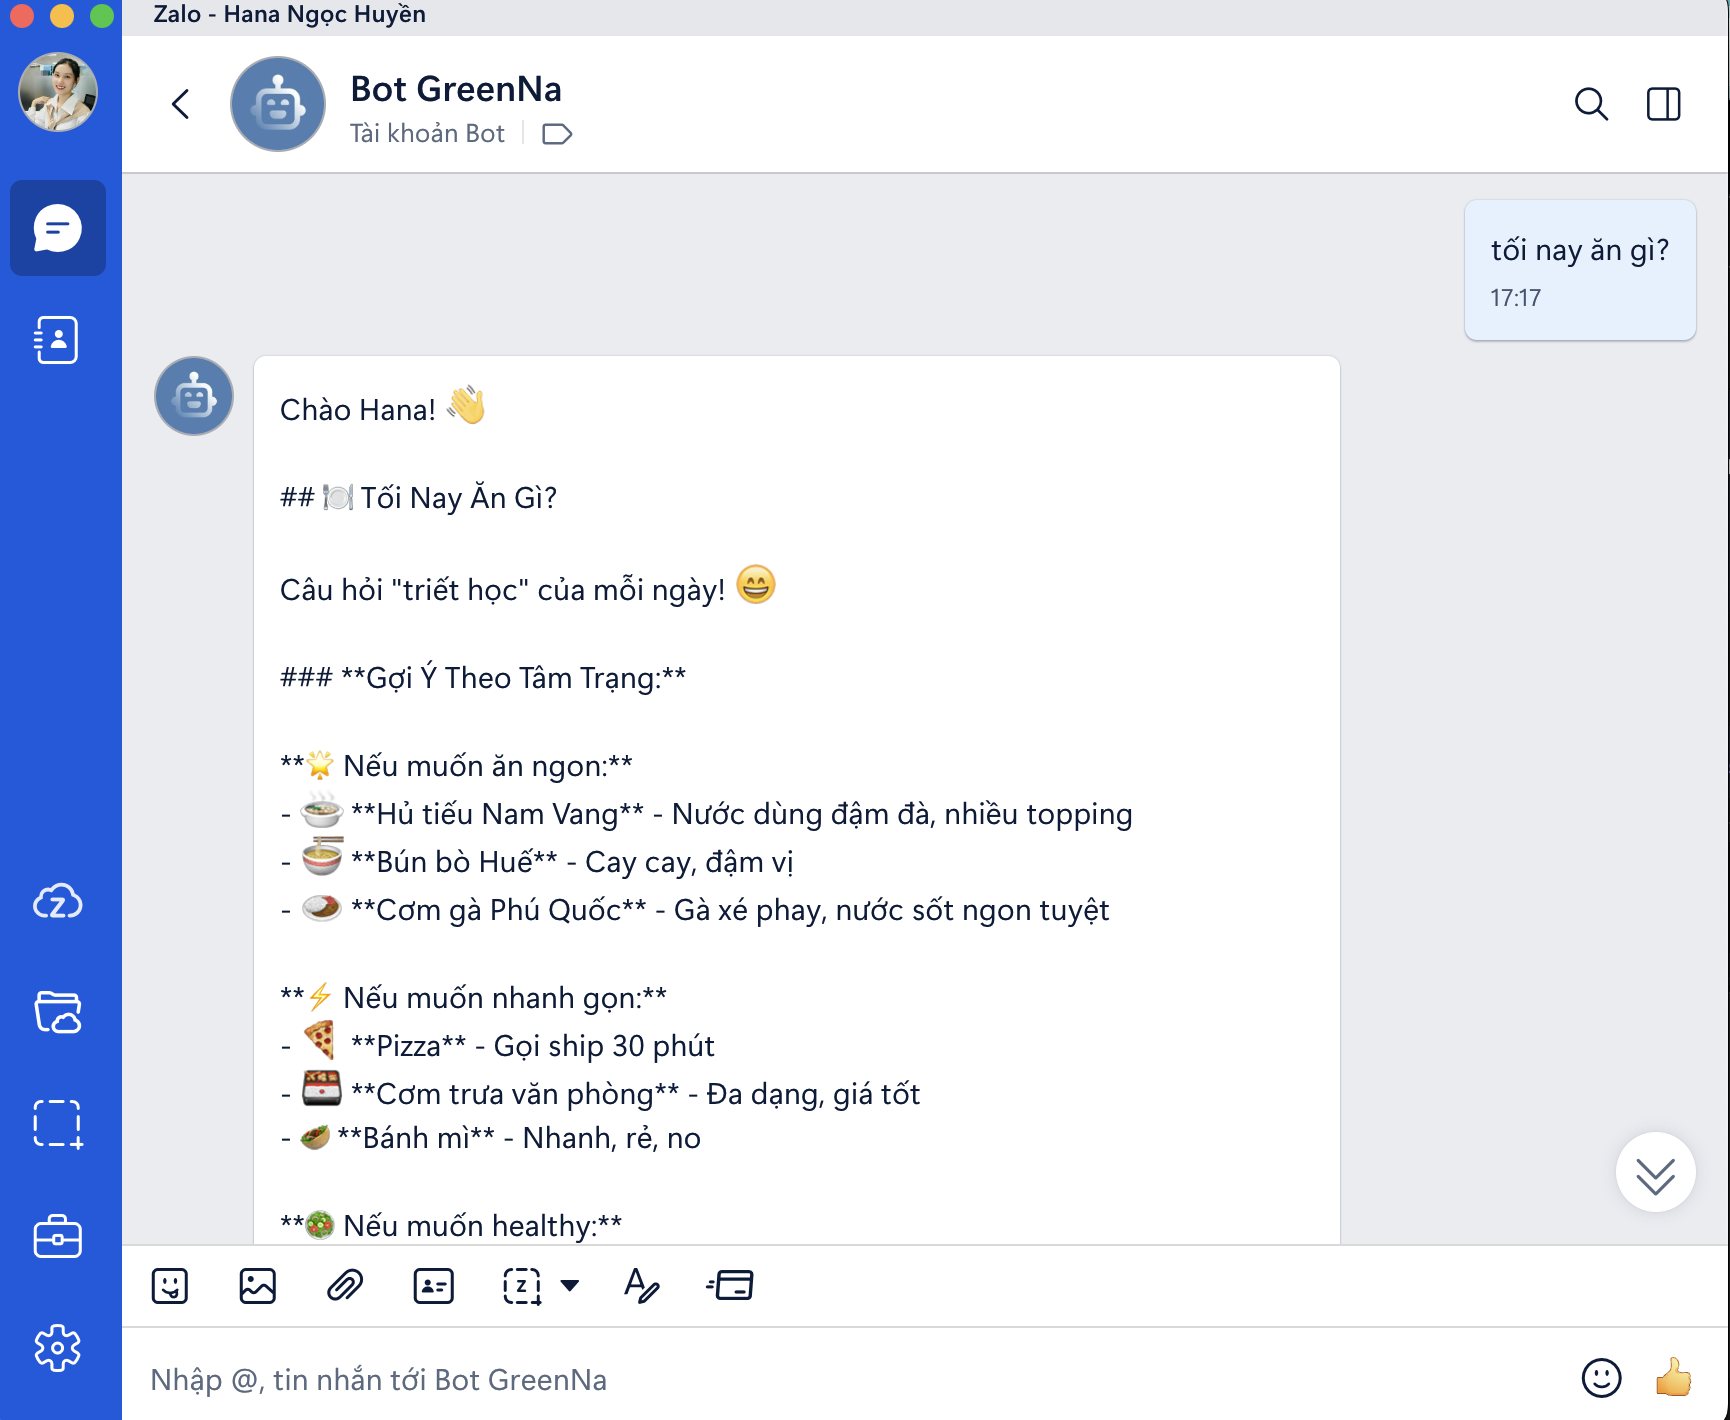
- Once pairing succeeds, the bot will send a welcome message through Zalo.
- You can then send a normal message to verify that two-way communication is working.
Expected result
- Success: The bot responds to your messages in Zalo.
- Success: Your account appears in the Dashboard under connected users.
- Success: Your Zalo user ID is stored.
- Success: Two-way chat works correctly.
- Error: If the pairing code expires, request a new one by sending
/startagain. - Error: If the code is invalid, verify that all 8 characters are correct.
- Error: If the bot does not respond, check whether the instance is still online.
Tip
The article notes that after a successful pairing, the user is automatically added to the allow list, so future messages usually do not require pairing again. It also reiterates that the Zalo channel is experimental, with limited media support and no group support.
Step 4 - Use an Allow List to Control Team Access
Why use an allow list
An allow list is useful when multiple people need access to the same OpenClaw agent through Zalo and you want a centralized way to control who can chat with it. It also removes the need for every user to go through the full pairing flow manually.
How Pairing Mode and allowFrom work together
Users already in allowFrom
- Can chat immediately.
- Do not need a pairing code.
- Are effectively pre-approved.
Users not yet in allowFrom
- Need to complete pairing the first time.
- Are automatically added after approval.
- Can chat normally afterward without repeating the pairing step.
How to add users to the allow list
Method 1 - Ask OpenClaw to add the user
- Open the OpenClaw Gateway Dashboard or chat directly with the bot.
- Send a request to add a user to the Zalo allow list.
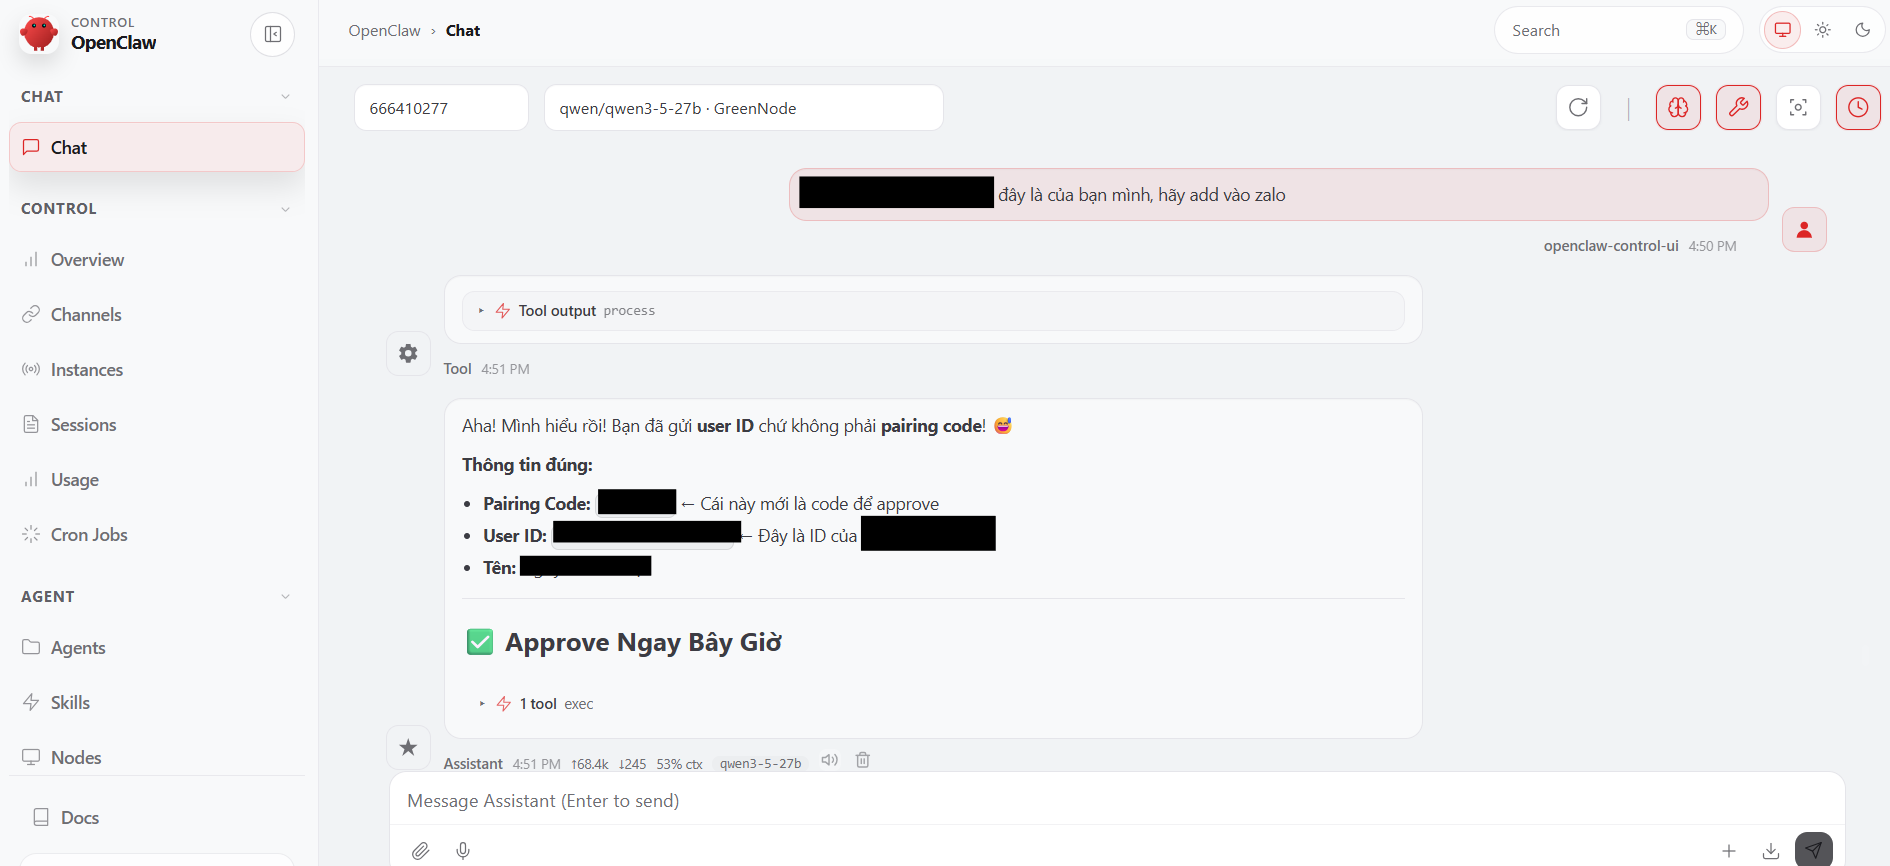
3. According to the source article, OpenClaw can then check the user, update the allow list configuration, save the change, restart the gateway if needed, and return the result.
Method 2 - Edit the configuration manually
- Get the user ID from the incoming Zalo messages in OpenClaw Gateway.
- Go to Settings → Config.
- Find the
zalo → allowFromsection and add the user ID.
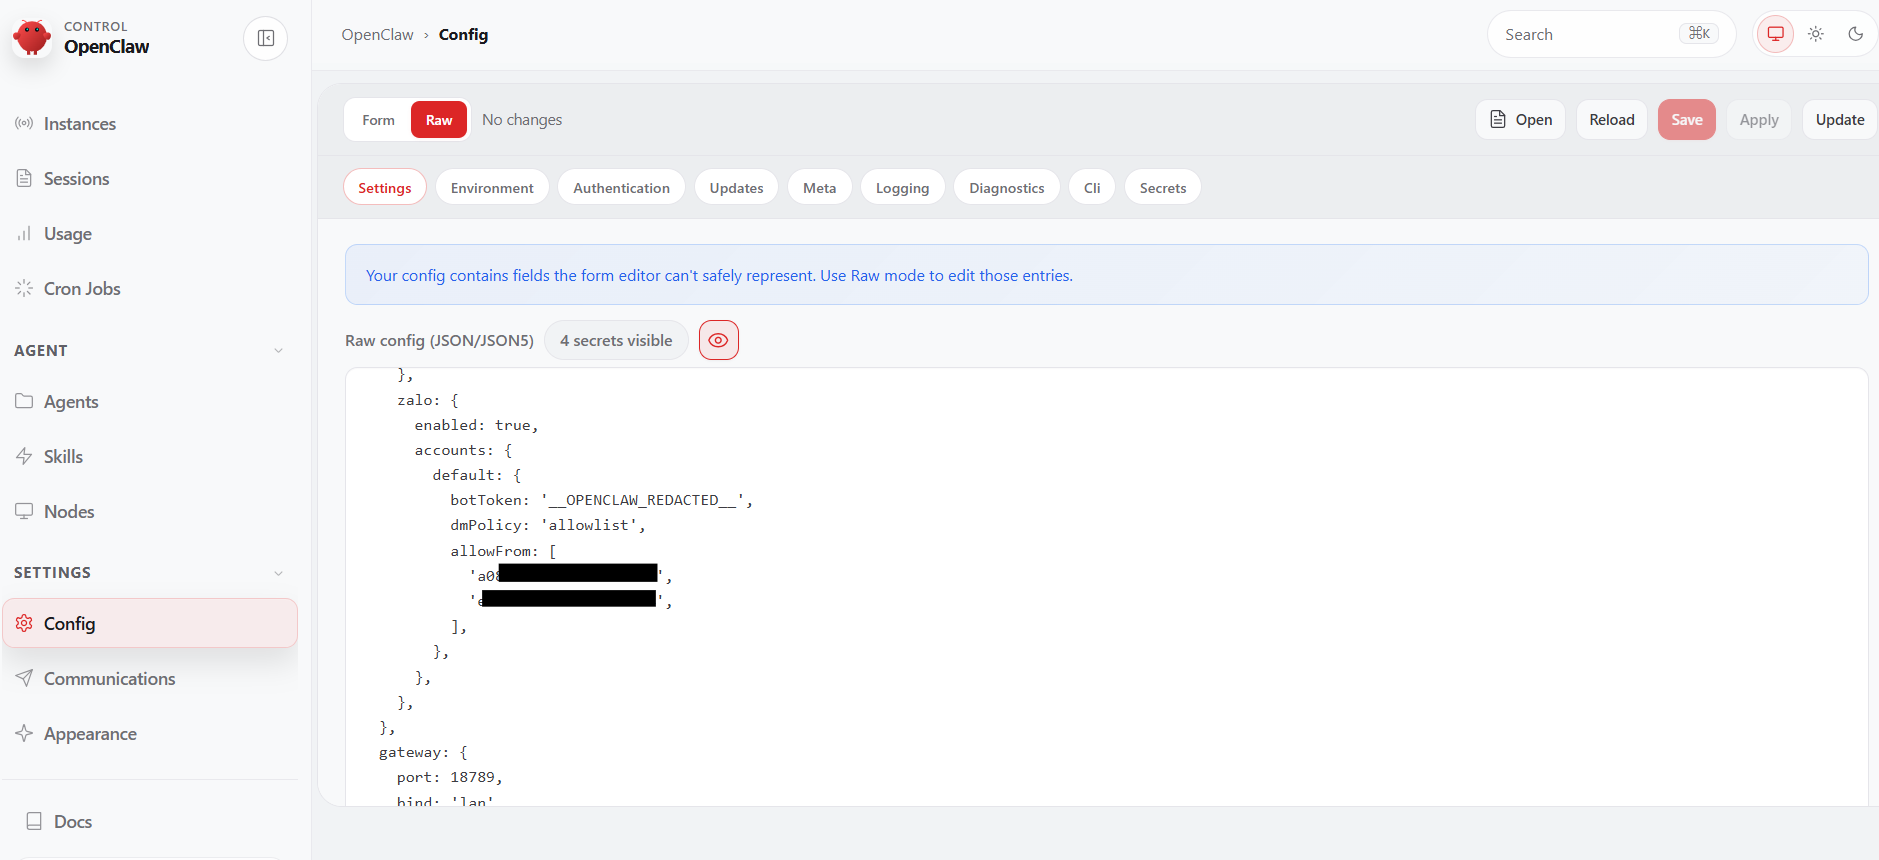
4. Click Save & Restart Gateway.
What your team needs to do
Once users have been added to the allow list, they can simply message the Zalo bot and start chatting without going through pairing again.
Expected result
- Success: Approved users can message the bot immediately.
- Success: Users outside the list cannot access it.
- Success: OpenClaw can automate the add-and-restart flow when using the chat-based method.
- Error: If an approved user still cannot chat, verify the user ID.
- Error: If OpenClaw cannot find the user, recheck the source user ID.
- Error: If the gateway does not restart, inspect the Dashboard logs.
Tip
The source recommends using the chat-based method whenever possible because it is faster and usually less error-prone than editing the configuration manually.
Step 5 - Manage Sessions for Multiple Users
Why sessions matter
When multiple users share the same agent, each user gets an independent session. This keeps chat history separated and makes it easier for admins to review, support, and troubleshoot usage.
How sessions work
User A
Example session: zalo:example00user11id22
Example history: Summarize this morning's meeting...
User B
Example session: zalo:colleague33user44id55
Example history: Explain this document...
Admin view
In the Sessions tab, an admin can review active users, recent messages, and current session status.
How to inspect sessions
Method 1 - Use the Sessions tab
- Open the OpenClaw Gateway Dashboard.
- Select the Sessions tab.
- Review the list of active user sessions.
- Open an individual session to inspect its chat history.
Method 2 - Use the console
# List all sessions
openclaw sessions list

# Get details for one session
openclaw sessions get zalo:example00user11id22
Access permissions
- Admin: Can see all sessions and chat history.
- Standard user: Can only see their own conversation context.
Expected result
- Success: Each user has a separate session and conversations do not mix.
- Success: Admins can review all sessions in the Dashboard.
- Success: Sessions can be filtered by user or time.
- Error: If a new user does not appear, they may not have started a chat yet.
- Error: If a session is not working, verify that the user is included in the allow list.
Tip
Sessions are especially useful for support and operations because admins can see exactly what the user asked and how OpenClaw responded.
Real-World Practice
Use case 1 - Marketing teams creating content through Zalo
The article gives an example where a marketing team spends too much time producing campaign content manually.
Suggested setup
- Connect OpenClaw to Zalo using the steps above.
- Create a content creation skill that can:
- Receive a campaign brief.
- Generate content ideas.
- Draft content automatically.
- Add the marketing team to the allow list.
Expected outcome
- Team members can request ideas quickly through Zalo.
- Draft content can be produced automatically.
- The source estimates time savings of 2 to 3 hours per day for the team.
Use case 2 - Sales teams accessing product knowledge in the field
Another example in the article involves sales teams that need immediate product information while meeting customers.
Suggested setup
- Connect OpenClaw to Zalo.
- Create a product knowledge skill that can:
- Read product catalog information.
- Answer product questions.
- Return specifications when needed.
- Add the sales team to the allow list.
Expected outcome
- Sales staff can get answers immediately during customer conversations.
- They spend less time doing manual lookups.
- The article suggests this can improve close rates.
- The estimated time saved is around 30 minutes per salesperson per day.
Additional Resources
- Zalo Bot Platform - Create a Zalo bot and obtain the token.
- AgentBase Documentation - Official documentation for AgentBase.
- OpenClaw GitHub - OpenClaw source code and related community resources.
Tips and Best Practices
1. Store the bot token securely
The article recommends avoiding public files and instead using a password manager, an encrypted local file, or environment variables if you are working in a development environment.
2. Test Pairing Mode before rolling out the allow list
- Pair your own account first.
- Ask one or two colleagues to test the flow.
- Expand access to the full team only after the setup is stable.
3. Monitor sessions actively
- Use the Sessions tab to monitor active users.
- Review chat history to understand what users are asking.
- Filter by user to inspect a specific conversation.
- Monitor activity patterns to identify users who may need support.
4. Use OpenClaw chat to manage the allow list
- Example:
Add user xxx to the Zalo allow list. - Example:
Show me the current allow list.
This approach is described in the article as faster and less error-prone than manual configuration editing.
5. Keep the Zalo channel limitations in mind
- DM only.
- No group support.
- Limited media reliability.
- Streaming is blocked by the message length limit.
- If you need broader feature coverage, the article suggests using Telegram instead.
6. Back up your channel configuration
If you lose the token, the article suggests returning to the Zalo Platform to retrieve or regenerate the required bot configuration details.
Master Checklist
Zalo setup checklist
- Open
bot.zaloplatforms.com. - Create a Zalo bot and copy the token in
numeric_id:secretformat. - Deploy OpenClaw on AgentBase with the bot token.
- Message the Zalo bot using
/start. - Receive the 8-character pairing code.
- Open the OpenClaw Gateway Dashboard.
- Approve the pairing code from the Dashboard.
- Send a test message through Zalo.
- Optionally add your team to the allow list.
- Remember that the Zalo channel is experimental, DM-focused, and has limited media support.
- Optionally review the Sessions tab to monitor active users.
Best practices checklist
- Store the token in a password manager.
- Validate pairing before enabling team-wide access.
- Monitor sessions in the AgentBase Dashboard.
- Use chat history to support users when needed.
- Prefer chat-based allow list management whenever possible.
- Back up the channel configuration and token.
- Always keep the current experimental limitations in mind.
