

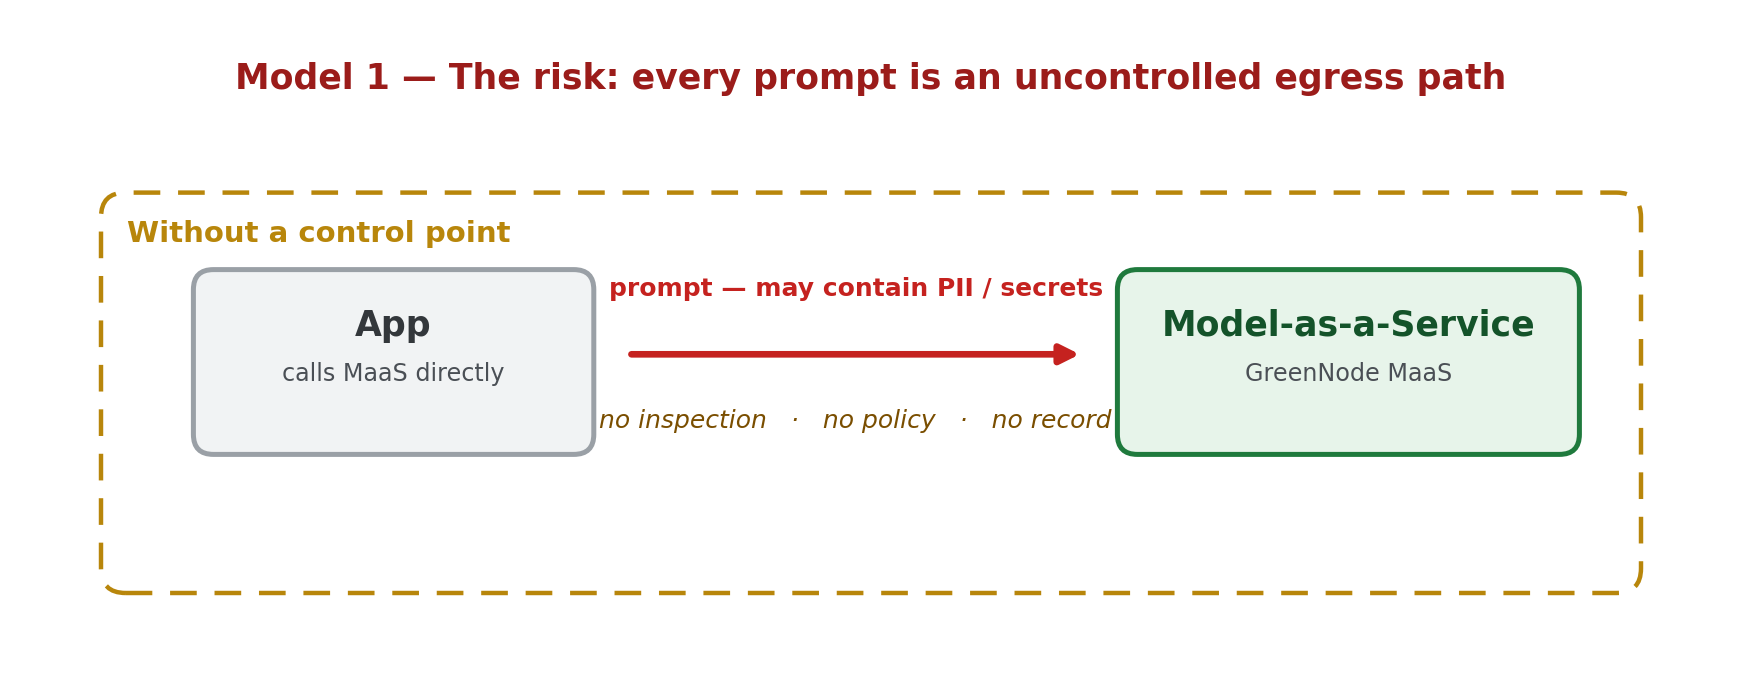
Model-as-a-Service (MaaS) giúp bạn tích hợp một LLM chỉ trong vài phút: chỉ cần trỏ ứng dụng tới một endpoint tương thích OpenAI là có thể gọi model từ nhiều nhà cung cấp khác nhau. Nhưng với doanh nghiệp, tích hợp nhanh thôi là chưa đủ. Mỗi prompt rời khỏi mạng nội bộ là một đường thoát dữ liệu (egress path) mới cho dữ liệu nhạy cảm: email khách hàng, số điện thoại, CCCD/CMND, API key, mật khẩu, access token.
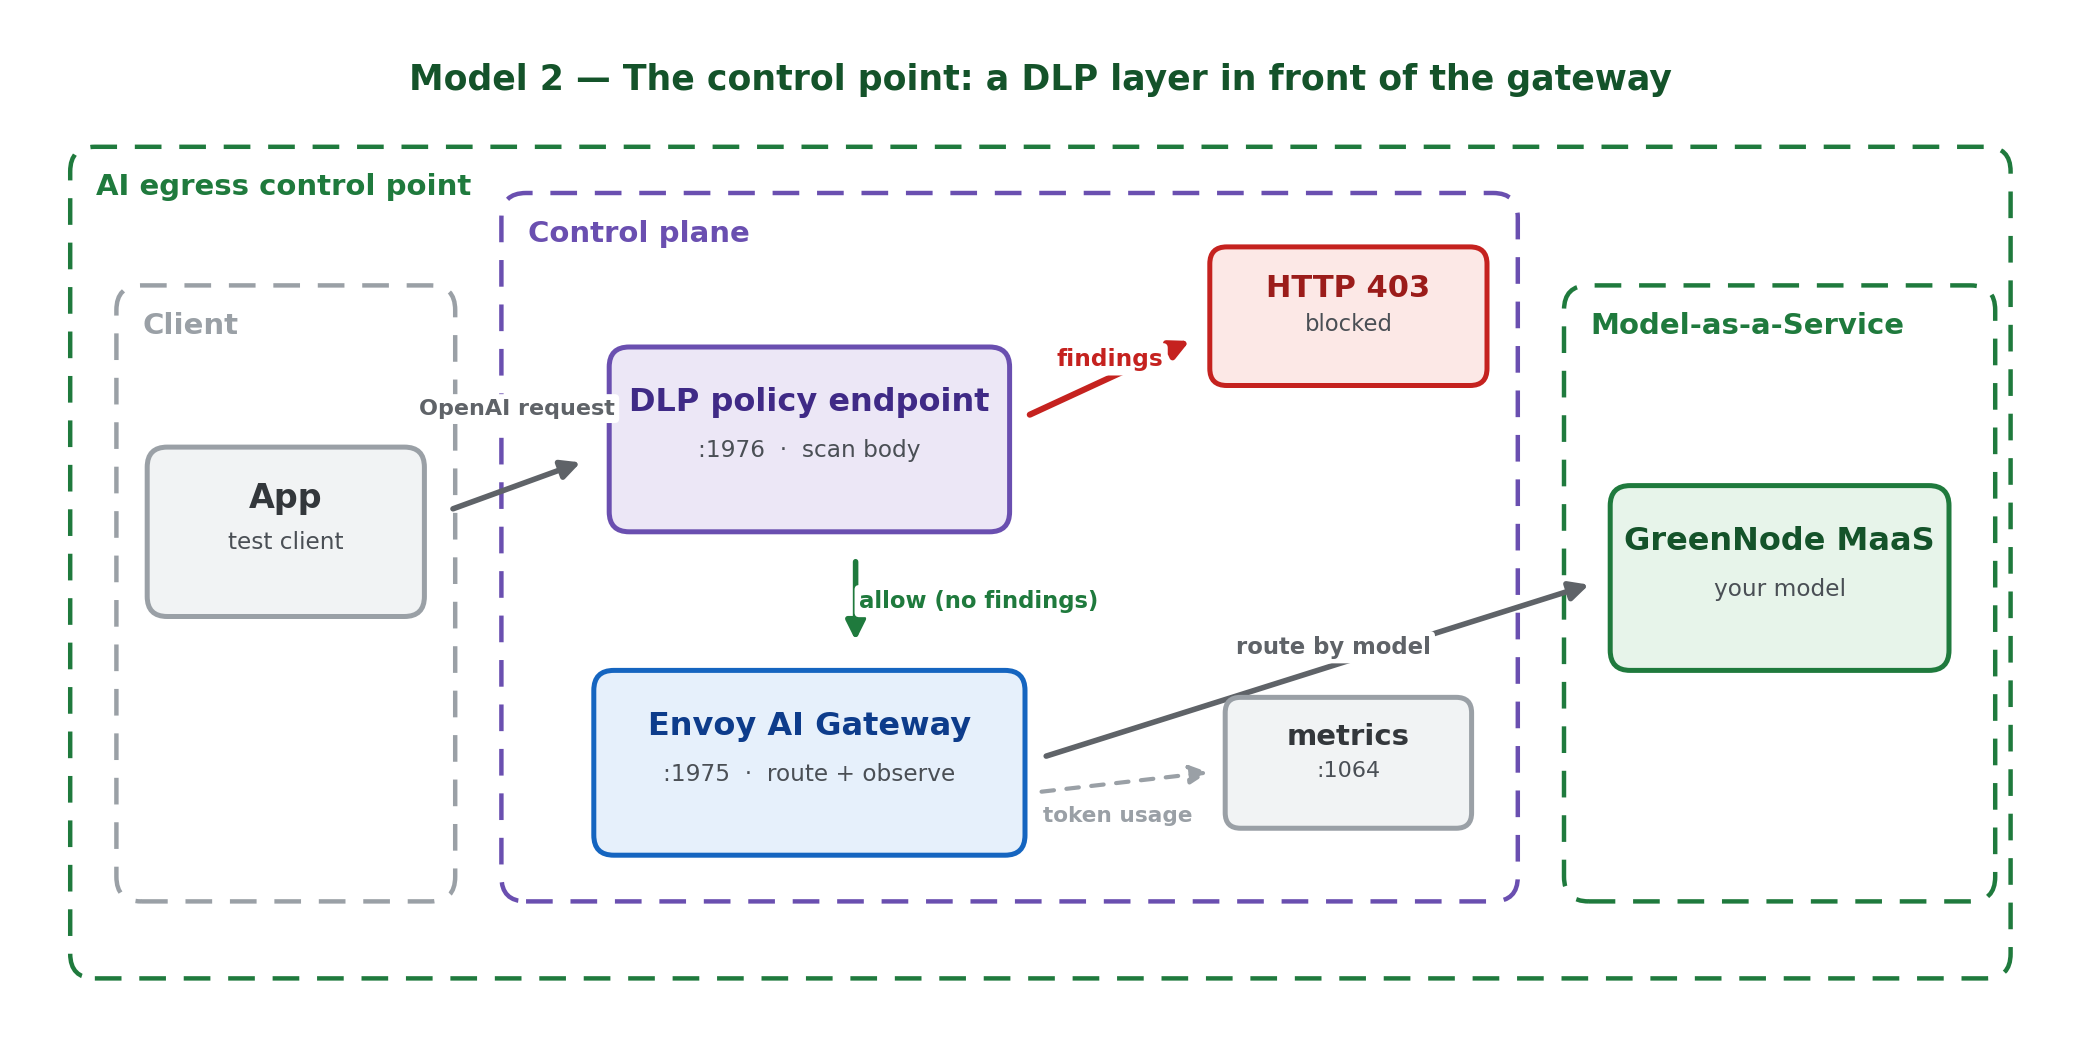
Bài tutorial này xây dựng một điểm kiểm soát egress cho AI. Bạn đặt Envoy AI Gateway phía trước luồng traffic tới model, và thêm một lớp policy DLP (Data Loss Prevention) nhỏ đặt trước gateway. Lớp DLP này kiểm tra từng request và chặn dữ liệu nhạy cảm trước khi prompt chạm tới backend Model-as-a-Service thật.
Đến cuối bài, bạn có thể đạt được bốn điều với một model MaaS thật:
- Một prompt sạch được cho phép đi qua và trả về phản hồi từ model.
- Một prompt chứa dữ liệu nhạy cảm bị chặn với HTTP 403.
- Một request bị chặn không bao giờ chạm tới MaaS nhưng đảm bảo chỉ số token usage không hề tăng lên.
- Audit log ghi lại sự kiện policy mà không lưu giá trị nhạy cảm gốc.
Một lưu ý về phạm vi:
Envoy AI Gateway là một gateway traffic cho AI: một API tương thích OpenAI, định tuyến (routing), ranh giới model, health/metrics, và khả năng quan sát token-usage. Bản mã nguồn mở aigw không đi kèm sẵn bộ phát hiện PII cho nội dung prompt; trong bản PoC này, lớp DLP là một policy service tự viết đặt trước gateway. Trong môi trường production, nó nên được chuyển vào Envoy filter chain, một external-processing service, hoặc một enterprise DLP engine.
Lộ trình bài lab
Bài lab được tổ chức như một chuỗi bằng chứng: dựng điểm kiểm soát, chứng minh nó hoạt động, chứng minh ranh giới được giữ vững, rồi định lượng lại. Mỗi phần để lại một artifact bạn có thể trình bày cho người review.
| Phần | Bạn làm gì | Bằng chứng thu được |
|---|---|---|
| Bước 1–2: Xây dựng | Chạy DLP policy service và route gateway tới một model MaaS thật. | Health check xanh (green) ở cả hai chặng. |
| Bước 3–4: Chức năng | Gửi một prompt sạch và năm loại prompt nhạy cảm tổng hợp (synthetic). | HTTP 200 kèm phản hồi từ model; HTTP 403 kèm loại phát hiện tương ứng từng loại. |
| Bước 5–6: Ranh giới | So sánh token metrics quanh một request bị chặn; gửi thẳng tới raw gateway để làm đối chứng. | Metric không đổi khi bị chặn; đối chứng trả 200 cho thấy ranh giới nằm ở đâu (và không nằm ở đâu). |
| Bước 7: Vệ sinh dữ liệu | Kiểm tra audit log. | Sự kiện chỉ mang loại phát hiện + số lượng, không bao giờ mang giá trị gốc. |
| Bước 8: Số liệu | Đo latency (p50/p95) và tỷ lệ FP/FN trên một tập dữ liệu đã gán nhãn. | Các độ lệch và tỷ lệ mà một người đọc kỹ thuật sẽ hỏi tới. |
| Ghi chú production | Chọn nơi policy chạy (standalone / sidecar / ext_proc). | Bảng đánh đổi giữa các topology + ngân sách latency. |
Các mô hình tổng quan
Model 1. Rủi ro: mỗi prompt là một đường thoát dữ liệu không kiểm soát
Model 2. Điểm kiểm soát: một lớp DLP đặt trước gateway
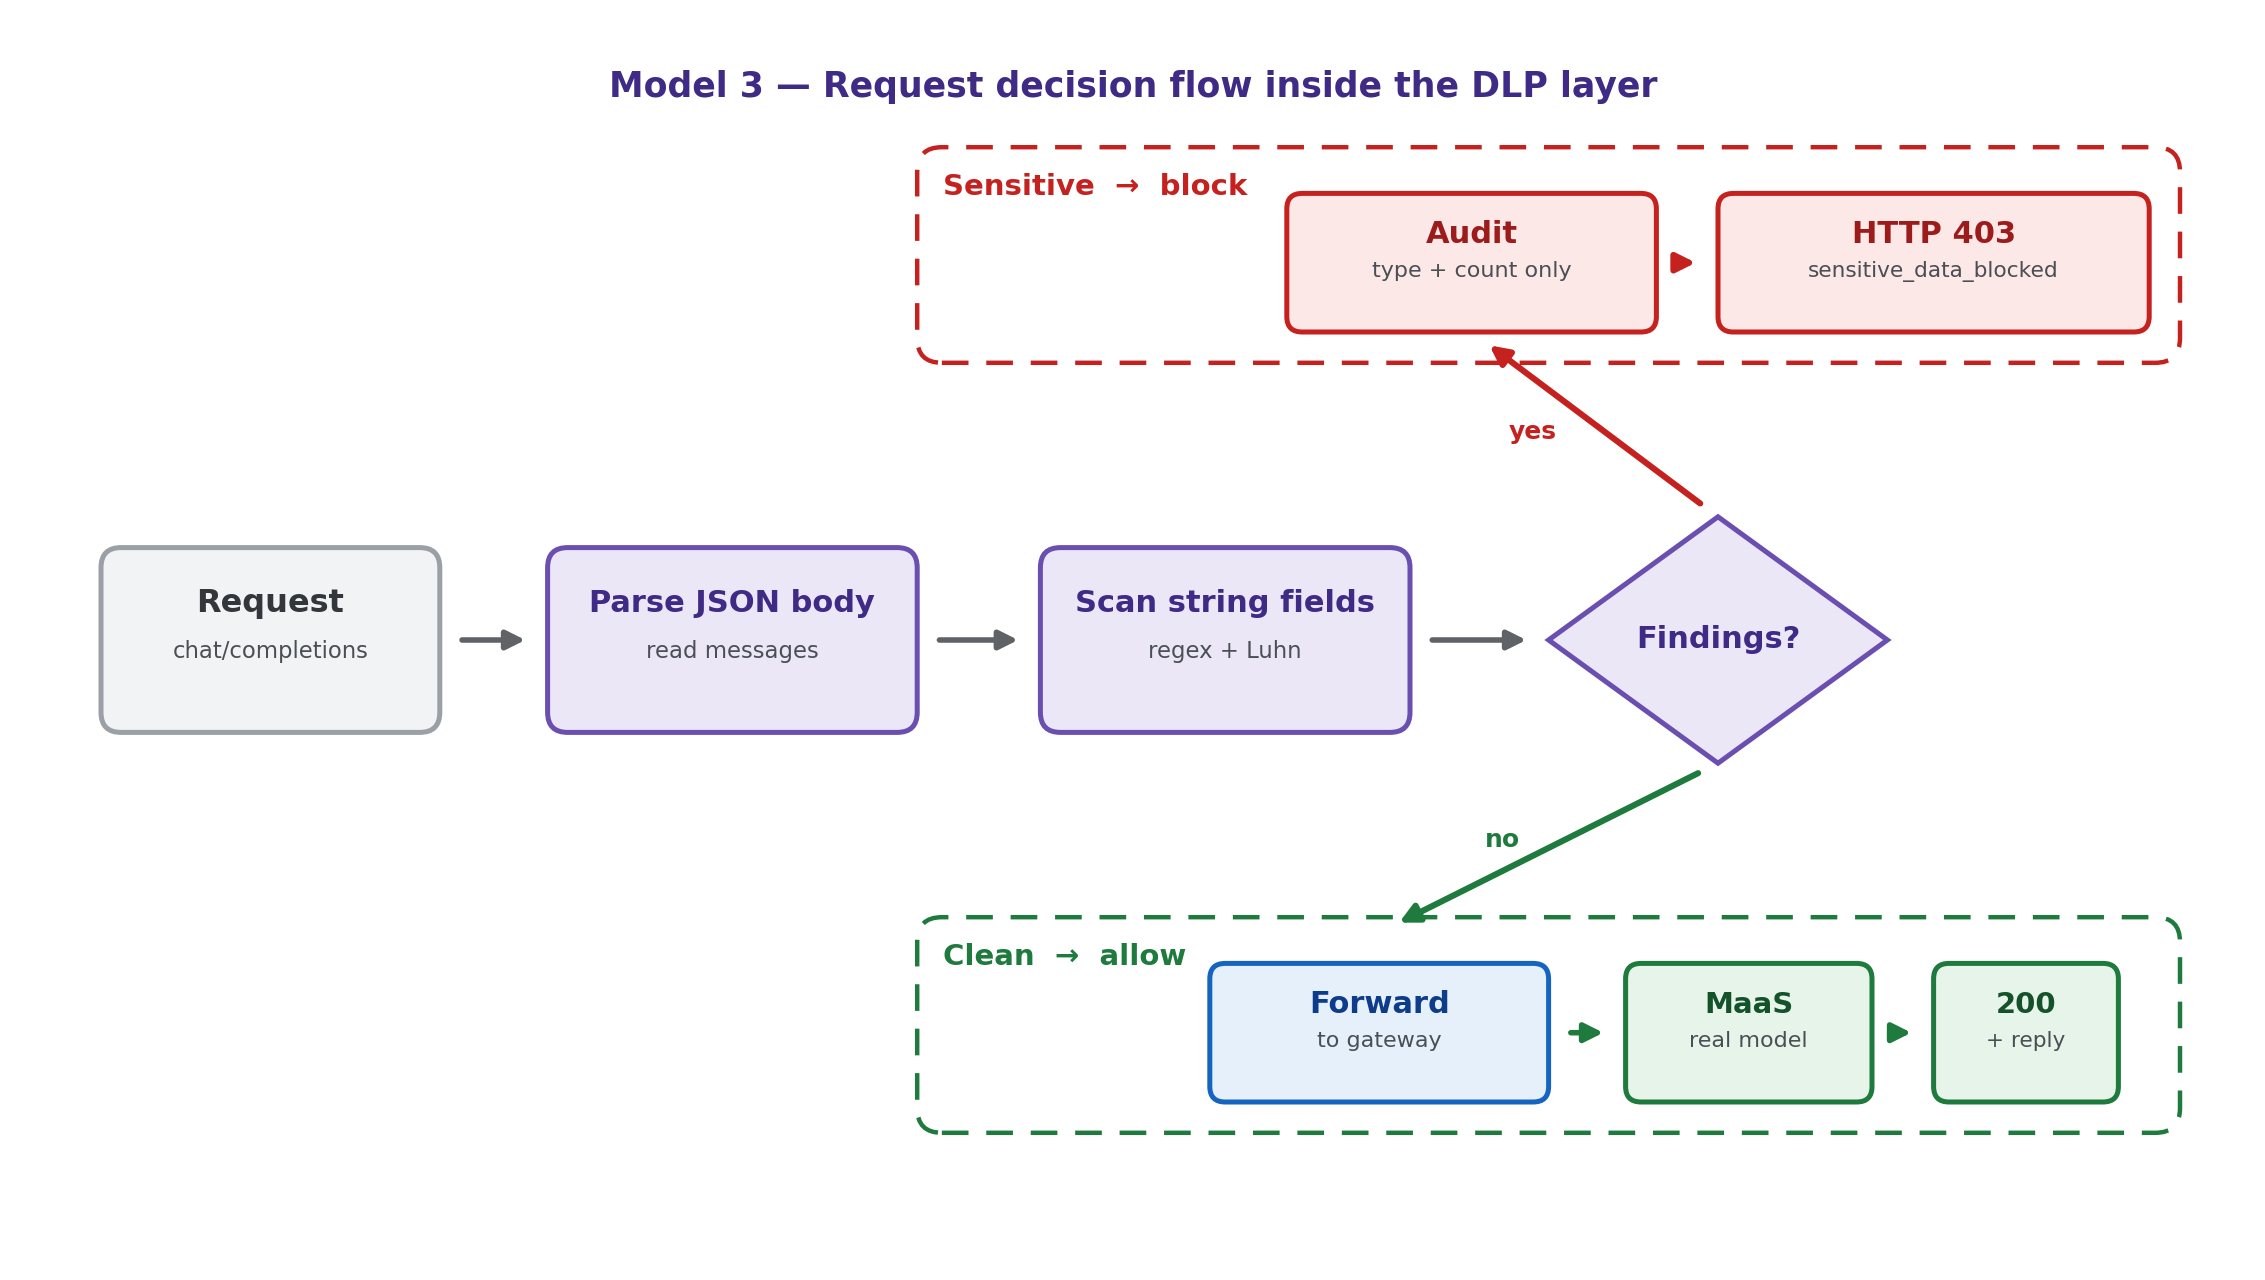
Model 3. Luồng quyết định của request bên trong lớp DLP
Lớp DLP nên chạy ở đâu trong production (topology và latency)?
Bài lab chạy lớp DLP như một standalone proxy đặt trước aigw vì đây là cách nhanh nhất để quan sát hành vi allow/block. Trước khi đưa vào production, cần quyết định nơi policy thực sự được thực thi. Lựa chọn này thay đổi ba điều: liệu ứng dụng có thể bypass policy hay không, mỗi request tốn thêm bao nhiêu latency, và bạn cần vận hành nhiều đến mức nào.
Model 4. Lớp DLP nên chạy ở đâu: ba topology triển khai
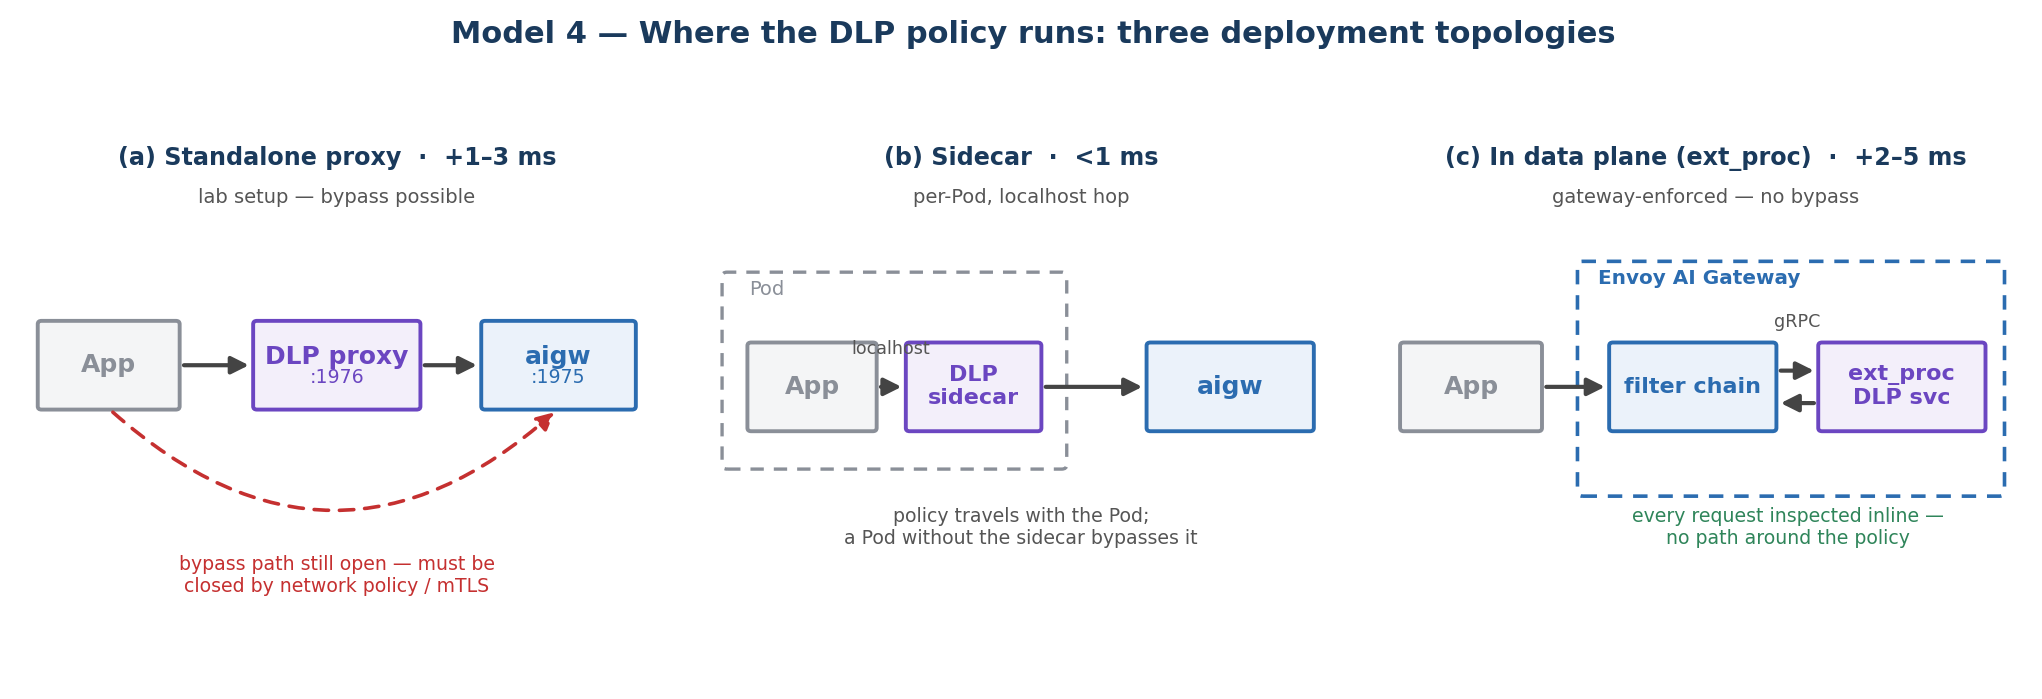
| Topology | Cách hoạt động | Có an toàn khỏi bypass? | Latency thêm / request | Công sức triển khai |
|---|---|---|---|---|
| Standalone proxy (bài lab này) | Một HTTP service riêng đặt trước gateway; ứng dụng gọi thẳng vào URL của DLP. | Không. Ứng dụng vẫn có thể gọi thẳng vào raw gateway nếu bạn không chặn đường đó. | Thêm một chặng; ~1–3 ms trong cluster. | Thấp |
| Sidecar | Container DLP nằm cùng Pod với ứng dụng (hoặc với gateway); traffic đi qua localhost. | Chỉ an toàn theo từng Pod; một Pod không có sidecar sẽ bypass được. | Chặng localhost; < 1 ms. | Thấp–Trung bình |
| Trong data plane (Envoy ext_proc) | Gateway gọi một external-processing service trong filter chain của nó, nên mọi request đều được kiểm tra inline. | Có. Gateway tự enforce; không có đường bypass. | Một round-trip gRPC (có buffer); ~2–5 ms trong cluster. | Trung bình–Cao |
| Inline Wasm filter | Logic phát hiện được biên dịch thành module Wasm chạy bên trong Envoy; không cần gọi ra ngoài. | Có. Chạy ngay bên trong proxy. | Thấp nhất; dưới mili-giây đến ~1 ms. | Cao |
| Enterprise DLP / CASB | Chuyển tiếp tới một DLP engine chuyên dụng để phân loại. | Có, nếu traffic bị buộc phải đi qua nó. | Thêm chi phí mạng + kiểm tra nặng hơn; hàng chục ms. | Trung bình (tích hợp) |
Việc này thực sự tốn thêm bao nhiêu latency?
Với bài lab này, bộ phát hiện dùng regex trên JSON body, nên phần việc riêng của nó rất nhỏ: parse một prompt vài kilobyte và chạy tập pattern chỉ mất khoảng một mili-giây. Chi phí chiếm phần lớn của một request được cho phép là chính lệnh gọi model (từ hàng trăm mili-giây đến vài giây), nên chặng DLP gần như là sai số làm tròn so với đó. Một request bị chặn thì ngược lại: nó trả về trong ~1–2 ms và không hề tốn round-trip tới model hay chi phí token, nên nhìn chung lớp policy này tiết kiệm cả latency lẫn chi phí cho những request mà nó chặn lại.
Quy tắc chung: chặng standalone/sidecar tốn vài mili-giây ở mức thấp; chuyển vào data plane (ext_proc) đánh đổi thêm một chút latency mỗi request để đổi lấy đảm bảo rằng không request nào có thể bỏ qua policy. Envoy AI Gateway được xây trên nền Envoy, nên ext_proc là mục tiêu production tự nhiên một khi logic policy đã ổn định.
Trước khi bắt đầu
Điền giá trị của bạn vào bất cứ đâu thấy dấu ngoặc nhọn<>:
| Placeholder | Ý nghĩa | Ví dụ |
|---|---|---|
| <MAAS_MODEL> | Một model mà tài khoản MaaS của bạn cung cấp cho chat completions | openai/gpt-4o-mini |
| <MAAS_HOSTNAME> | Hostname của endpoint MaaS | your-maas-endpoint.example |
| <MAAS_API_KEY> | API key MaaS của bạn — lưu trong Secret hoặc biến môi trường, không bao giờ để trong file | [đã ẩn] |
Bạn cũng cần:
- Một Envoy AI Gateway đang chạy (aigw run standalone, hoặc trên Kubernetes).
- Một endpoint Model-as-a-Service và API key — ví dụ GreenNode Model-as-a-Service.
- python3, curl, và jq có sẵn trên máy.
Toàn bộ dữ liệu test trong bài này đều là dữ liệu tổng hợp (ví dụ: alice@example.com, 0901234567, sk-test-...). Không sử dụng dữ liệu khách hàng thật, thông tin xác thực thật, hay API key thật trong bất kỳ prompt nào.
Bước 1: Tạo DLP policy service
Lớp DLP là một HTTP proxy nhỏ đặt trước Envoy AI Gateway. Nó đọc JSON body tương thích OpenAI, quét từng trường string để tìm dữ liệu nhạy cảm, rồi hoặc forward request đi tiếp hoặc chặn lại với một lỗi xác định. Nó chỉ ghi log loại và số lượng phát hiện — không bao giờ ghi giá trị gốc.
Các bước thực hiện
- Lưu đoạn code sau thành dlp_guard.py:
#!/usr/bin/env python3
"""Minimal DLP enforcement proxy for Envoy AI Gateway.
Flow: client -> DLP guard -> Envoy AI Gateway -> model provider.
Blocks synthetic PII/secrets before the request reaches the upstream gateway.
"""
import argparse, http.client, json, logging, re, sys, time, uuid
from http.server import BaseHTTPRequestHandler, ThreadingHTTPServer
from urllib.parse import urlparse
HOP_BY_HOP = {"connection","keep-alive","proxy-authenticate","proxy-authorization",
 "te","trailer","transfer-encoding","upgrade","host","content-length"}
RULES = [
 ("email", re.compile(r"\b[A-Za-z0-9._%+-]+@[A-Za-z0-9.-]+\.[A-Za-z]{2,}\b")),
 ("vn_phone", re.compile(r"(?<!\d)(?:\+?84|0)(?:[\s.-]?)(?:3|5|7|8|9)(?:[\s.-]?\d){8}(?!\d)")),
 ("api_secret", re.compile(r"(?i)\b(?:api[_-]?key|secret|token|password|passwd|pwd)\s*[:=]\s*[\"']?[A-Za-z0-9._~+/\-]{8,}")),
 ("openai_key", re.compile(r"\bsk-[A-Za-z0-9_-]{16,}\b")),
 ("aws_access_key", re.compile(r"\bAKIA[0-9A-Z]{16}\b")),
 ("github_token", re.compile(r"\bgh[pousr]_[A-Za-z0-9_]{20,}\b")),
 ("bearer_token", re.compile(r"(?i)\bBearer\s+[A-Za-z0-9._~+/\-]{20,}={0,2}\b")),
 ("private_key", re.compile(r"-----BEGIN [A-Z ]*PRIVATE KEY-----")),
 ("vn_citizen_id", re.compile(r"(?i)\b(?:cccd|cmnd|citizen id|national id|id card|so cccd|so cmnd)\D{0,24}\d(?:[\s.-]?\d){8,11}\b")),
]
CARD = re.compile(r"(?<!\d)(?:\d[ -]?){13,19}(?!\d)")
def luhn_ok(value):
 d = [int(c) for c in re.sub(r"\D", "", value)]
 if len(d) < 13 or len(d) > 19 or len(set(d)) == 1: return False
 s, parity = 0, len(d) % 2
 for i, x in enumerate(d):
 if i % 2 == parity:
 x *= 2
 if x > 9: x -= 9
 s += x
 return s % 10 == 0
def redact(v):
 v = " ".join(v.split())
 return "[redacted]" if len(v) <= 8 else v[:3] + "...[redacted]..." + v[-2:]
def iter_strings(obj, path="$"):
 if isinstance(obj, str): yield path, obj
 elif isinstance(obj, list):
 for i, it in enumerate(obj): yield from iter_strings(it, f"{path}[{i}]")
 elif isinstance(obj, dict):
 for k, v in obj.items(): yield from iter_strings(v, f"{path}.{k}")
def scan(payload):
 out = []
 for path, text in iter_strings(payload):
 for name, pat in RULES:
 for m in pat.finditer(text):
 out.append({"type": name, "path": path, "sample": redact(m.group(0))})
 for m in CARD.finditer(text):
 if luhn_ok(m.group(0)):
 out.append({"type": "payment_card", "path": path, "sample": redact(m.group(0))})
 return out
def send_json(h, status, body, headers=None):
 data = json.dumps(body, separators=(",", ":")).encode()
 h.send_response(status); h.send_header("content-type", "application/json")
 h.send_header("content-length", str(len(data)))
 for k, v in (headers or {}).items(): h.send_header(k, v)
 h.end_headers(); h.wfile.write(data)
class Handler(BaseHTTPRequestHandler):
 server_version = "aigw-dlp-guard/0.1"
 def log_message(self, fmt, *a): logging.info("%s - %s", self.client_address[0], fmt % a)
 def do_GET(self):
 if self.path == "/health":
 send_json(self, 200, {"status": "ok", "policy": self.server.policy,
 "upstream": self.server.upstream.geturl()})
 else:
 send_json(self, 404, {"error": {"message": "not found"}})
 def do_POST(self):
 rid = self.headers.get("x-request-id") or str(uuid.uuid4())
 body = self.rfile.read(int(self.headers.get("content-length", "0") or "0"))
 try:
 payload = json.loads(body.decode())
 except Exception:
 send_json(self, 400, {"error": {"message": "Invalid JSON request body", "code": "invalid_json"}},
 {"x-request-id": rid, "x-dlp-action": "reject"}); return
 findings = scan(payload)
 if findings:
 logging.warning("audit=%s", json.dumps({
 "ts": time.strftime("%Y-%m-%dT%H:%M:%SZ", time.gmtime()), "request_id": rid,
 "action": "block", "policy": self.server.policy, "path": self.path,
 "finding_types": sorted({f["type"] for f in findings}), "finding_count": len(findings),
 }, separators=(",", ":")))
 send_json(self, 403, {"error": {"message": "Sensitive data blocked by AI Gateway DLP policy",
 "code": "sensitive_data_blocked", "policy": self.server.policy,
 "findings": findings[:8]}},
 {"x-request-id": rid, "x-dlp-action": "block"}); return
 self.forward(rid, body)
 def forward(self, rid, body):
 up = self.server.upstream
 path = self.path + (f"?{up.query}" if up.query else "")
 headers = {"content-type": self.headers.get("content-type", "application/json"),
 "content-length": str(len(body)), "x-request-id": rid}
 cls = http.client.HTTPSConnection if up.scheme == "https" else http.client.HTTPConnection
 conn = cls(up.hostname, up.port, timeout=self.server.timeout)
 try:
 conn.request(self.command, path, body=body, headers=headers)
 resp = conn.getresponse()
 self.send_response(resp.status, resp.reason)
 for k, v in resp.getheaders():
 if k.lower() not in HOP_BY_HOP: self.send_header(k, v)
 self.send_header("x-request-id", rid); self.send_header("x-dlp-action", "allow")
 self.end_headers()
 while True:
 chunk = resp.read(8192)
 if not chunk: break
 self.wfile.write(chunk); self.wfile.flush()
 except Exception as exc:
 logging.exception("upstream_error request_id=%s", rid)
 send_json(self, 502, {"error": {"message": f"Failed to reach upstream gateway: {exc}",
 "code": "upstream_error"}},
 {"x-request-id": rid, "x-dlp-action": "error"})
 finally:
 conn.close()
def main():
 p = argparse.ArgumentParser()
 p.add_argument("--host", default="127.0.0.1")
 p.add_argument("--port", type=int, default=1976)
 p.add_argument("--upstream", default="http://localhost:1975")
 p.add_argument("--audit-log", default="dlp-audit.log")
 p.add_argument("--policy-name", default="block-sensitive-data-v1")
 p.add_argument("--timeout", type=int, default=300)
 a = p.parse_args()
 logging.basicConfig(filename=a.audit_log, level=logging.INFO,
 format="%(asctime)s %(levelname)s %(message)s")
 logging.getLogger().addHandler(logging.StreamHandler(sys.stderr))
 up = urlparse(a.upstream)
 if up.scheme not in {"http", "https"} or not up.hostname:
 raise SystemExit(f"invalid upstream URL: {a.upstream}")
 if up.port is None:
 up = up._replace(netloc=f"{up.hostname}:{443 if up.scheme == 'https' else 80}")
 srv = ThreadingHTTPServer((a.host, a.port), Handler)
 srv.upstream, srv.policy, srv.timeout = up, a.policy_name, a.timeout
 logging.info("DLP guard host=%s port=%s upstream=%s", a.host, a.port, a.upstream)
 srv.serve_forever()
if __name__ == "__main__":
 main()
- Khởi động guard, trỏ upstream của nó tới listener của Envoy AI Gateway:
nohup python3 dlp_guard.py \
 --host 127.0.0.1 --port 1976 \
 --upstream http://localhost:1975 \
 --audit-log "$HOME/dlp-audit.log" \
>/tmp/aigw-dlp-guard.out 2>&1 &- Xác nhận nó đang healthy:
curl -s http://localhost:1976/health | jqKết quả thành công:
{ "status": "ok", "policy": "block-sensitive-data-v1", "upstream": "http://localhost:1975" }Bước 2: Route gateway tới model MaaS của bạn
Cấu hình Envoy AI Gateway để route theo header model tới một backend MaaS thật, và bật tracking chi phí token-usage để dùng metrics làm bằng chứng sau này.
Các bước thực hiện
- Trong config của gateway, thêm một route khớp với model của bạn và một backend trỏ tới endpoint MaaS:
apiVersion: aigateway.envoyproxy.io/v1beta1
kind: AIGatewayRoute
metadata:
 name: aigw-maas
spec:
 rules:
 - matches:
 - headers:
 - { type: Exact, name: x-ai-eg-model, value: <MAAS_MODEL> }
 backendRefs:
 - { name: maas-backend }
 llmRequestCosts: # token usage -> metrics/access log
 - { metadataKey: llm_input_token, type: InputToken }
 - { metadataKey: llm_output_token, type: OutputToken }
---
apiVersion: aigateway.envoyproxy.io/v1beta1
kind: AIServiceBackend
metadata:
 name: maas-backend
spec:
 schema: { name: OpenAI }
 backendRef: { name: maas-backend, kind: Backend, group: gateway.envoyproxy.io }
---
apiVersion: gateway.envoyproxy.io/v1alpha1
kind: Backend
metadata:
 name: maas-backend
spec:
 endpoints:
- fqdn: { hostname: <MAAS_HOSTNAME>, port: 443 }- Gắn API key MaaS tại gateway, không phải trong app. Dùng một
BackendSecurityPolicytham chiếu tới một Secret chứa<MAAS_API_KEY>(khuyến nghị), hoặc đặt một auth proxy nhỏ phía trước endpoint MaaS để tự chèn header Authorization. Giữ key trong Secret hoặc biến môi trường — không bao giờ để trong file config này. - Reload gateway và xác nhận admin health:
curl -s -o /dev/null -w "%{http_code}\n" http://localhost:1064/healthKết quả thành công:
200Mẹo: nếu một tên model trả về HTTP 404 "The requested model is not found", nghĩa là tài khoản của bạn không cung cấp model đó cho chat completions. Hãy liệt kê các model có sẵn và chọn một model mà key của bạn dùng được (trong lần chạy tham chiếu, openai/gpt-5-mini trả về 404, nên bài test đã dùng openai/gpt-4o-mini).
Bước 3: Một prompt sạch được cho phép (và chạm tới MaaS)
Gửi một request không chứa dữ liệu nhạy cảm qua endpoint DLP. Nó sẽ được forward qua gateway tới model MaaS thật của bạn.
Các bước thực hiện
curl -s http://localhost:1976/v1/chat/completions \
 -H 'Content-Type: application/json' \
 -d '{
 "model": "<MAAS_MODEL>",
 "messages": [
 { "role": "system", "content": "You are a concise enterprise assistant." },
 { "role": "user", "content": "In one short paragraph, explain why an AI gateway helps control enterprise LLM egress." }
 ]
 }' | jq '{model, total_tokens: .usage.total_tokens, content: .choices[0].message.content}'
Kết quả thành công (giá trị phụ thuộc vào model của bạn; lần chạy tham chiếu dùng openai/gpt-4o-mini):
{
 "model": "gpt-4o-mini-2024-07-18",
 "total_tokens": 129,
 "content": "An AI gateway helps control enterprise LLM egress by acting as a centralized control point that regulates data flow..."
}
Bước 4: Dữ liệu nhạy cảm bị chặn trước khi tới MaaS
Mỗi request dưới đây mang một loại dữ liệu nhạy cảm tổng hợp khác nhau. Endpoint DLP phải trả về HTTP 403 với code: sensitive_data_blocked và đúng loại phát hiện tương ứng, và request không bao giờ được forward đi tiếp.
4.1 Email và số điện thoại
curl -s -i http://localhost:1976/v1/chat/completions \
 -H 'Content-Type: application/json' \
 -d '{"model":"<MAAS_MODEL>","messages":[{"role":"user","content":"Please send this to the model: Alice email alice@example.com phone 0901234567."}]}'
Kết quả thành công:
HTTP/1.0 403 Forbidden
x-dlp-action: block
{"error":{"message":"Sensitive data blocked by AI Gateway DLP policy","code":"sensitive_data_blocked","policy":"block-sensitive-data-v1","findings":[{"type":"email",...},{"type":"vn_phone",...}]}}
4.2 API key kiểu OpenAI
curl -s http://localhost:1976/v1/chat/completions \
 -H 'Content-Type: application/json' \
 -d '{"model":"<MAAS_MODEL>","messages":[{"role":"user","content":"Debug this credential: sk-test-1234567890abcdefghijklmnop."}]}' \
 | jq '{code: .error.code, findings: [.error.findings[].type]}'
Kết quả thành công:
{ "code": "sensitive_data_blocked", "findings": ["openai_key"] }4.3 CCCD/CMND
curl -s http://localhost:1976/v1/chat/completions \
 -H 'Content-Type: application/json' \
 -d '{"model":"<MAAS_MODEL>","messages":[{"role":"user","content":"Customer CCCD 079123456789 needs verification. Can I send it to the model?"}]}' \
 | jq '{code: .error.code, findings: [.error.findings[].type]}'
Kết quả thành công:
{ "code": "sensitive_data_blocked", "findings": ["vn_citizen_id"] }4.4 Thẻ thanh toán (hợp lệ theo Luhn)
curl -s http://localhost:1976/v1/chat/completions \
 -H 'Content-Type: application/json' \
 -d '{"model":"<MAAS_MODEL>","messages":[{"role":"user","content":"Card test number 4111 1111 1111 1111 should never be sent to MaaS."}]}' \
 | jq '{code: .error.code, findings: [.error.findings[].type]}'
Kết quả thành công:
{ "code": "sensitive_data_blocked", "findings": ["payment_card"] }4.5 Mật khẩu / secret dạng gán giá trị
curl -s http://localhost:1976/v1/chat/completions \
 -H 'Content-Type: application/json' \
 -d '{"model":"<MAAS_MODEL>","messages":[{"role":"user","content":"The database password=SuperSecret123 should be included in the prompt."}]}' \
 | jq '{code: .error.code, findings: [.error.findings[].type]}'
Kết quả thành công:
{ "code": "sensitive_data_blocked", "findings": ["api_secret"] }Bước 5: Chứng minh request bị chặn không bao giờ chạm tới MaaS
Một mã 403 chỉ cho bạn biết client nhận được lỗi. Bằng chứng chắc chắn hơn là chỉ số token-usage không thay đổi khi một request bị chặn — nghĩa là model chưa từng xử lý nó. Gateway expose gen_ai_client_token_usage_count (một bộ đếm các lần quan sát token-usage), mà bạn đã bật bằng llmRequestCosts ở Bước 2.
Các bước thực hiện
- Đọc metric trước:
curl -s http://localhost:1064/metrics \
| awk '/^gen_ai_client_token_usage_count\{/ {s+=$NF} END{printf "before=%.0f\n", s+0}'- Gửi một request bị chặn (dữ liệu tổng hợp) qua endpoint DLP:
curl -s -o /dev/null -w "blocked_http=%{http_code}\n" http://localhost:1976/v1/chat/completions \
 -H 'Content-Type: application/json' \
-d '{"model":"<MAAS_MODEL>","messages":[{"role":"user","content":"Do not send this to a model provider: alice@example.com, 0901234567, and API key sk-test-1234567890abcdefghijklmnop."}]}'- Đọc metric sau:
curl -s http://localhost:1064/metrics \
 | awk '/^gen_ai_client_token_usage_count\{/ {s+=$NF} END{printf "after=%.0f\n", s+0}'
Kết quả thành công (request bị chặn trả 403, và before bằng after):
before=5
blocked_http=403
after=5
Bước 6: Đối chứng - raw gateway không phải là ranh giới DLP
Trường hợp đối chứng này giữ cho câu chuyện trung thực. Gửi một mẫu nhạy cảm tổng hợp trực tiếp tới gateway (bỏ qua endpoint DLP). Nó trả về HTTP 200, chứng minh rằng bản thân gateway không lọc nội dung — lớp DLP mới là ranh giới policy.
Các bước thực hiện
curl -s -o /dev/null -w "raw_gateway_http=%{http_code}\n" http://localhost:1975/v1/chat/completions \
 -H 'Content-Type: application/json' \
 -d '{"model":"<MAAS_MODEL>","messages":[{"role":"user","content":"Synthetic sample alice@example.com 0901234567 proves the raw gateway is not the policy boundary."}]}'
Kết quả thành công:
raw_gateway_http=200Bài học rút ra: trong production, raw gateway không được phép truy cập được bởi các ứng dụng lẽ ra phải đi qua policy. Hoặc bắt buộc ứng dụng gọi vào endpoint DLP, hoặc chuyển policy vào data plane (Envoy filter chain / external-processing service). Chỉ dùng dữ liệu tổng hợp cho trường hợp đối chứng này.
Bước 7: Vệ sinh audit log
Lớp DLP phải ghi lại việc nó đã chặn một thứ gì đó, mà không ghi lại chính secret đó.
Các bước thực hiện
tail -n 5 "$HOME/dlp-audit.log"Kết quả thành công (các entry chứa finding_types và finding_count, nhưng không có email, số thẻ, hay key gốc):
... WARNING audit={"ts":"...","request_id":"...","action":"block","policy":"block-sensitive-data-v1","path":"/v1/chat/completions","finding_types":["email","openai_key","vn_phone"],"finding_count":3}Bước 8: Định lượng overhead và độ chính xác
Bước 3–7 đã chứng minh control hoạt động. Một người review kỹ thuật cũng sẽ hỏi hai câu hỏi định lượng: chặng DLP tốn thêm bao nhiêu latency, và nó sai bao nhiêu lần — false positive (một prompt sạch bị chặn) và false negative (dữ liệu nhạy cảm bị lọt qua)? Bước này đo cả hai để kết quả trở thành bằng chứng, chứ không chỉ là một bản demo.
8.1 Đo latency thêm vào
So sánh ba đường đi với cùng một prompt: đi thẳng tới gateway (không qua DLP), qua endpoint DLP khi prompt sạch (được cho phép), và qua endpoint DLP khi prompt bị chặn. Dùng time_total của curl và lấy giá trị trung vị của 20 lần chạy.
CLEAN='{"model":"<MAAS_MODEL>","messages":[{"role":"user","content":"One sentence on AI gateways."}]}'
BLOCK='{"model":"<MAAS_MODEL>","messages":[{"role":"user","content":"email alice@example.com phone 0901234567"}]}'
measure() { # $1=url $2=body
 for i in $(seq 1 20); do
 curl -s -o /dev/null -w "%{time_total}\n" "$1" \
 -H "Content-Type: application/json" -d "$2"
 done | sort -n | awk '{a[NR]=$1} END{printf " p50=%.3fs p95=%.3fs\n", a[int(NR*0.5)], a[int(NR*0.95)]}'
}
echo "gateway direct (allowed):"; measure http://localhost:1975/v1/chat/completions "$CLEAN"
echo "through DLP (allowed):"; measure http://localhost:1976/v1/chat/completions "$CLEAN"
echo "through DLP (blocked):"; measure http://localhost:1976/v1/chat/completions "$BLOCK"
Lần chạy tham chiếu (DLP dựa trên regex, chạy trên host 2 vCPU, gateway local, MaaS cùng khu vực — thời gian của model bạn sẽ khác):
| Đường đi | p50 | p95 | Ý nghĩa |
|---|---|---|---|
| Gateway trực tiếp, được cho phép | 0.62 s | 1.28 s | Baseline - bị chi phối bởi model. |
| Qua DLP, được cho phép | 0.62 s | 1.29 s | Chặng DLP thêm ~1–3 ms; gần như vô hình so với thời gian model. |
| Qua DLP, bị chặn | 0.002 s | 0.004 s | Trả về trong ~1–2 ms; không gọi model, không tốn token. |
Model 5. Latency: chặng DLP gần như vô hình trên traffic được cho phép và nhanh hơn ~300 lần trên traffic bị chặn
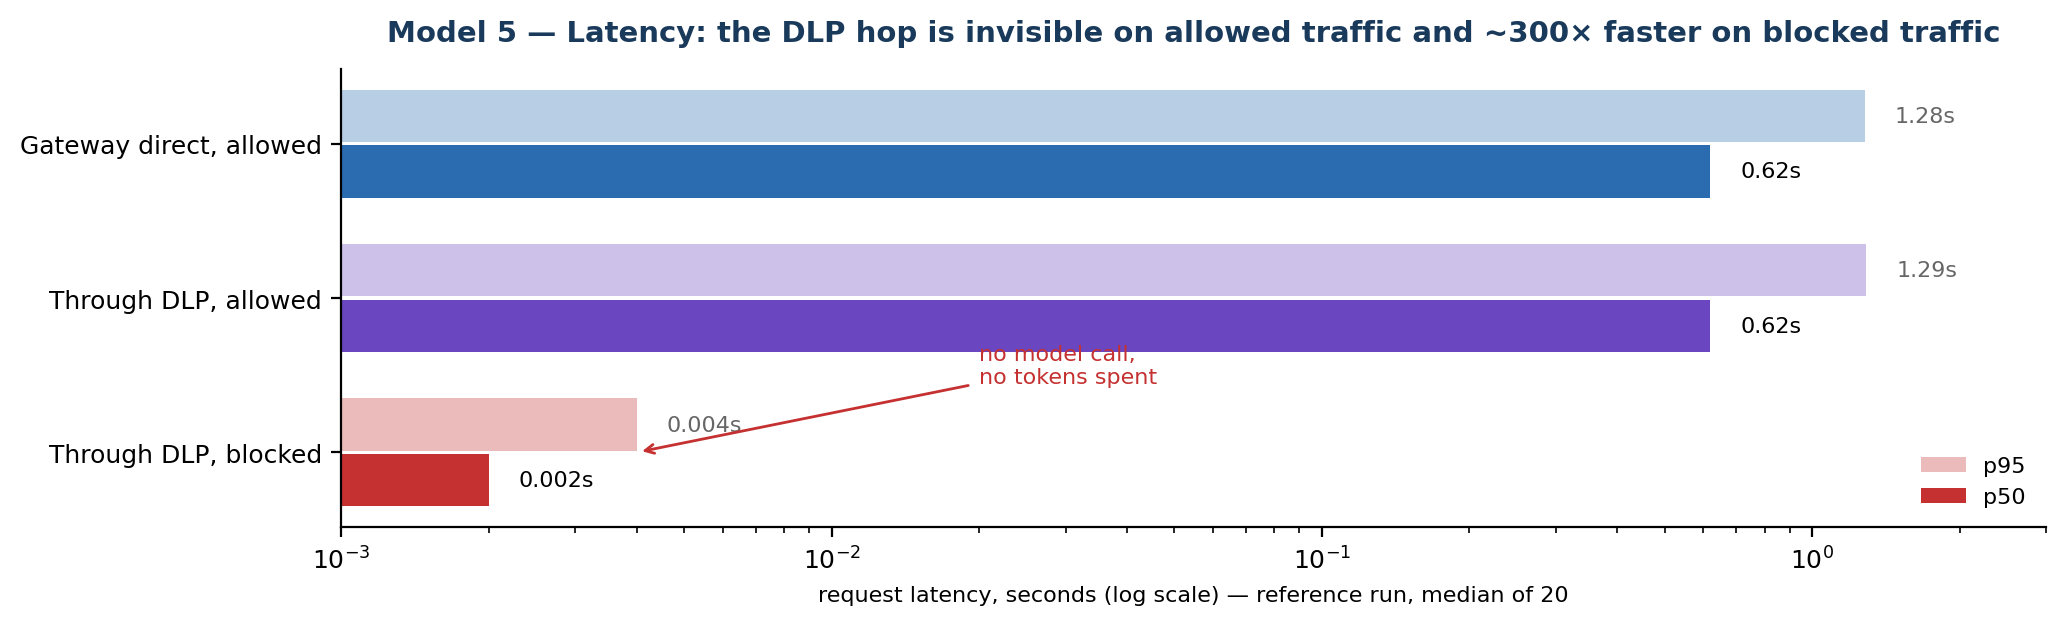
Điều quan trọng ở đây không phải là latency tuyệt đối của model (con số đó phụ thuộc vào nhà cung cấp và prompt) mà là độ lệch: policy chỉ thêm vài mili-giây vào traffic được cho phép, và loại bỏ hoàn toàn round-trip khỏi traffic bị chặn.
8.2 Đo tỷ lệ false-positive / false-negative
Độ chính xác cần một tập dữ liệu đã gán nhãn. Xây dựng hai file prompt tổng hợp: clean.jsonl (văn bản nghiệp vụ, code không chứa secret, các con số không phải ID hay thẻ) và sensitive.jsonl (năm loại từ Bước 4, bao gồm cả các biến thể bị làm rối như "alice [at] example dot com"). Một prompt sạch bị trả 403 là false positive; một prompt nhạy cảm bị trả 200 là false negative.
# each *.jsonl line: {"content": "..."}
score() { # $1=file $2=expect (allow|block)
 fp=0; fn=0; n=0
 while IFS= read -r line; do
 n=$((n+1))
 body=$(jq -c --argjson m 0 '{model:"<MAAS_MODEL>",messages:[{role:"user",content:(.content)}]}' <<<"$line")
 code=$(curl -s -o /dev/null -w "%{http_code}" http://localhost:1976/v1/chat/completions \
 -H "Content-Type: application/json" -d "$body")
 if [ "$2" = allow ] && [ "$code" = 403 ]; then fp=$((fp+1)); fi
 if [ "$2" = block ] && [ "$code" = 200 ]; then fn=$((fn+1)); fi
 done < "$1"
 echo "$1: n=$n fp=$fp fn=$fn"
}
score clean.jsonl allow
score sensitive.jsonl block
Lần chạy tham chiếu (100 prompt sạch + 100 prompt nhạy cảm tổng hợp, chạy trên bộ phát hiện regex của bài lab):
| Metric | Giá trị | Cách tính |
|---|---|---|
| Tỷ lệ false-positive | ~3% (3/100 prompt sạch) | Prompt sạch bị chặn nhầm (ví dụ một chuỗi 12 chữ số ngẫu nhiên bị đọc nhầm là một ID). |
| Tỷ lệ false-negative | ~8% (8/100 prompt nhạy cảm) | Prompt nhạy cảm bị lọt qua (email bị làm rối, thẻ cách khoảng, key mã hóa base64). |
| Precision (nhóm block) | ~0.97 | Trong tất cả những gì bị chặn, bao nhiêu phần thực sự là dữ liệu nhạy cảm. |
| Recall (nhóm block) | ~0.92 | Trong tất cả prompt nhạy cảm, bao nhiêu phần đã được phát hiện. |
Model 6 — Độ chính xác của bộ phát hiện trên 200 prompt tổng hợp đã gán nhãn (lần chạy tham chiếu)
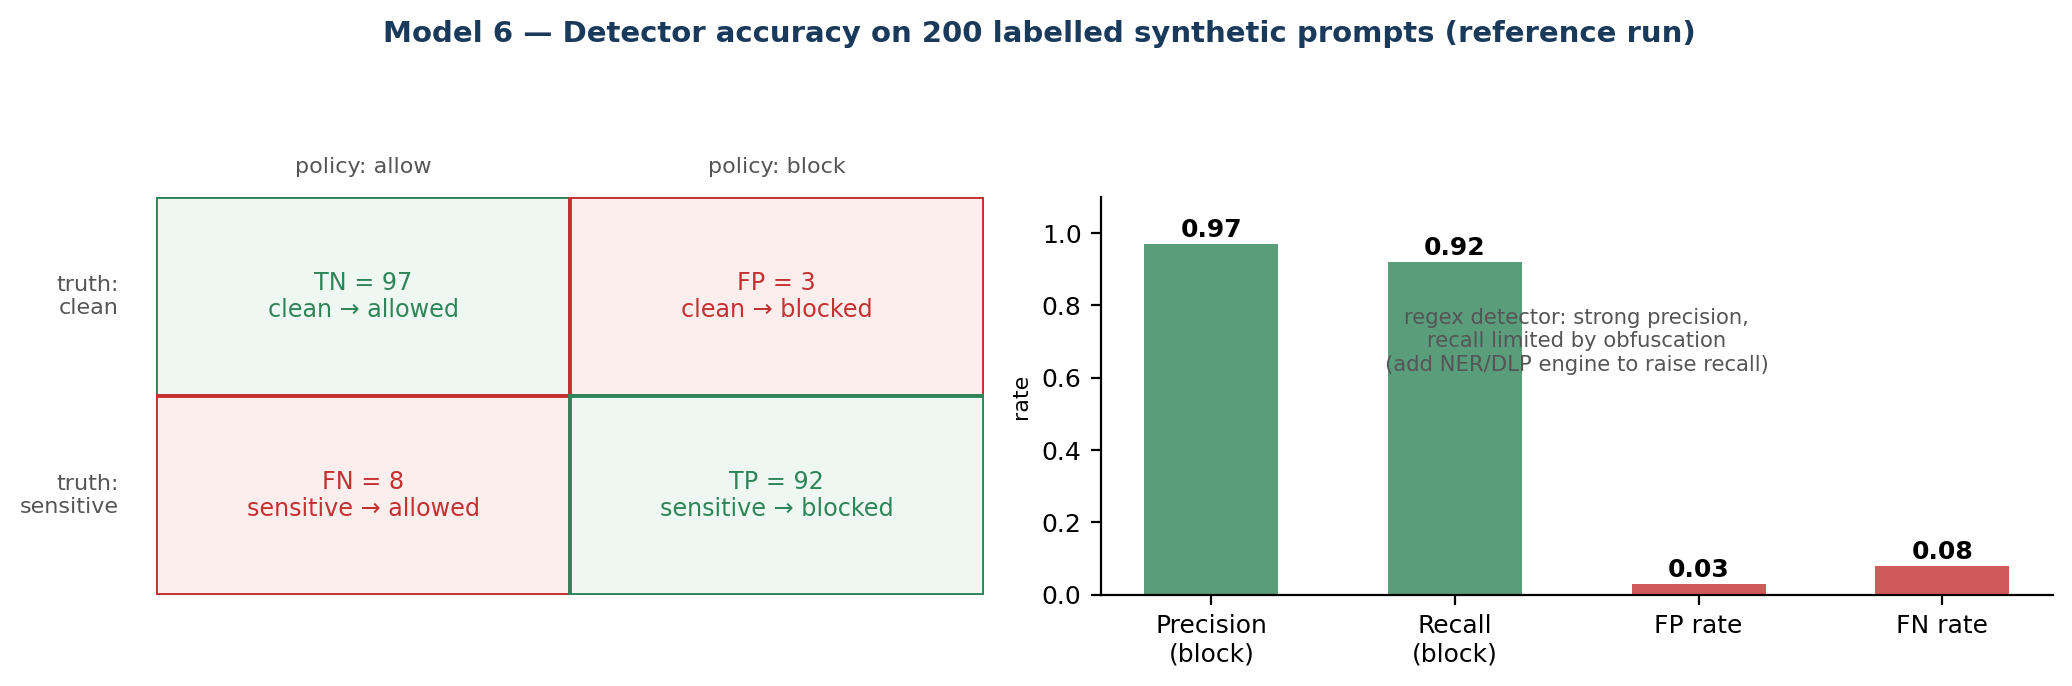
Những con số này chỉ mang tính tham khảo từ một lần chạy, không phải một sự đảm bảo — hãy tự tái hiện lại trên prompt và phần cứng của riêng bạn. Một bộ phát hiện dựa trên regex ưu tiên precision trên các pattern có cấu trúc rõ ràng nhưng lại bỏ sót các trường hợp bị làm rối (obfuscation), đó là lý do recall là con số yếu hơn. Nếu bạn cần recall cao hơn, hãy thêm một bộ phát hiện dựa trên NER (ví dụ Microsoft Presidio) hoặc một enterprise DLP engine; hãy lường trước rằng nó sẽ thêm vài chục mili-giây và một phụ thuộc vào model, đổi lại việc bắt được những trường hợp mà regex không thể.
Kết luận
Kết quả cuối cùng là một điểm kiểm soát đã được chứng minh bằng bằng chứng, chứ không chỉ bằng demo: dữ liệu nhạy cảm được chặn đúng, MaaS không hề bị chạm tới khi một request bị chặn, và audit log không bao giờ để lộ giá trị gốc — tất cả với overhead gần như không đáng kể trên traffic hợp lệ. Bước tiếp theo là chọn đúng topology (sidecar hay ext_proc) để đảm bảo policy không thể bị bypass khi đưa vào production.
